Showing posts with label stamp anniething. Show all posts

Favorite Extraterrestrial 5x7 Card with Stamp Anniething - Fandom Friday!

Friday, March 21, 2025

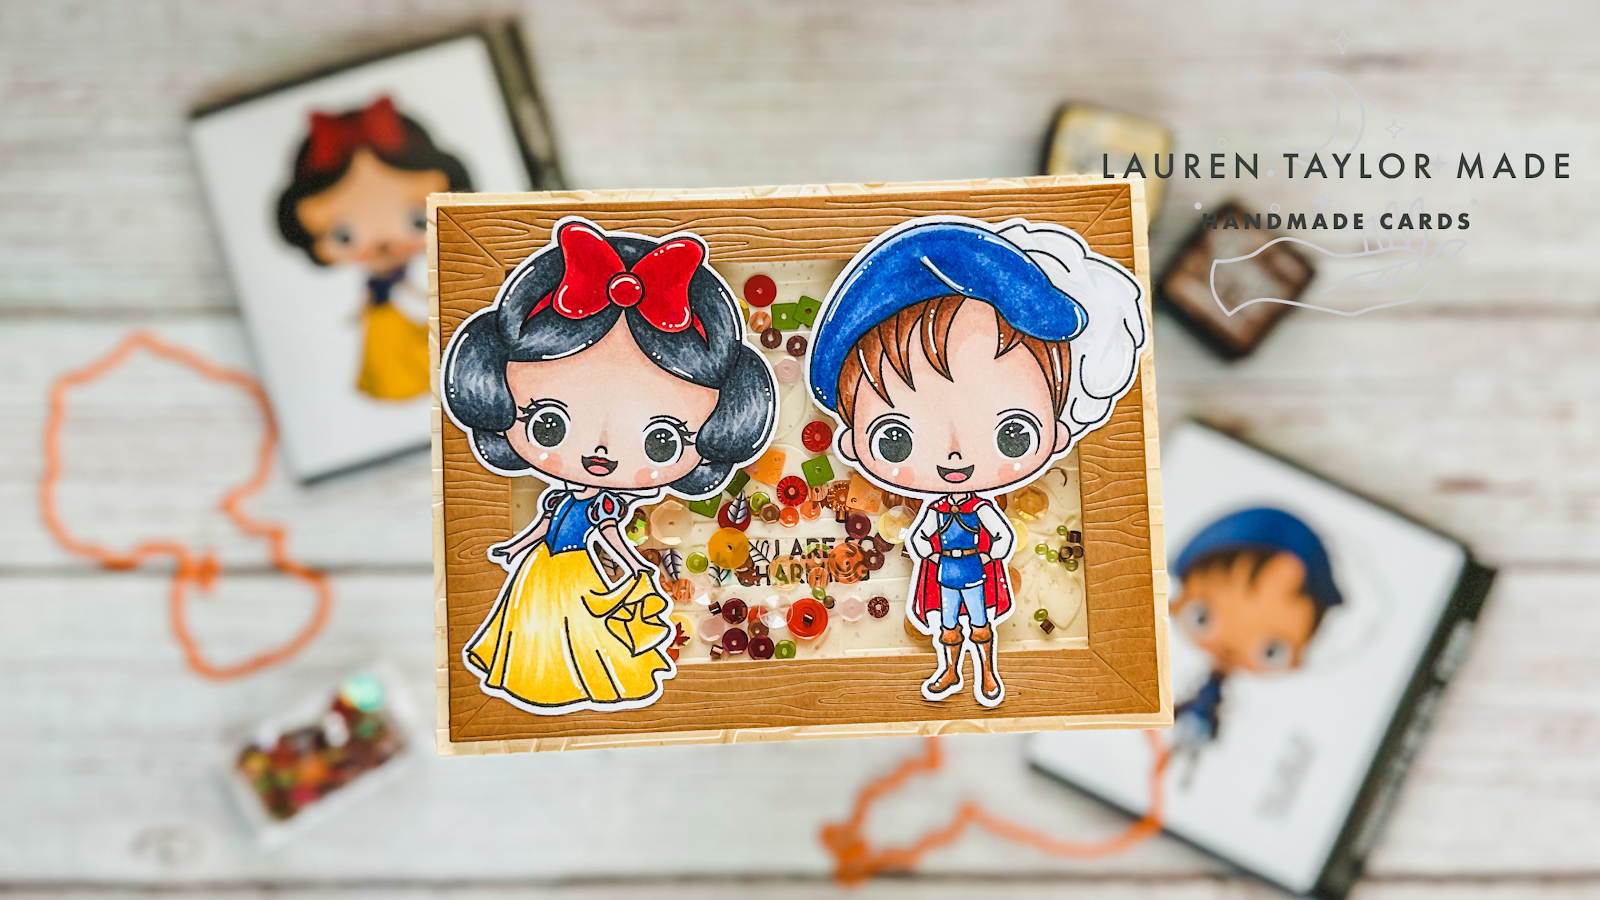
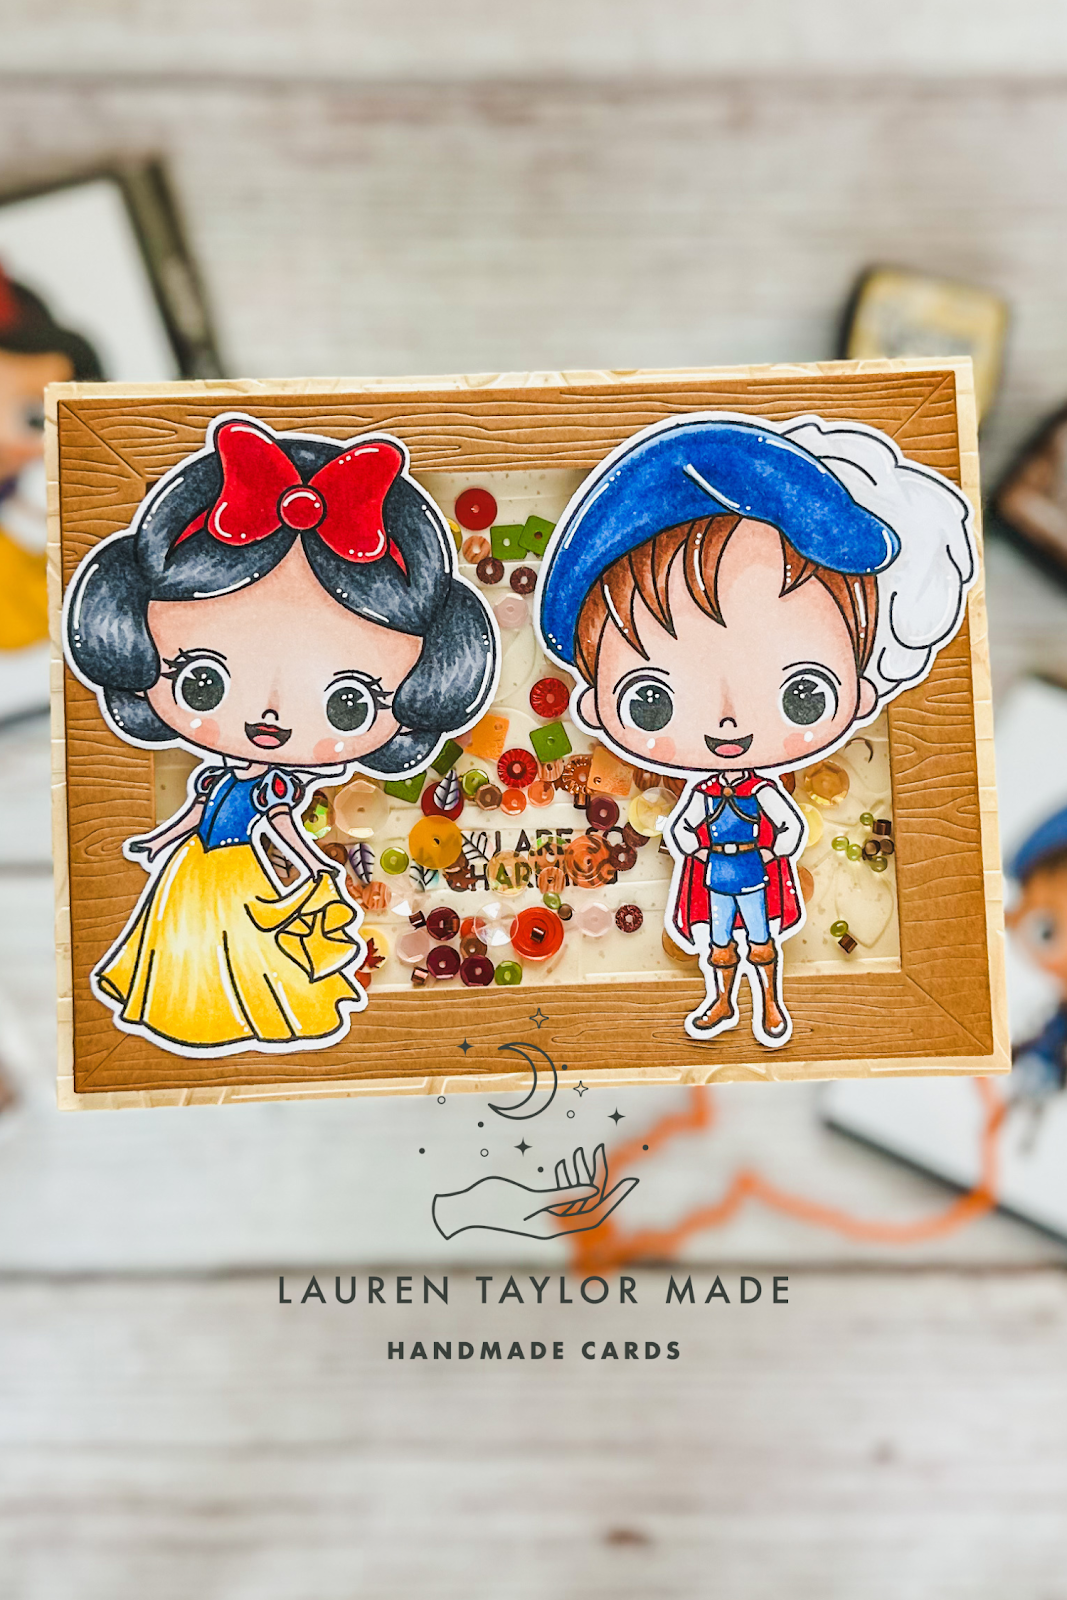
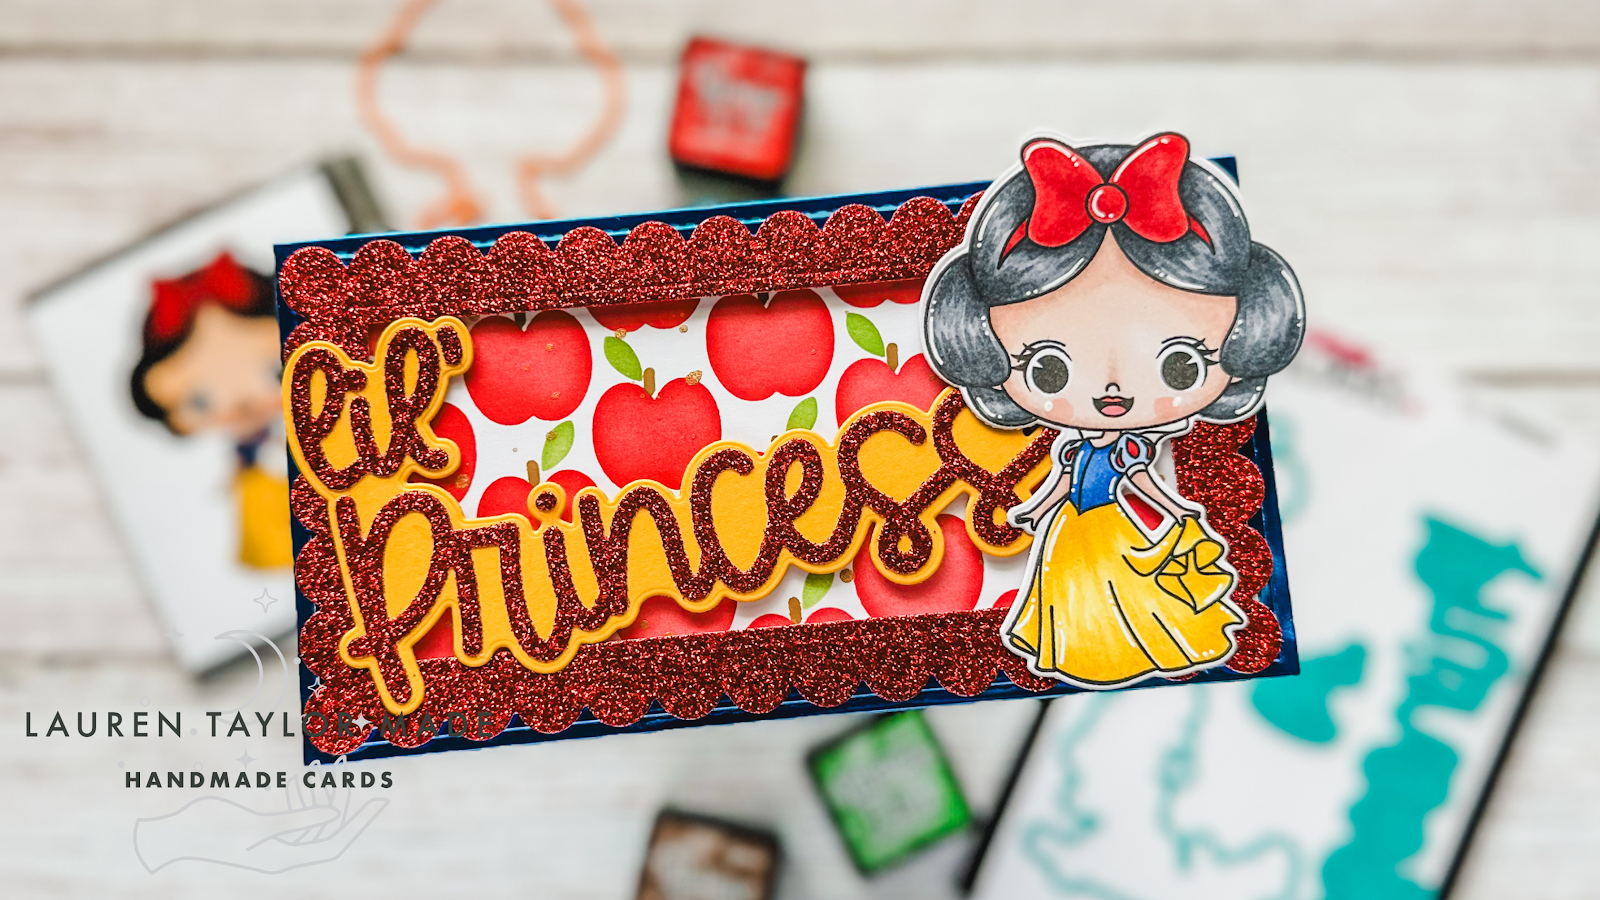
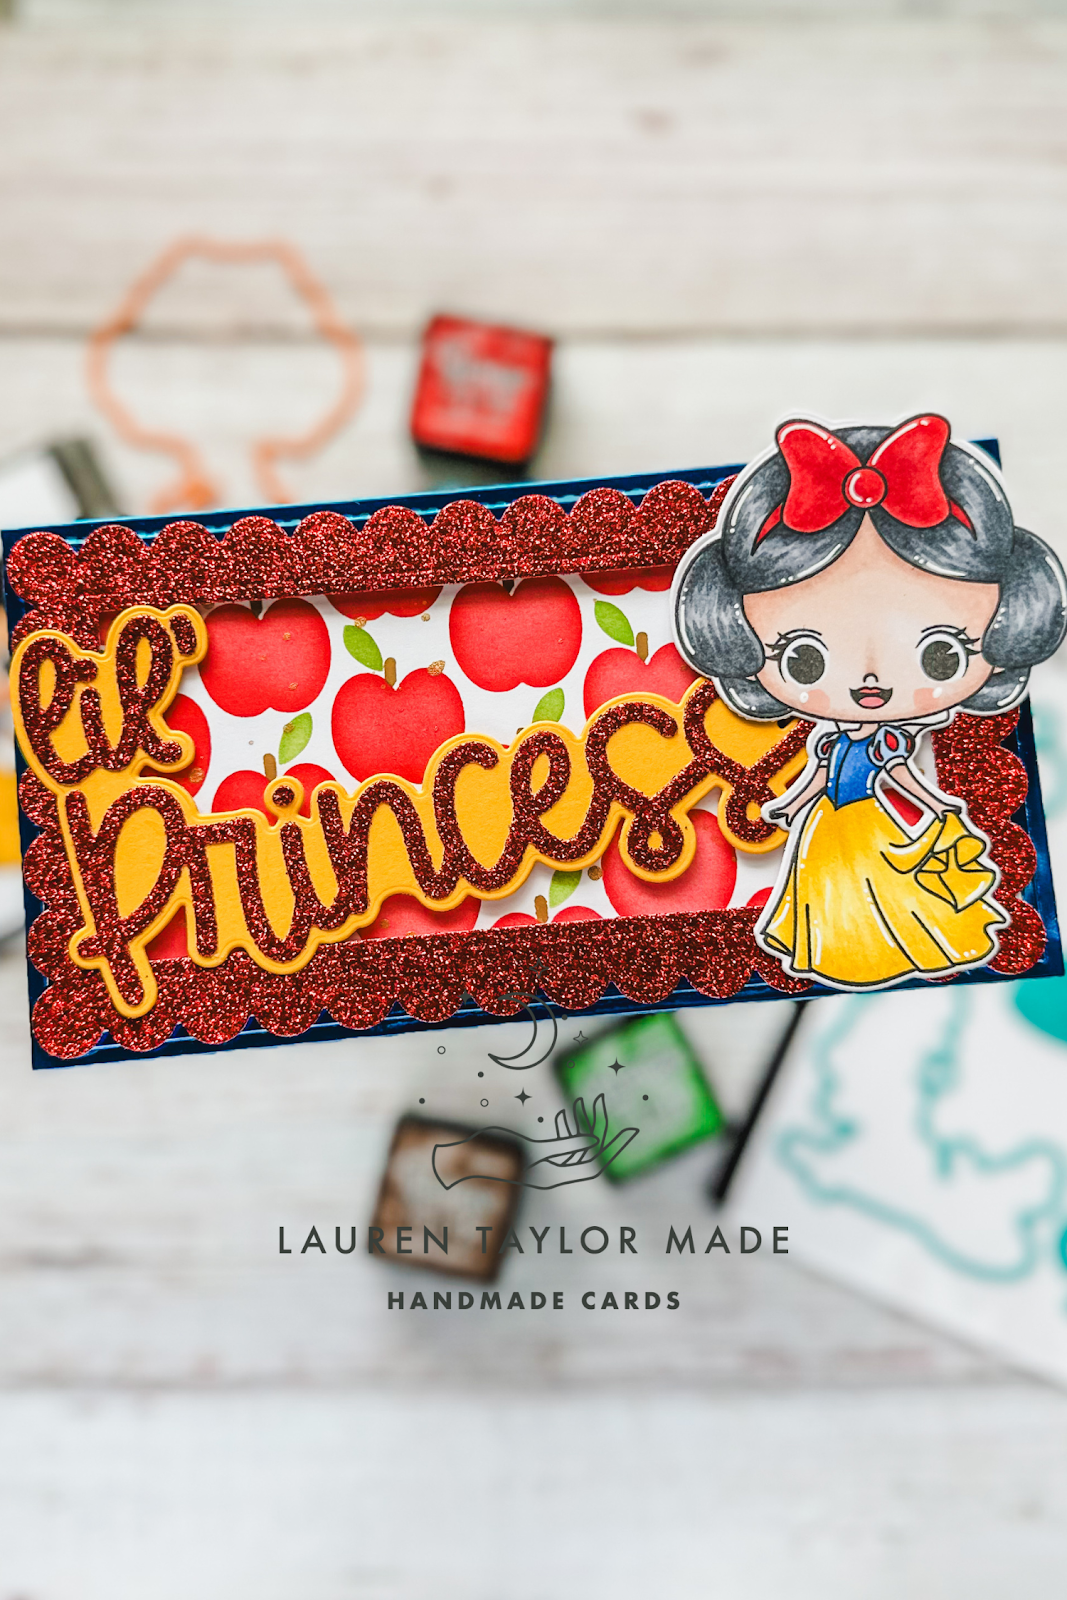
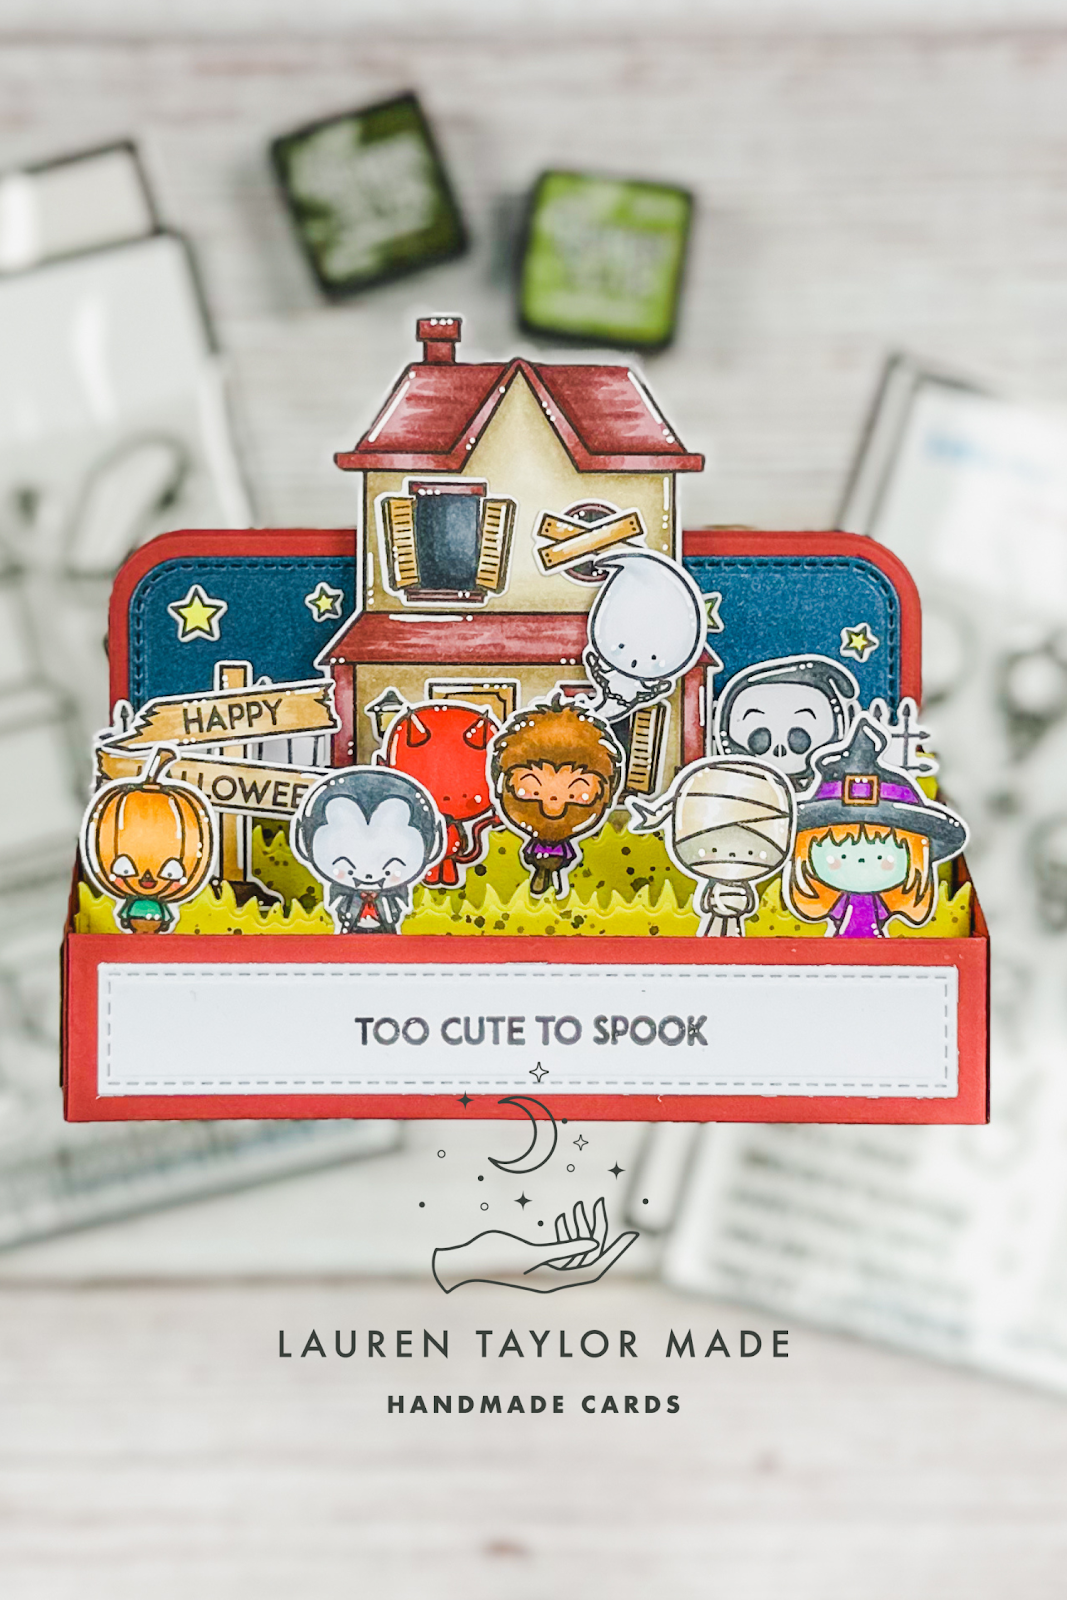
Hey crafty friends! Welcome back to my blog and my craft room! It's Fandom Friday, and I'm super excited to share this fun card featuring the adorable extraterrestrial stamp set from Stamp Anniething, "Phone Home," along with their amazing Speak & Spell builder dies. This card was a blast to put together, with lots of die-cutting from various Cardstock Warehouse colors like Cherry, Pitch Black, Canary, Flame, and Splash, all to perfectly match the iconic 80s Speak & Spell from the movie. I even colored the cute characters with my Olo markers, using a range of shades to bring them to life. For a full visual walkthrough and all the tips and tricks, be sure to check out my YouTube video linked below!

To recreate this card, start by die-cutting all the Speak & Spell pieces from your chosen cardstock colors, referencing the original design for button placement. Next, stamp the adorable alien and boy image onto alcohol marker-friendly paper using Inkon3's Blackout Hybrid ink. Color them with Olo markers, paying attention to shading and blending for depth. I used a Stampin' Up Stargazing paper for the background, cutting it to 5x6.5 inches using the Popsiclesticks Admit 1 5x7 layer die. For the sentiment, I used white embossing powder on the black cardstock to mimic the Speak & Spell's display. Assemble the card by adhering the background to a white A7 card base, then adding the Speak & Spell and the colored image with foam adhesive for dimension. Don't forget to watch my YouTube video for all the details, and let me know in the comments what you think of this fun, fandom-inspired card!

VIDEO TUTORIAL


PIN THIS
SUPPLY LIST

Read More

HB2U Fandom Card with Stamp Anniething

Wednesday, May 29, 2024

I'm having some fandom fun today for this week's episode of Craft Roulette! I bought these amazing stamps and dies from Stamp Anniething that are inspired by one of my favorite time traveling 80s movie. I started with stamping and coloring my images - I used a mix of OLO and Ohuhu markers. There are coordinating dies, but I forgot I had them and fussy cut the images out!

After, I did lots of die cutting for my DeLorean and sentiment. I adhered the car pieces together, but inked up my sentiment with some red ink before gluing together. My background is a piece of blue cardstock and I added white ink with the Starburst Stencil as well as some inking to try and look like smoke inspired by the movie poster.

I adhered the DeLorean to the background that is attached to the card base, then I popped up my sentiment and fandom characters. For some final touches, I added a few rhinestones to "charm" up my card and to meet the last requirement of Craft Roulette. I hope you like my take with these Stamp Anniething products. I will be guest designing with them again in the future - so excited!

PIN THIS
SUPPLY LIST

Read More

You're Dope Cottage Card with Stamp Anniething

Friday, November 10, 2023

It's my last project as a guest designer for Stamp Anniething! I'm sharing a video where I walked through all of the products I was sent from them to create with for these cards. I just LOVE this sweet Cottage Builder Die and in my video I share how I added details to my cardstock and assembled the cottage. After I build my cottage, I also show how I used the new stencil to create my background scene.

Once my background was done, I stamped and colored my little character with Ohuhu Art Markers. He is cut out with the coordinating die and I used a banner die to stamp my sentiment. You can see the full assembly in today's video tutorial! I hope you enjoyed the last few days of my projects with the latest Stamp Anniething. I can't wait to get more products and share more with you!

VIDEO TUTORIAL


PIN THIS
SUPPLY LIST

Read More

Charming Duo Shaker Card with Stamp Anniething

Thursday, November 9, 2023

I am back totday with my second project as a guest designer for Stamp Anniething! Today they released the adorable Charming stamp - now I have the most charming duo for projects. I stamped and colored my characters with Ohuhu Art Markers and used their coordinating die to cut them out. I wanted to put them on a shaker card, so I have different supplies to make this card interactive.

The background is cream cardstock and I embossed it with a woodland themed embossing folder. I used some Distress Ink to splatter onto the background, but I love the subtle leaf details in the background. The frame for the shaker is cut from kraft cardstock and has woodgrain details in the die. I assembled my shaker with foam adhesive, acetate and a retired sequin mix to give it more of that woodland feel!

Before I closed up my shaker, I stamped my sentiment to the background and once it was added to my card base, I adhered my charming duo to the front of the card. I just how cute they look together! Let me know what you think of this new release and what other fandom favorites you like from Stamp Anniething.

PIN THIS
SUPPLY LIST

Read More

Lil' Princess Mini Slimline Card with Stamp Anniething

Wednesday, November 8, 2023

We love our fandom sets! I was so excited to be asked my Stamp Anniething to help with their new release and I'm excited to share with you the adorable princess stamp - she is the fairest of them all. I have a short video below of quick coloring and aseembly of my card, but I'll walk you through each of the steps here on my blog today.

My card base measures 3.5x6.5" and I used my PopsicleSticks dies to cut metallic blue cardstock to be on the card base, the smallest of the dies cut my stenciled apple background, and the scallops are cut from red sparkle cardstock. I layered the apple stenciled background to the blue cardstock and popped up the scallop frame with foam adhesive.

I die cut my sentiment from the same red sparkle cardtock and yellow cardstock. I layered them together with liquid adhesive and added it to my card - I used foam adhesive where it overlapped onto the stenciled background. My sweet princess was stamped and colored with Ohuhu Art Markers, then I used the coordinating die to cut her out.

She is added the same as my sentiment; I used foam adhesive where she overlaps the apple patterned design and liquid adhesive anywhere else. I just love this sweet mini slimline and I cannot wait to show you the rest of my designs over the next couple of days. Let me know in the comments if you've heard of Stamp Anniething before and what your favorite stamp set is... I need to expand my collection!

VIDEO TUTORIAL


PIN THIS
SUPPLY LIST

Read More

Kawaii Cuties Halloween Box Card with Stamp Anniething

Tuesday, May 30, 2023

It's so hard to believe we're approaching the end of May already. I feel like it was just yesterday I was singing NSYNC "it's gonna be maayyyy" and now it's past Memorial Day weekend. I have a fun sneak peek of an upcoming release to share tomorrow, so I'm sharing my latest Halloween on the Last Day of the Month video today! Using My Favorite Things slimline box card dies, I created this little Halloween party at a Haunted House with the cutest little monster stamps I've ever seen.

These are Kawaii Cuties from Stamp Anniething and I had been eyeing these stamps for a while and I finally bought them the other day (along with a really adorable sea critters Kawaii Cuties stamp set, too) to use for a Halloween themed project. In my video today, I'm sharing all of the pieces I die cut in colored cardstock from Your Paper Insider and how I added some ink to give depth to my grass pieces. Then we'll walk through assembling the box card, haunted house and adding in all of the pieces onto the box card to create this fun little party. I hope you enjoy the video and it brings some joy to you today!

VIDEO TUTORIAL


PIN THIS
SUPPLY LIST

Read More