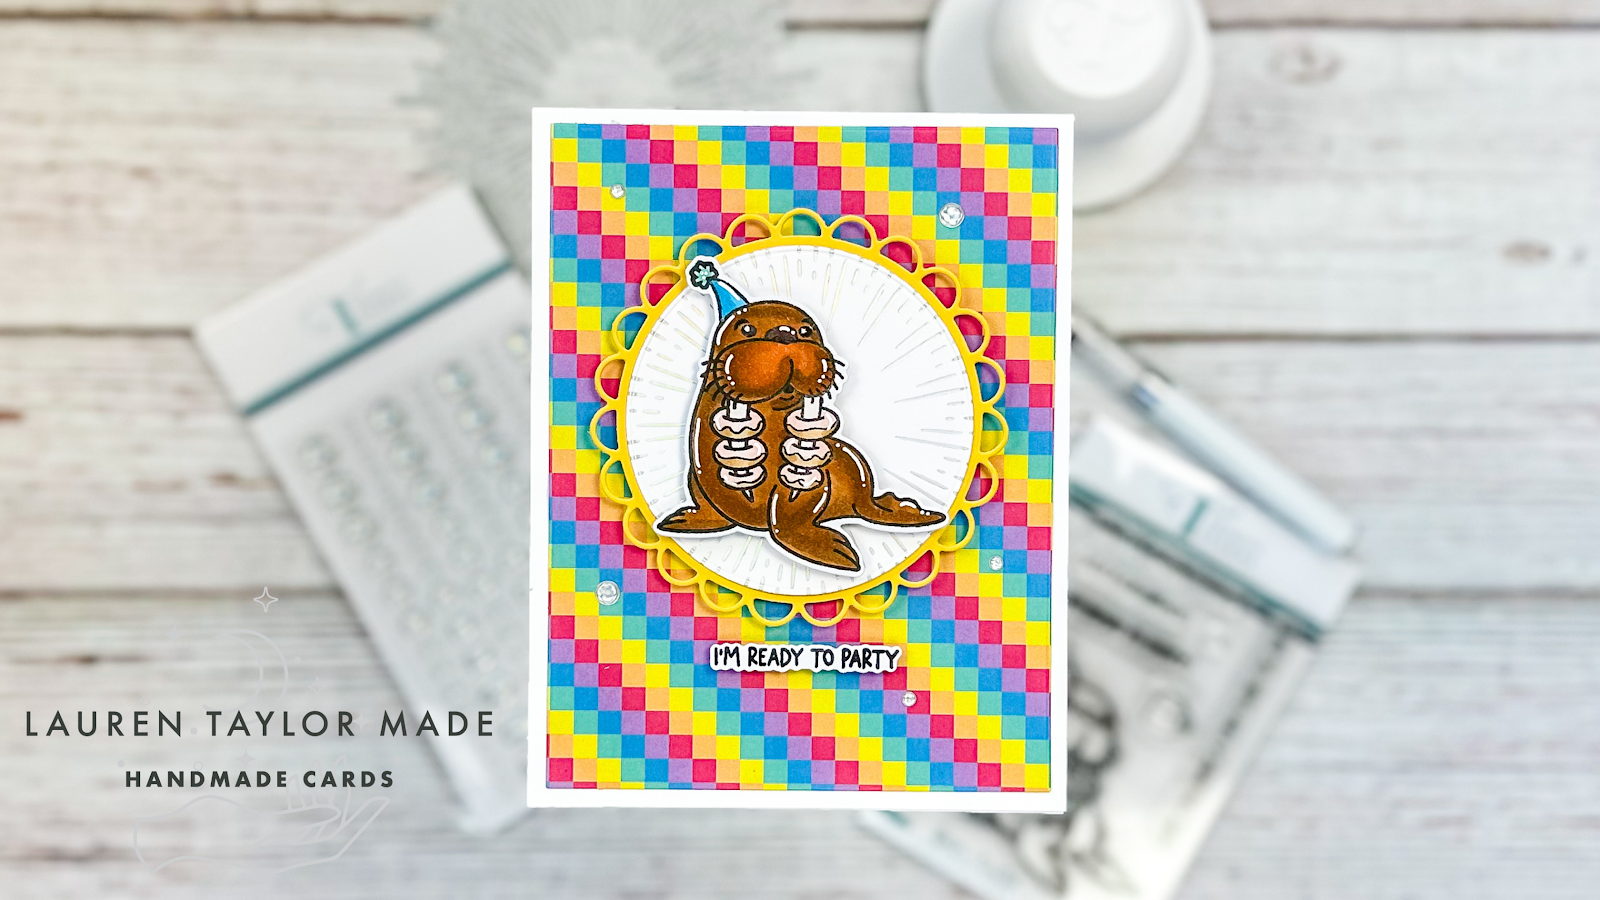
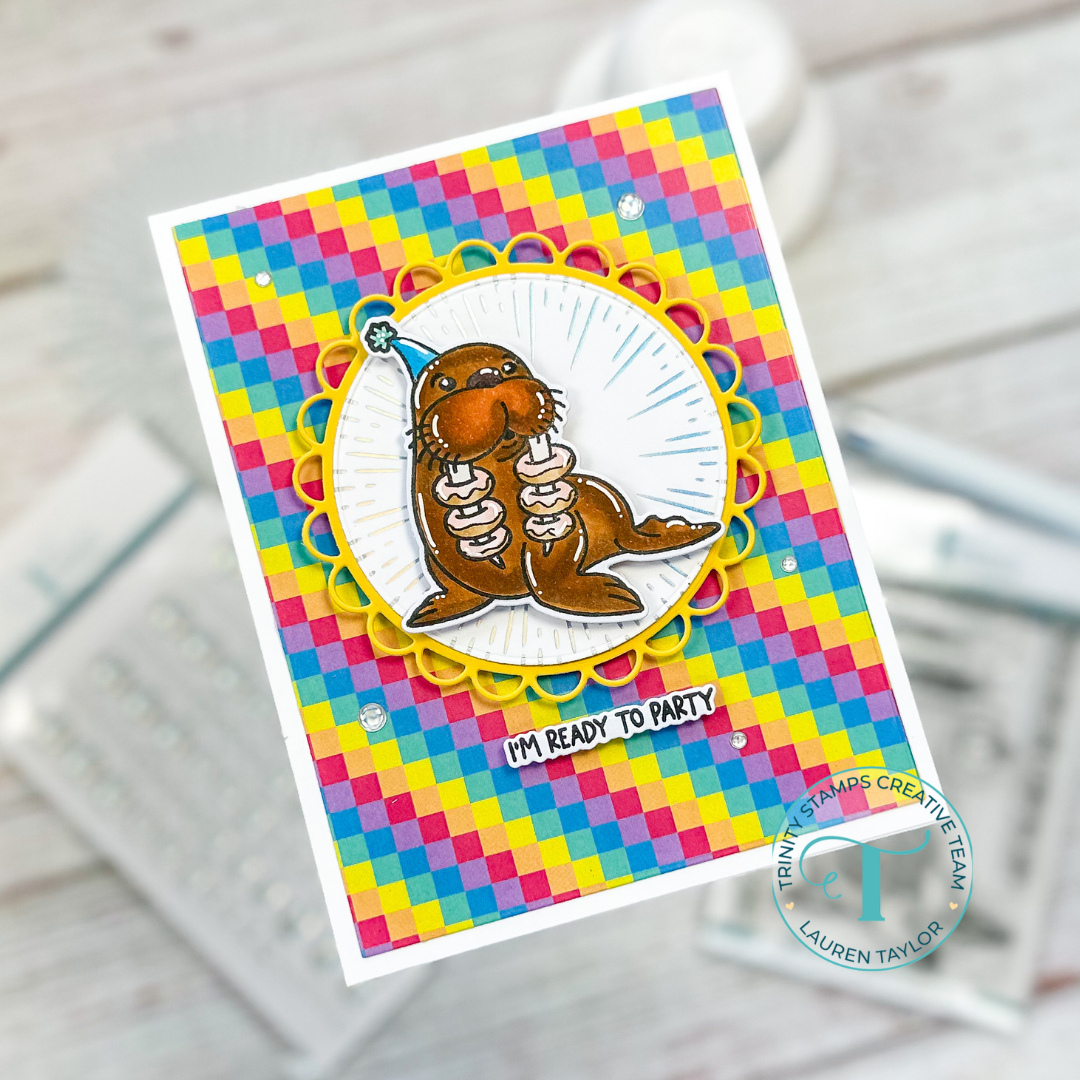
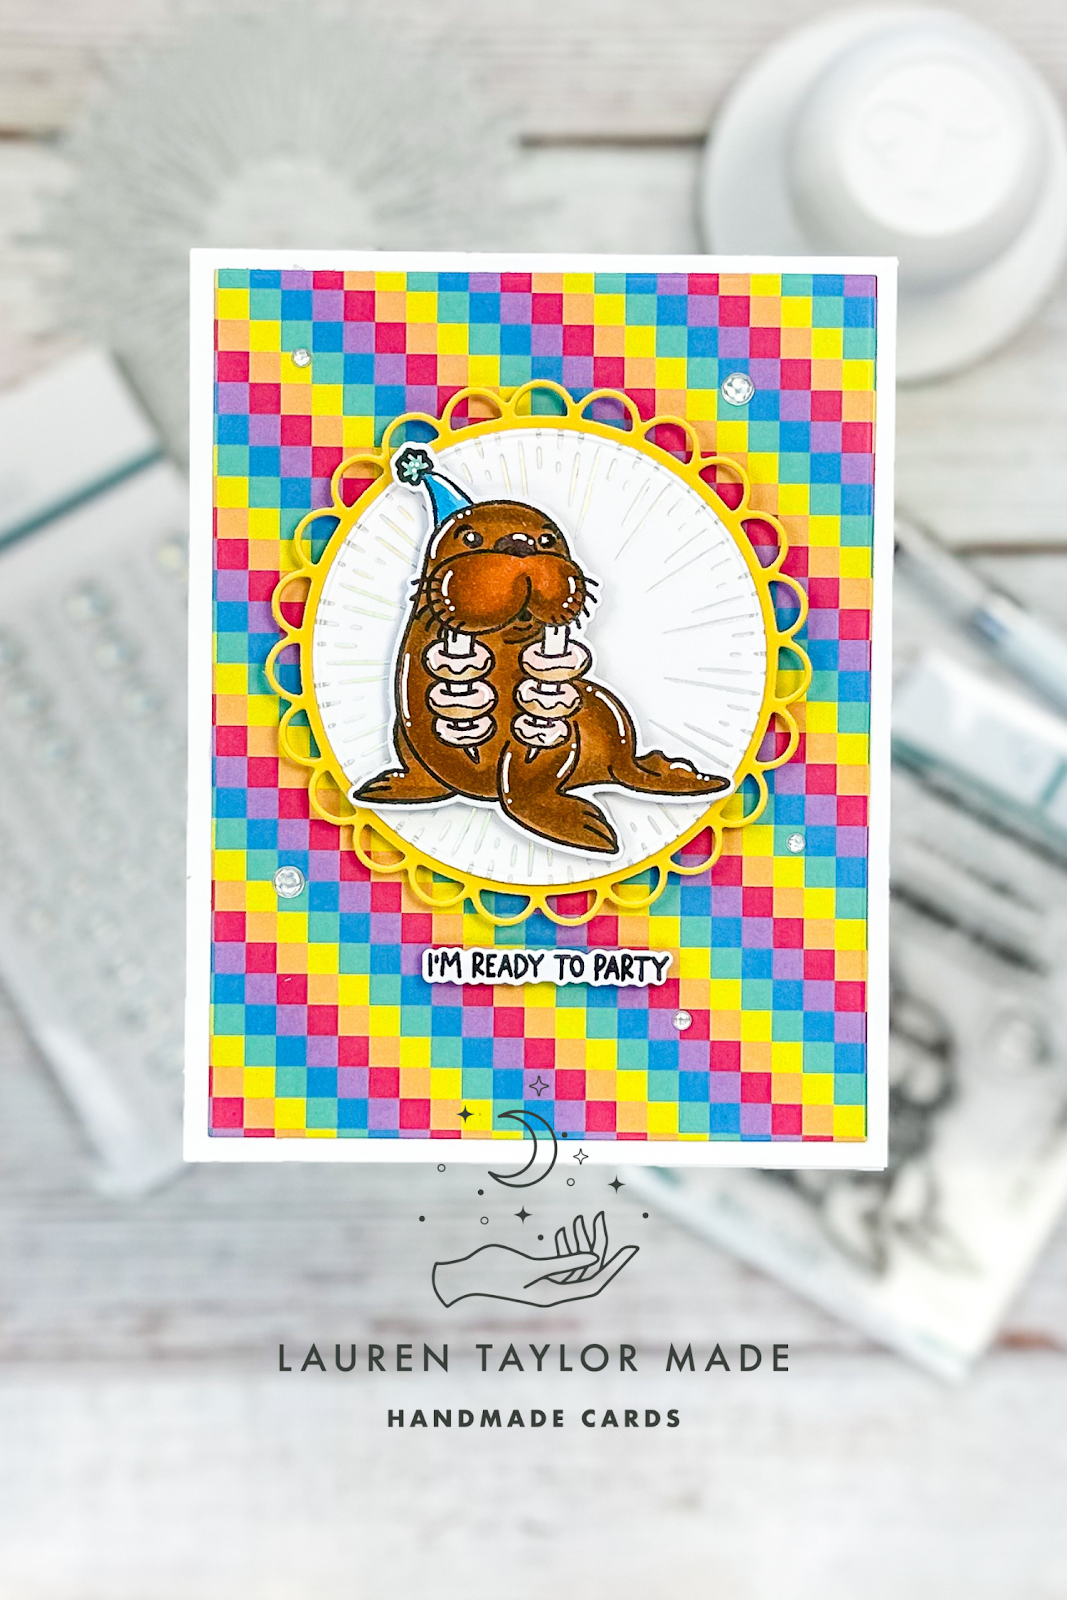
How cute is this walrus with the donuts on his tusks?! I just think he's adorable and wanted to put him on a colorful card. You can see my Reels down below that went live on Trinity Stamp's Instagram today! I started with hot foiling my burst in prism - it was hard to die cut, but don't worry! I saved the extra piece and foil for a future project. I layered it onto a scalloped circle in a yellow cardstock and popped it up on a rainbow background of patterned paper!
The background was added to an A2 card base and then I got to stamping. I stamped my walrus and sentiment in black ink and colored my walrus in with my Ohuhu Art Markers. After fixing a couple spots with a fine line pen and added some highlights in a white gel pen, I die cut both out with their coordinating dies. They were both popped up onto the card and added some final touches of holographic enamel dots around the card.
I hope you like this bright and color birthday (or celebration) card! It has a simple layout but there's lots of fun and shine that make it just pop.
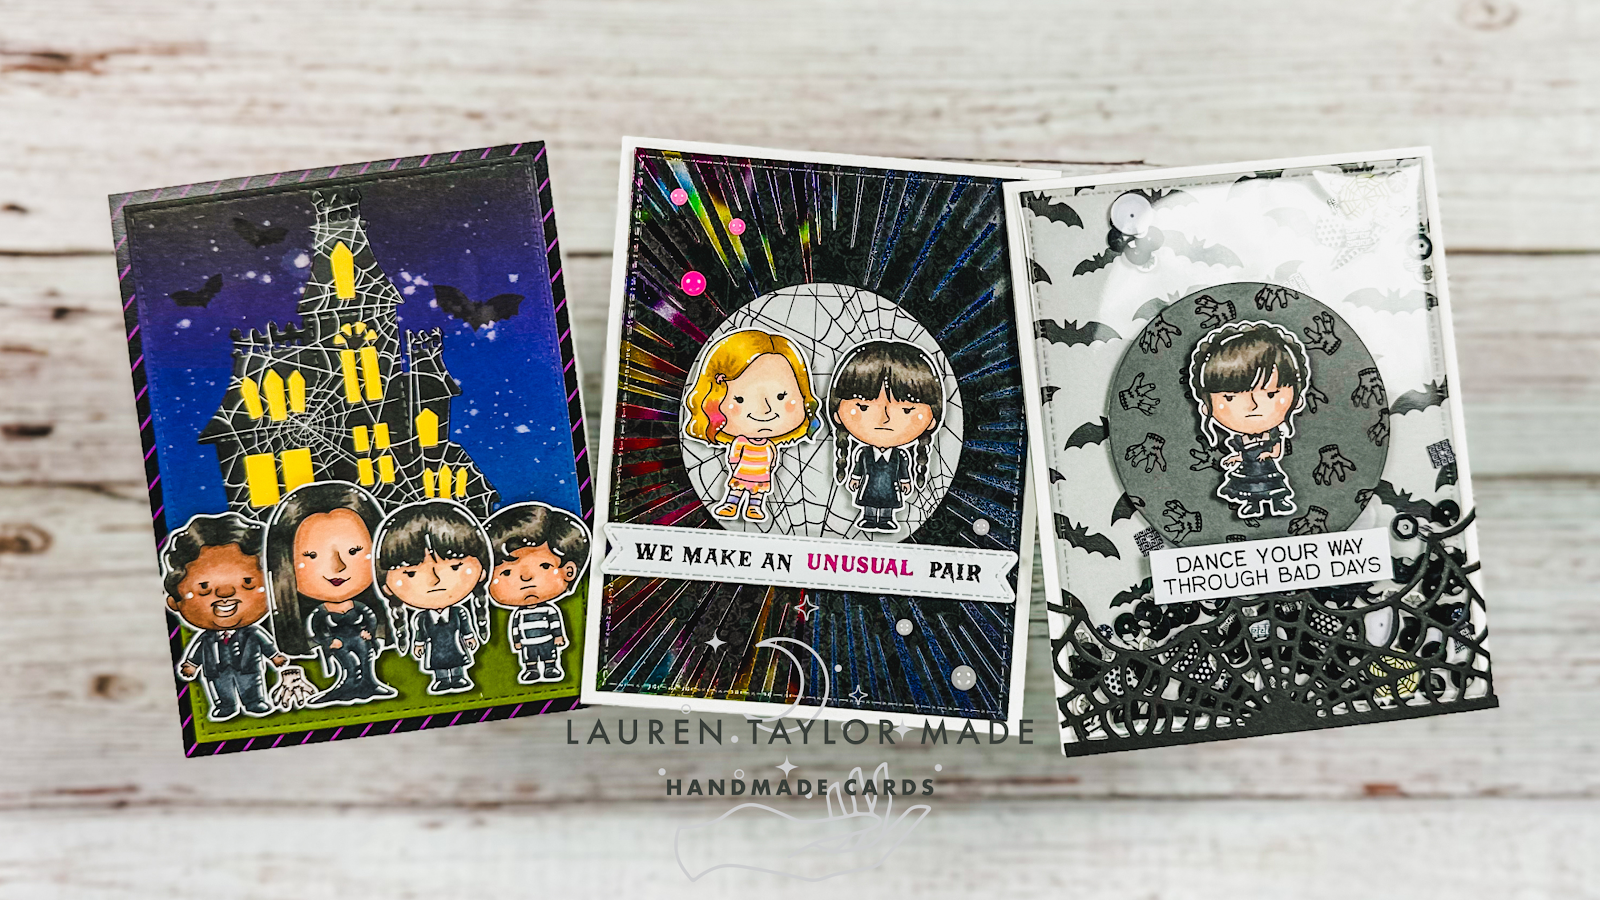
It's new release day from Kindred Stamps! The Unusual Ones stamp set I am excited to share works perfectly for it being the last day of the month for some Halloween inspiration, too. I have three cards to share with you and a video to go along with my shake card featuring my dancing main character. Let's start with that card since I have a video! I created an infinity shaker panel with my dancing main character. She's perfect as a shaker card!
My second card is a scene with the whole unusual family! I used Distress Oxide inks to create my own background and splattered on some white ink. I added a grass hill, tucked in my haunted house and stamped a few bats in black. I layered the scene onto a patterned paper background and added all of my fandom characters on with foam adhesive.
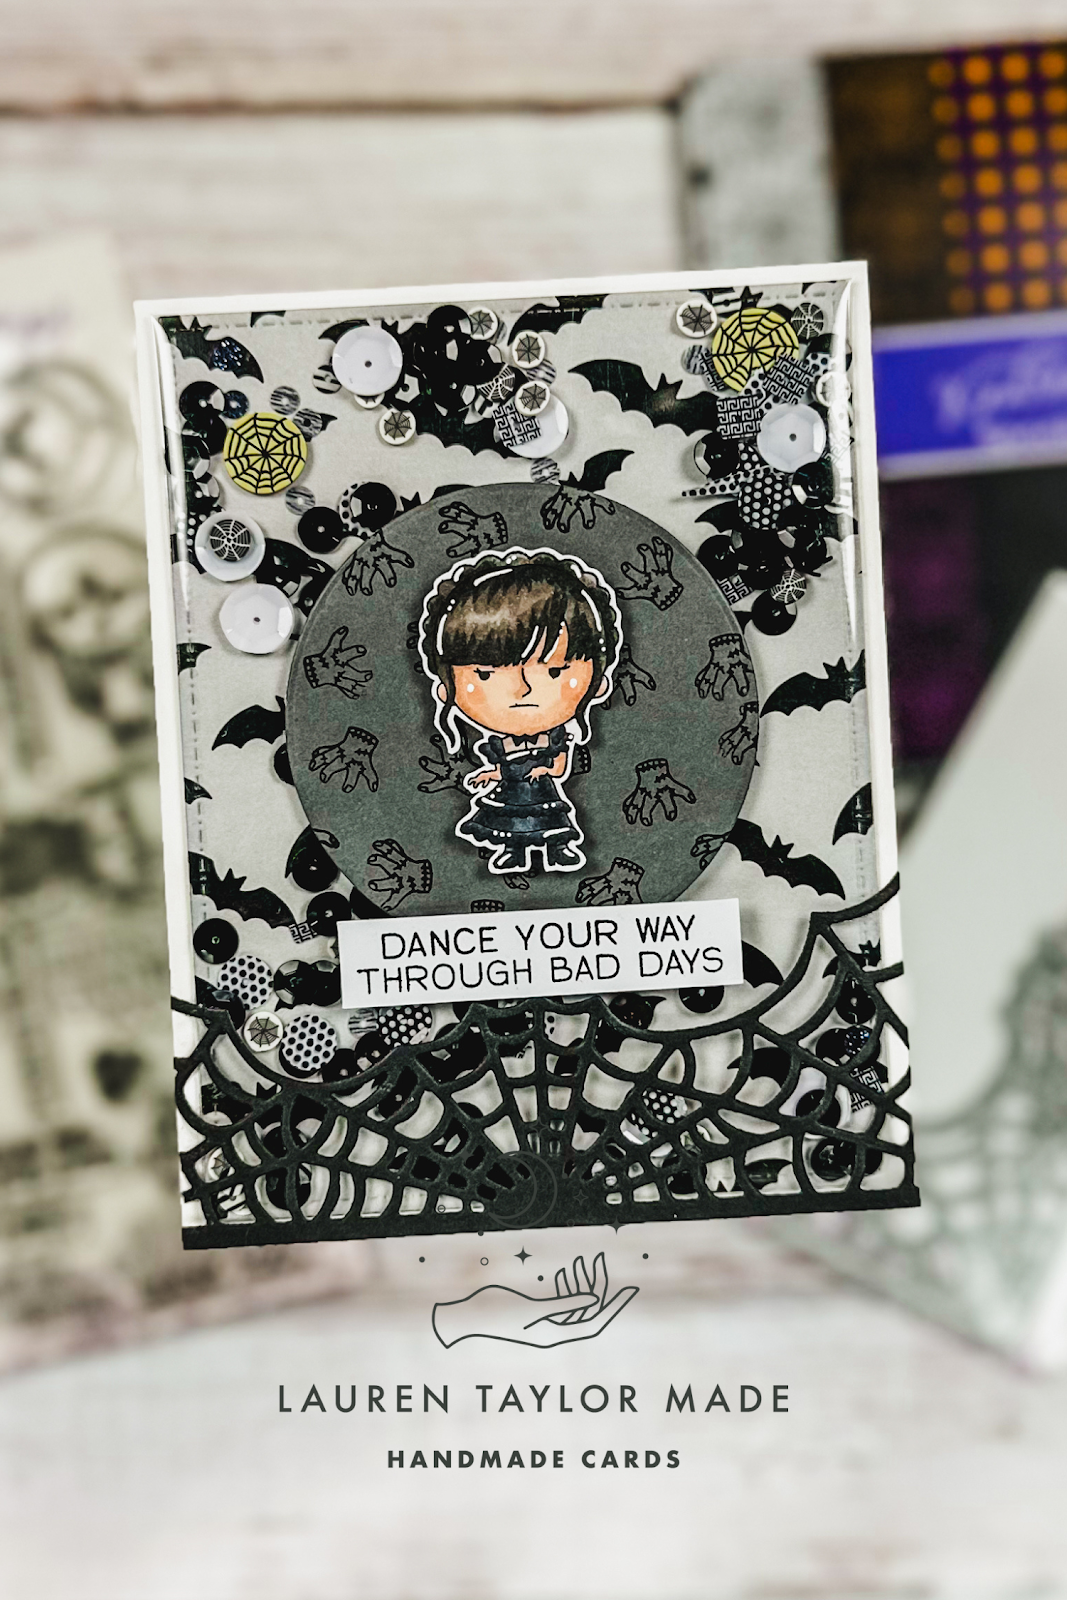
The final card is inspired by the two personalities of these school roommates! I hot foiled a background with one half in a midnight black foil and the other half with a rainbow confetti design. I added a circle in the middle of the foiled design so my two girls would pop off the card. I actually did use foam adhesive to literally pop them up as well as my sentiment strip. For final touches, I added some enamel dots again that match the different personalities.
I hope you are loving this new release from Kindred Stamps - let me know what your favorite product is from the new release in the comments. I already know what I need to order for myself!
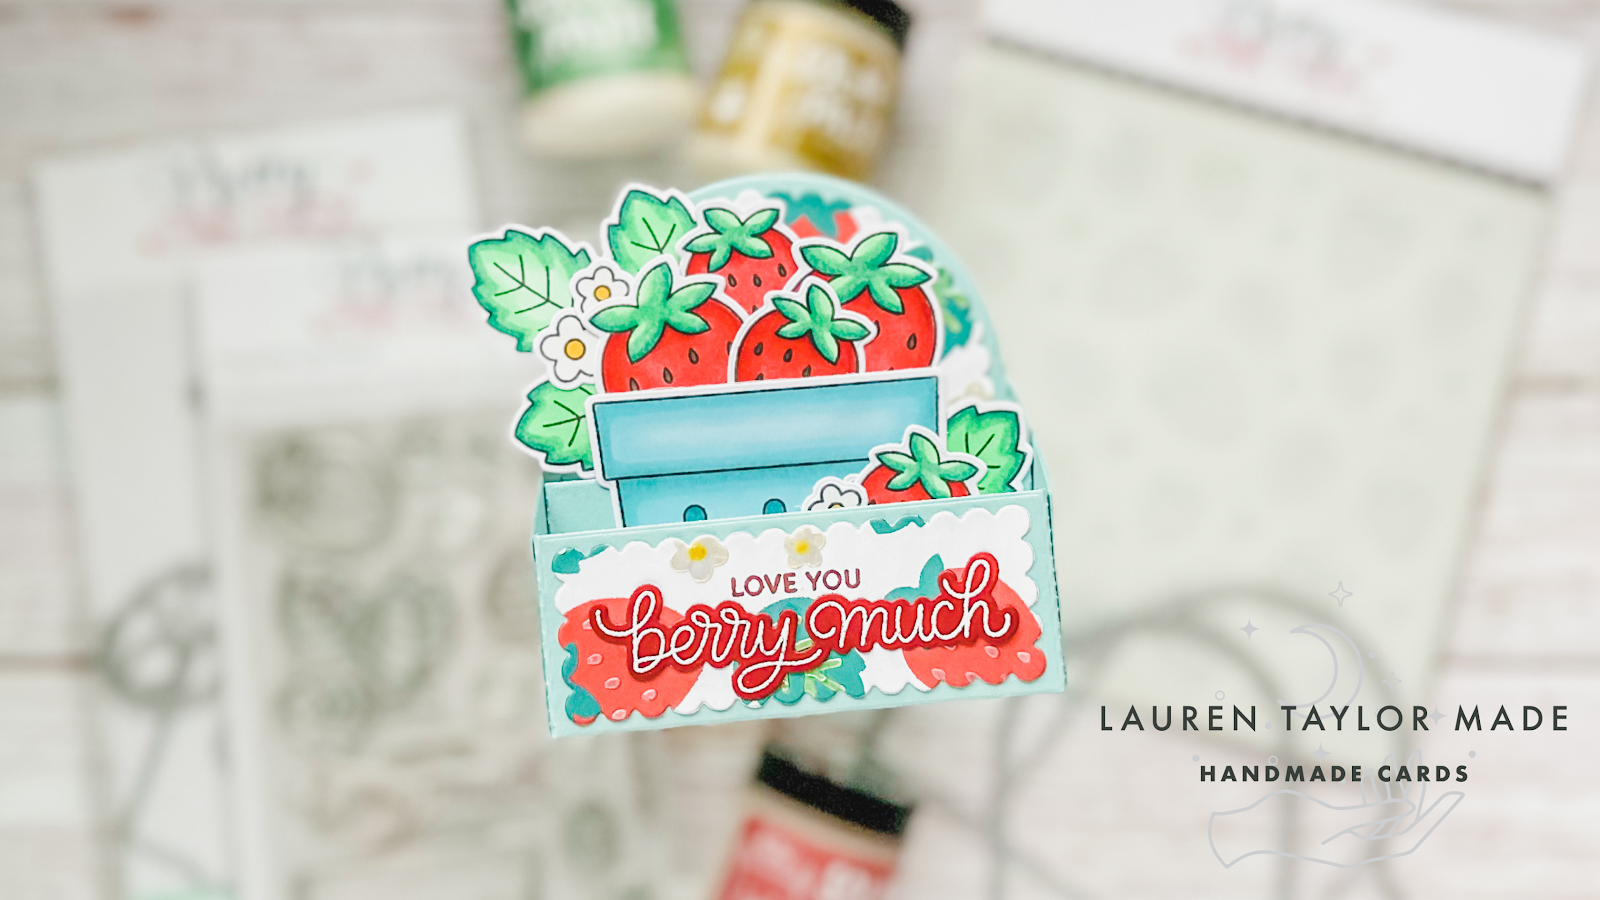
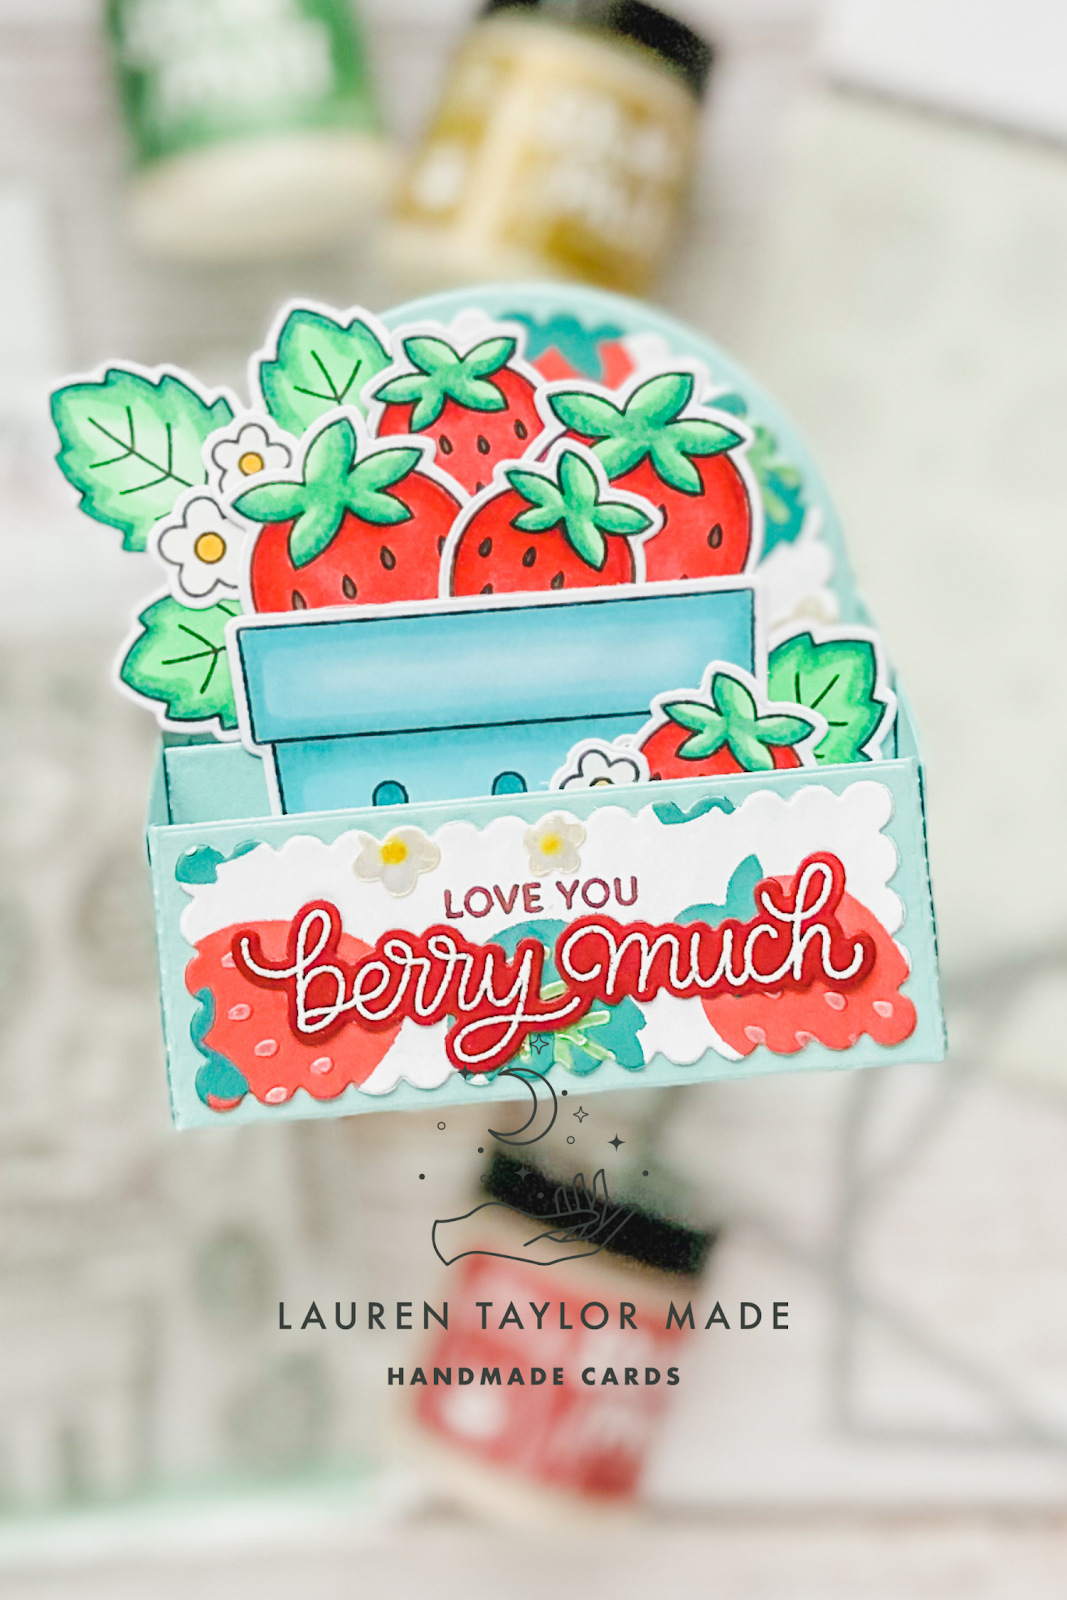
One of my favorite items in my craft room are my mint/teal berry baskets that I use for storage and when I saw the Fresh Berries Stamp Set and Coordinating Dies, I knew I had to color the basket stamp the same color!
I will be using different stencil pastes in the video, so I will be jumping around just a little bit as I need some drying time when making my stenciled background. Starting with a 6x6” piece of white cardstock, I started with using the Layered Strawberries Stencils.
Using Festive Berries Distress Oxide, I added ink to the strawberries after masking the flowers with Stencil A. Next is Stencil B with Pine Needles Distress Oxide, followed by Mustard Seed Distress Oxide through the small circles in Stencil C; I used a small foam blender so I would just get ink through the circles.
For the first stencil paste, I am using Golden Hour Solar Paste for the flowers in Stencil A and then set it aside to dry while I color. I stamped the Fresh Berries Stamp Set with an alcohol marker friendly black ink and colored them in with Ohuhu Art Honolulu Markers after die cutting them with their Coordinating Dies. In my video, I share the marker caps so you can follow along with the colors if you’d like!
When I finished coloring, my flowers were dry and I brought back Stencil C to add the strawberry seeds with Cross My Heart Solar Paste. Setting the backdrop to the side to dry, I moved on to die cutting the Scallop Box Card Dies out of some mint/teal-ish cardstock and assembling the die cut pieces with strong adhesive tape. Finally, I add my last layer of stencil paste using Stencil D with Crocodile Tears Solar Paste.
My Fresh Berries sentiment is embossed with white embossing powder with a berry colored cardstock and used the Coordinating Die. I assembled the berry box with the strawberries, leaves and flowers, then added it to the center of my box card. When my stenciled cardstock was dry, I used the scalloped details from the Scallop Box Card Dies and glued them to the assembled box card as well. After adding my sentiment, that will finish up my box card! I hope it brings a smile to your face and inspires you to create today!
Another unique card from Craft Roulette to share today! I think I should have done a tone on tone with the hexagon background, but I like the colors and it's really embracing the rustic garden colors parameter from last Friday's episode of Craft Roulette. I also have hexagons, a card that is see-through in the arch shaped window and fashionable sunglasses.
I started the card with cutting a hexagon background from green cardstock. I also cut out my window from the hexagon background and my card base, doing my best to make sure they aligned! I added some pink ink to my card base, using a lighter Spun Sugar towards the window opening and Kitsch Flamingo around the corners and edges. Before gluing on the green hexagons, I splattered some metallic watercolors to add a little shine
I stamped my monkey, colored them in with alcohol markers and die cut it out with its coordinating die. My flamingo floatie is die cut from colored cardsotck as well as flowers and a tropical leaf. I assembled my floatie together, tucked in my monkey and add their sunglasses. I wanted some water to pop up my floatie, so I added a piece of dark blue cardstock that was cut with a simple wave on the back side of the card front. After I added my floatie, I tucked in my tropical leaf and added the flowers.
That is when I realized I wanted a sentiment, so I was very daring and embossed my sentiment with white powder - luckily it embossed well and I think the card turned out pretty cute! Let me know how you think I did with the parameters!
Hi, Friends! It's been a minute since I've been in the craft room... From traveling for work, volunteering with Girl Scouts and then a sudden passing of a good friend which sent my husband out of state for a few days... I just have not been able to get to "my room" to get some projects done. I was not able to get a video recorded in time for my normal Christmas on the 25th... So I'm bringing you just a blog post on the 27th instead. There honestly is not a lot to this card, just some time for coloring and making my own make shift version of this tiny world themed ride.
I started with cutting down a sheet of my 9x4 Tiny World to fit on a slimline card. I then die cut out the Castle World dies - I did the base in white cardstock and the details in shimmery cardstocks in white and gold. I did have to cut a few extras in the gold to create my scene, but overall I tried to just use the die cut pieces from one time through.
When it was all glued together, I trimmed the sides just a bit so that way it would fit on my slimline card, which is 3.5x8.5". I glued it to the background on my card base to the top leaving lots of room on the bottom for my sweet little characters. I stamped and colored them in their holiday clothes in white and gold - again, trying to go from memory of what I think they would look like. I think they're so cute! I popped them up with foam adhesive and also stamped and cut out a Santa hat to add to my smiling clock face.
Finally, I stamped and embossed my sentiment in gold and added it to the card. It's not a Christmas sentiment, but I think it still fits well on my card. How do you think I did with this Christmas inspiration for the month? I know it's not a video like I've been doing each month, but it's still a little something!
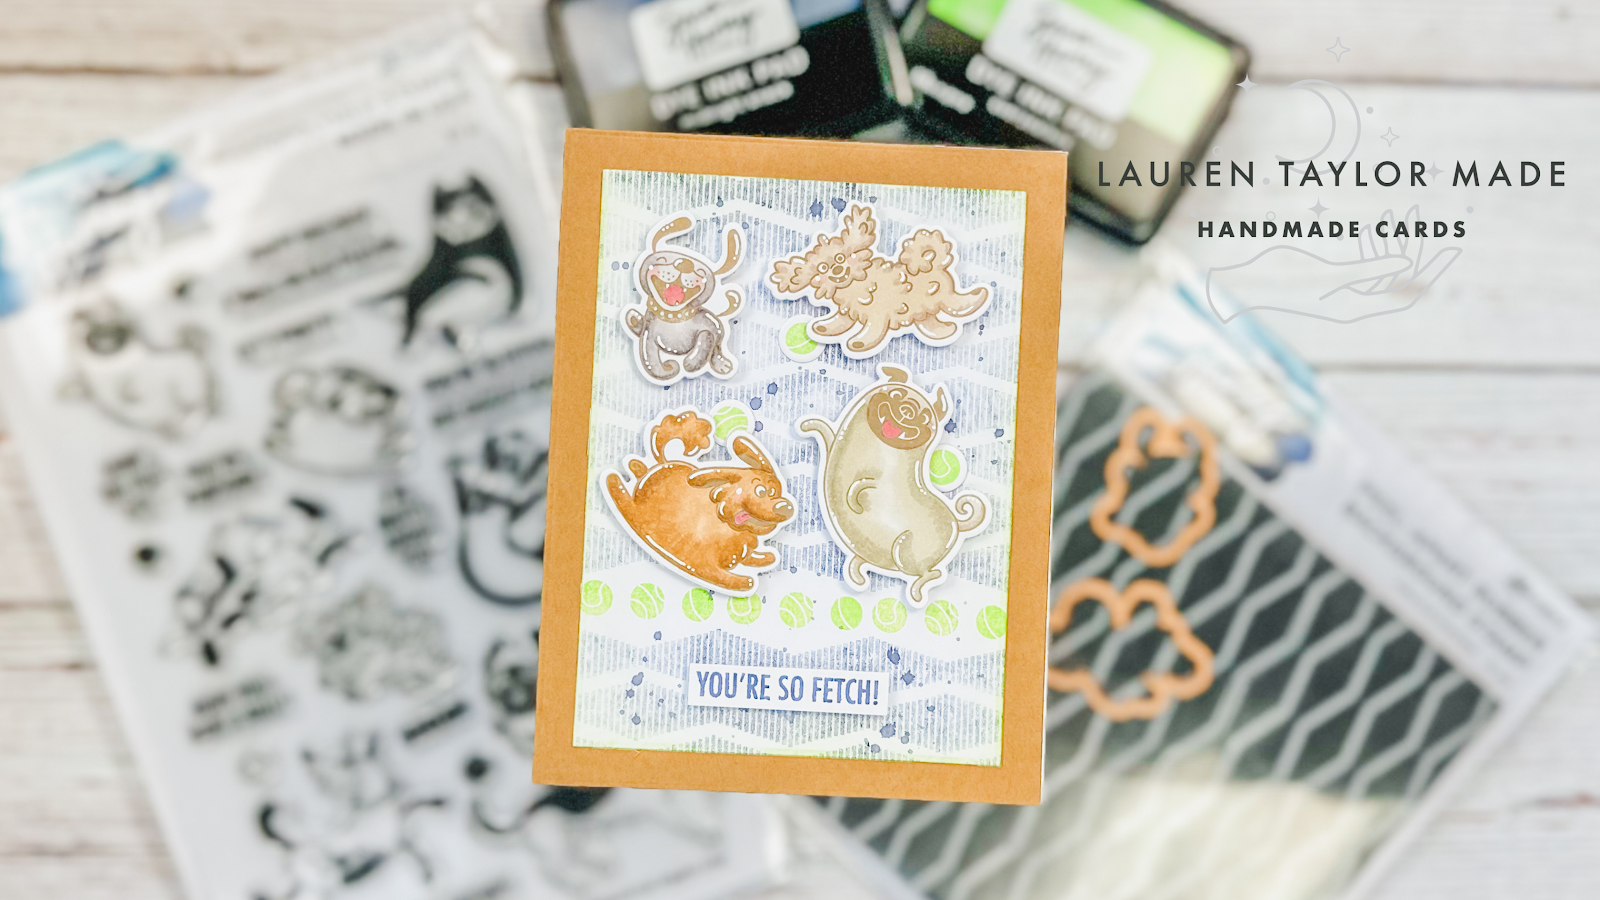
There are so many new cute new products released today from Simon Hurley with Ranger Ink and Spellbinders! I was gifted a wonderful package of goodies from Ranger Ink and I'm sharing one of my projects today to celebrate the new release. For this card, I'm using the new Hot Diggity Dog! stamp set and coordinating dies as well as the Sound Waves peel-apart rubber background stamp.
I started with making my background with Sound Waves! I took out one of the strips from the stamp and inked it up with Midnight Snack ink. Before stamping on my white cardstock, I took a scrap piece of paper so I could second generation stamp. I wanted the background to look lighter as I knew my stamped images would be lighter and I didn't want the blue to overpower my scene. In the blank strip, I stamped different tennis balls in Overzealous and I think it turned out so dang cute!
The background was die cut with a nested A2 rectangle and I inked more Overzealous around the edges and splattered on some Midnight Snack. While the background was drying, I stamped and colored in my images with a brown alcohol marker friendly ink and my Ohuhu Honolulu Markers. The tennis balls were stamped in the same green ink and then I die cut all of my images with their coordinating dies. My sentiment is stamped with the same blue ink and just used my paper trimmer to cut around the stamped sentiment.
I added my puppies and sentiment to the background with foam adhesive and then tucked in the tennis balls with liquid adhesive so it looks like my pups are playing around with them! This background was then glued to kraft cardstock which is attached to an A2 card base. I'm so excited to show you more of the new products from Simon Hurly in the next couple of weeks! Shop the new release using my supply list down below.
I'm hoping along with some crafty friends today and I had a lot of fun with the theme this month! When I saw Greek, I immediately thought of the Stay Strong stamp set from Kindred Stamps. The underworld god is one of my favorite villains and I thought it was just perfect. I used the colors of this character to inspire the rest of my card.
For the kaleidoscope or stained glass, I thought I could accomplish a look like a kaleidoscope look with my Penguin Palace Stencils 360 with Distress Oxides and Simon Hurley Solar Paste. I hope you'll check out my video below and make sure to watch it on YouTube so you can get all the details of how to hop along with my crafty friends and me!
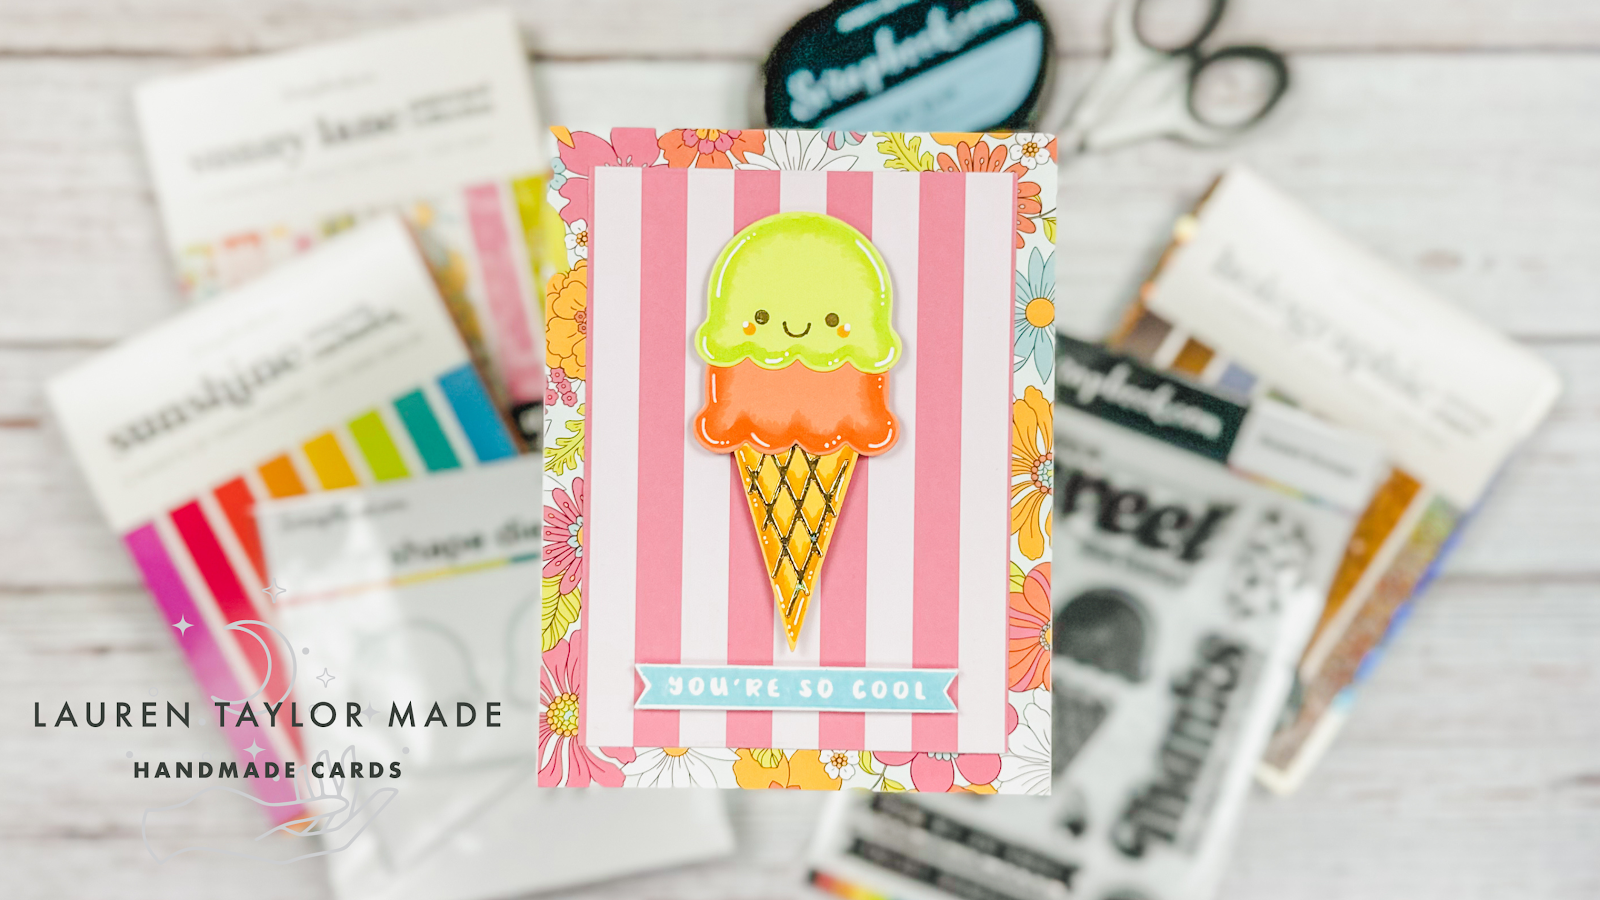
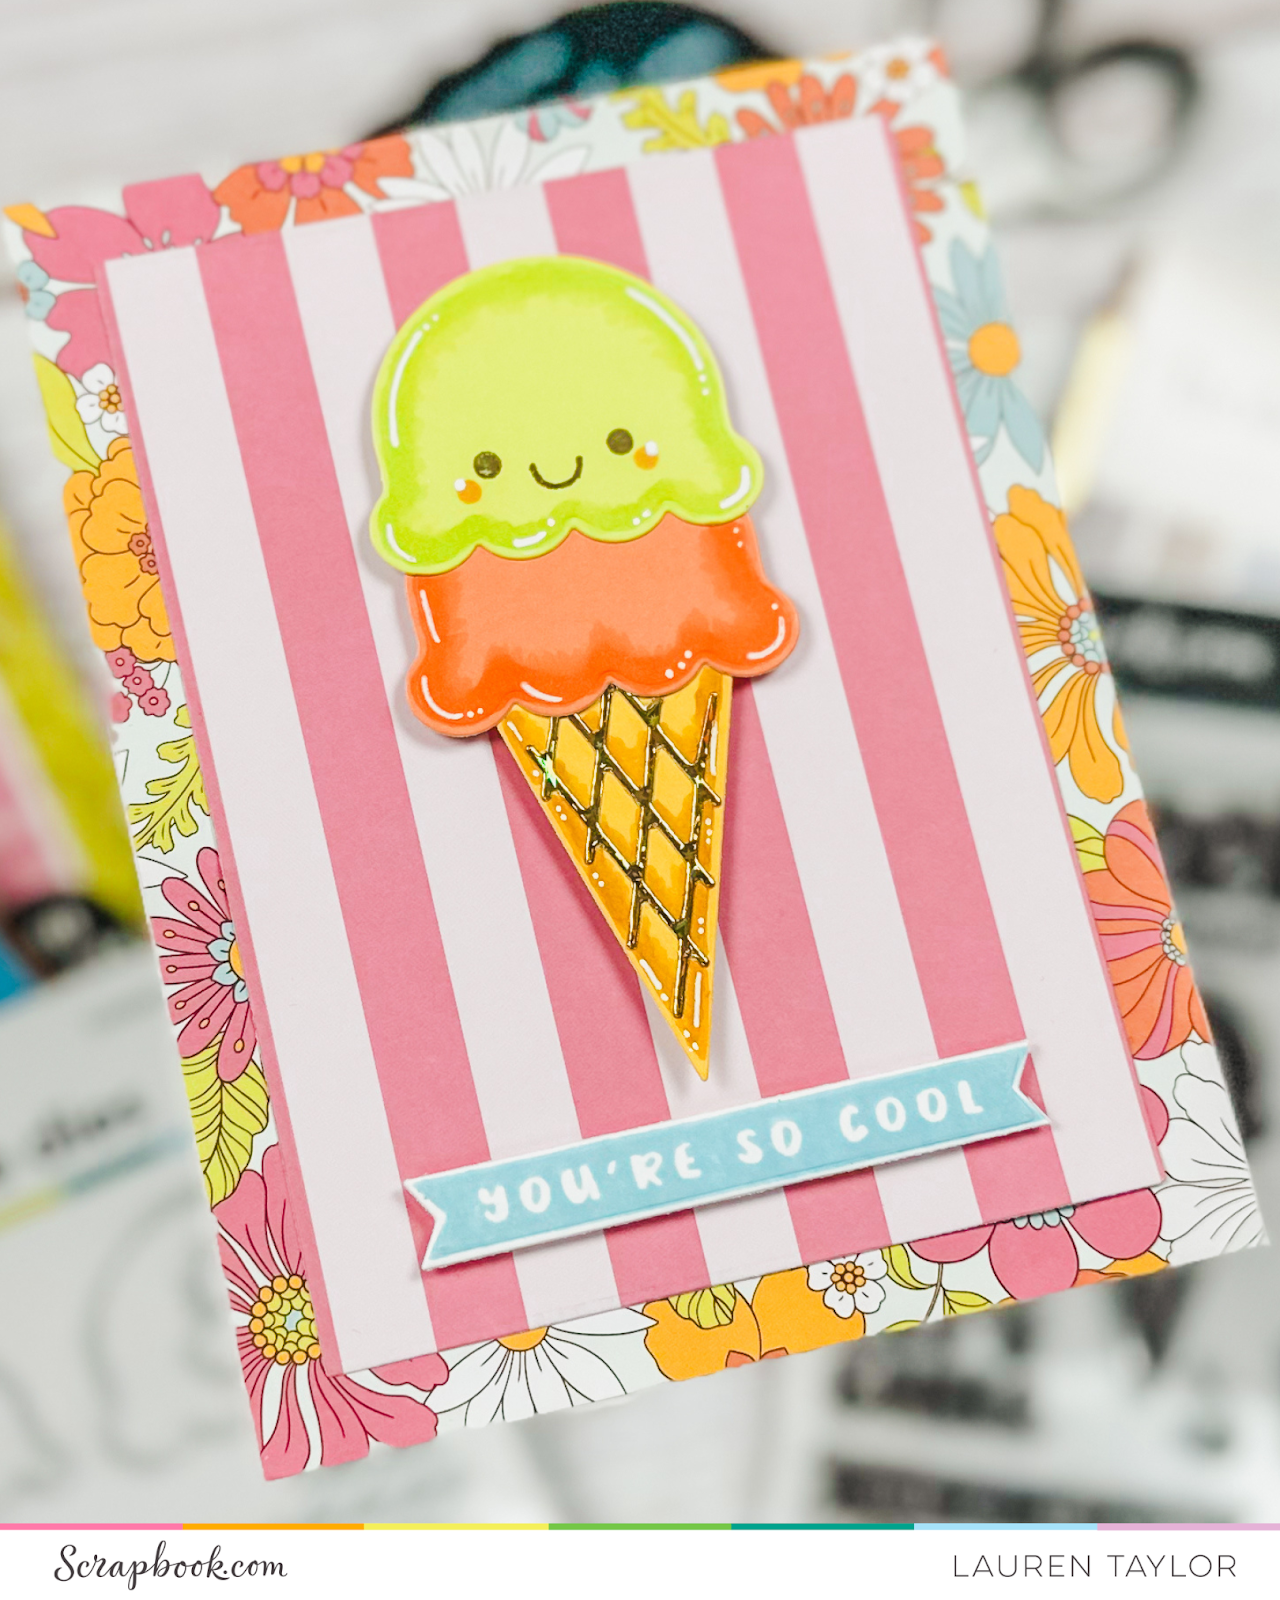
I'm literally sliding in at the last minute with my Craft Roulette project for last week's episode! I have been so so busy this week and last that I feel 100% behind in life. But that's okay! I'm in the craft room getting projects made because it makes me happy and at least that will be on track... Right? Anyway! I'm using some of my new goodies from Scrapbook.com to create this kid card - it's giving florals and it's giving snacks.
I started with my spring scene patterned paper as my background and layered the pink striped patterned paper to the center. After stamping my sentiment in a blue ink, I die cut it with a Lawn Fawn banner die (twice so it could fit perfectly around the stamped image). My ice cream cone pieces are die cut from Sunshine and Holographic cardstock, but I felt they looked a little plain... So I added some alcohol marker ink to add some dimension and stamped a cute face on the top scoop!
The colors are wild, but the final parameter was citrus orchard - I'm going with lime green, orange, grapefruit pink and the blue sky above my orchard. I think that all counts, right? My sentiment and ice cream cone are popped up with foam adhesive and my simple card is done! Just in time for the next episode, hehe.
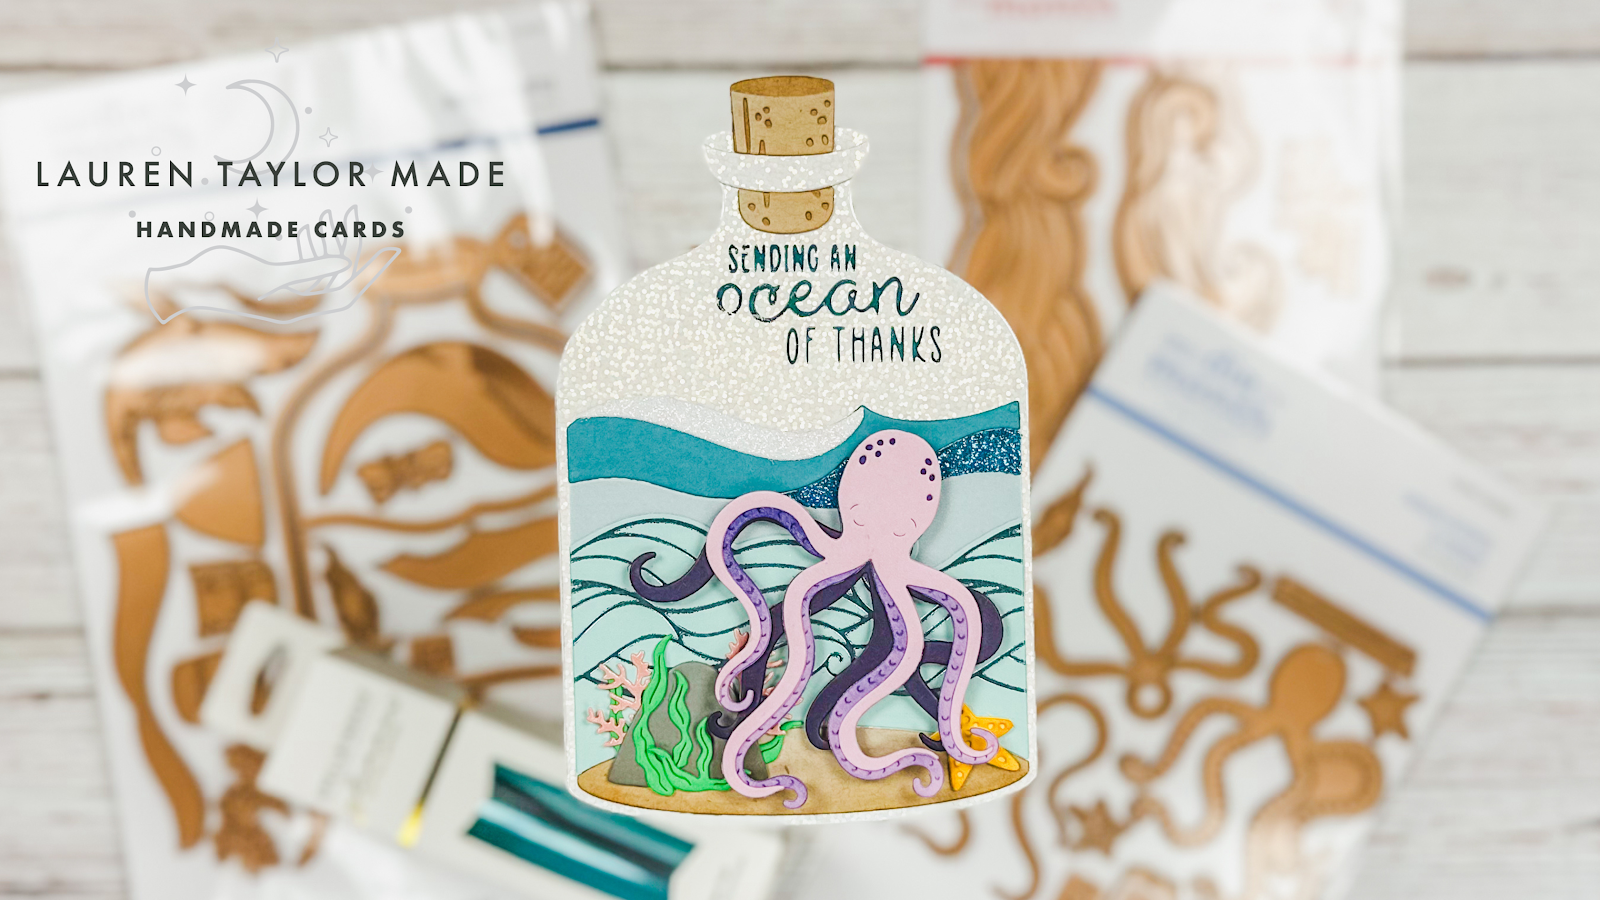
So excited for this month's kits from Spellbinders! I am a part of the Influencer Team for the Clear Stamp and Die of the Month (you can see my post and video here), but I received the Glimmer, Die and Large Die Kits of the Month with my own cash, because I just love this month's theme. I started with creating a shaped card base using the large bottle die. I made sure to leave a gap so I still had a fold on my card.
Next I die cut lots of different pieces from both die kits - I used a mix of scrap cardstocks and my Your Paper Insider Boxes. I also hot foiled some waves on some blue cardstock to tie in also the kits together for this project. There is a little bit of ink blending on my sandy bottom, rock, starfish and octopus. I thought about making it interactive, but I wanted to make sure the legs stay "inside" the bottle.
As I hot foiled my sentiment on the front of the card, I thought I'd use my Clear Stamp of the Month on the inside of the card. It fits really well along the bottom of the bottle and I stamped with brown ink. I hope this card inspires you and you're having lots of fun with the Spellbinders kits this month! I just love water images and dies, so these are a must have in my book.
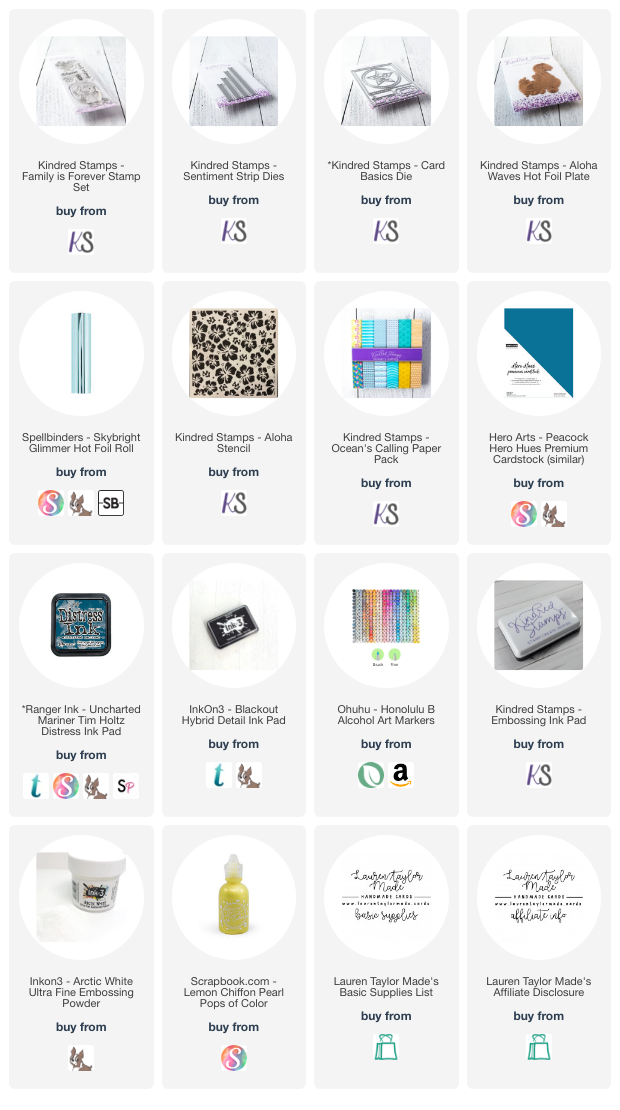
Aloha! Kindred Stamps released some new tropical themed products recently and I wanted to match them to one of my favorite sets, Family is Forever. This stamp set is retired, but comes back every once in a while so make sure you're in the Kindred Stamps Fan Club to keep up to date on restocks. This card is on the simple side, so I have an Instagram Reels down below so you can see some of the steps of how it came together.
I started with hot foiling the Aloha Waves Hot Foil Plate with some blue foil and then stenciled on blue ink with the Aloha Stencil. I layered some patterned paper behind my stenciled background and added my cute images from the Family is Forever stamp set that are colored in with Ohuhu Art Markers. After adding them on with foam adhesive, I also added my embossed sentiment with foam adhesive. Final touches are some yellow Pops of Color to tie in with my little girl's dress. I hope you like today's inspiration and you get a little crafty yourself today!