You're My Favorite with Pretty Pink Posh + Exciting Design Team News!

Wednesday, December 28, 2022

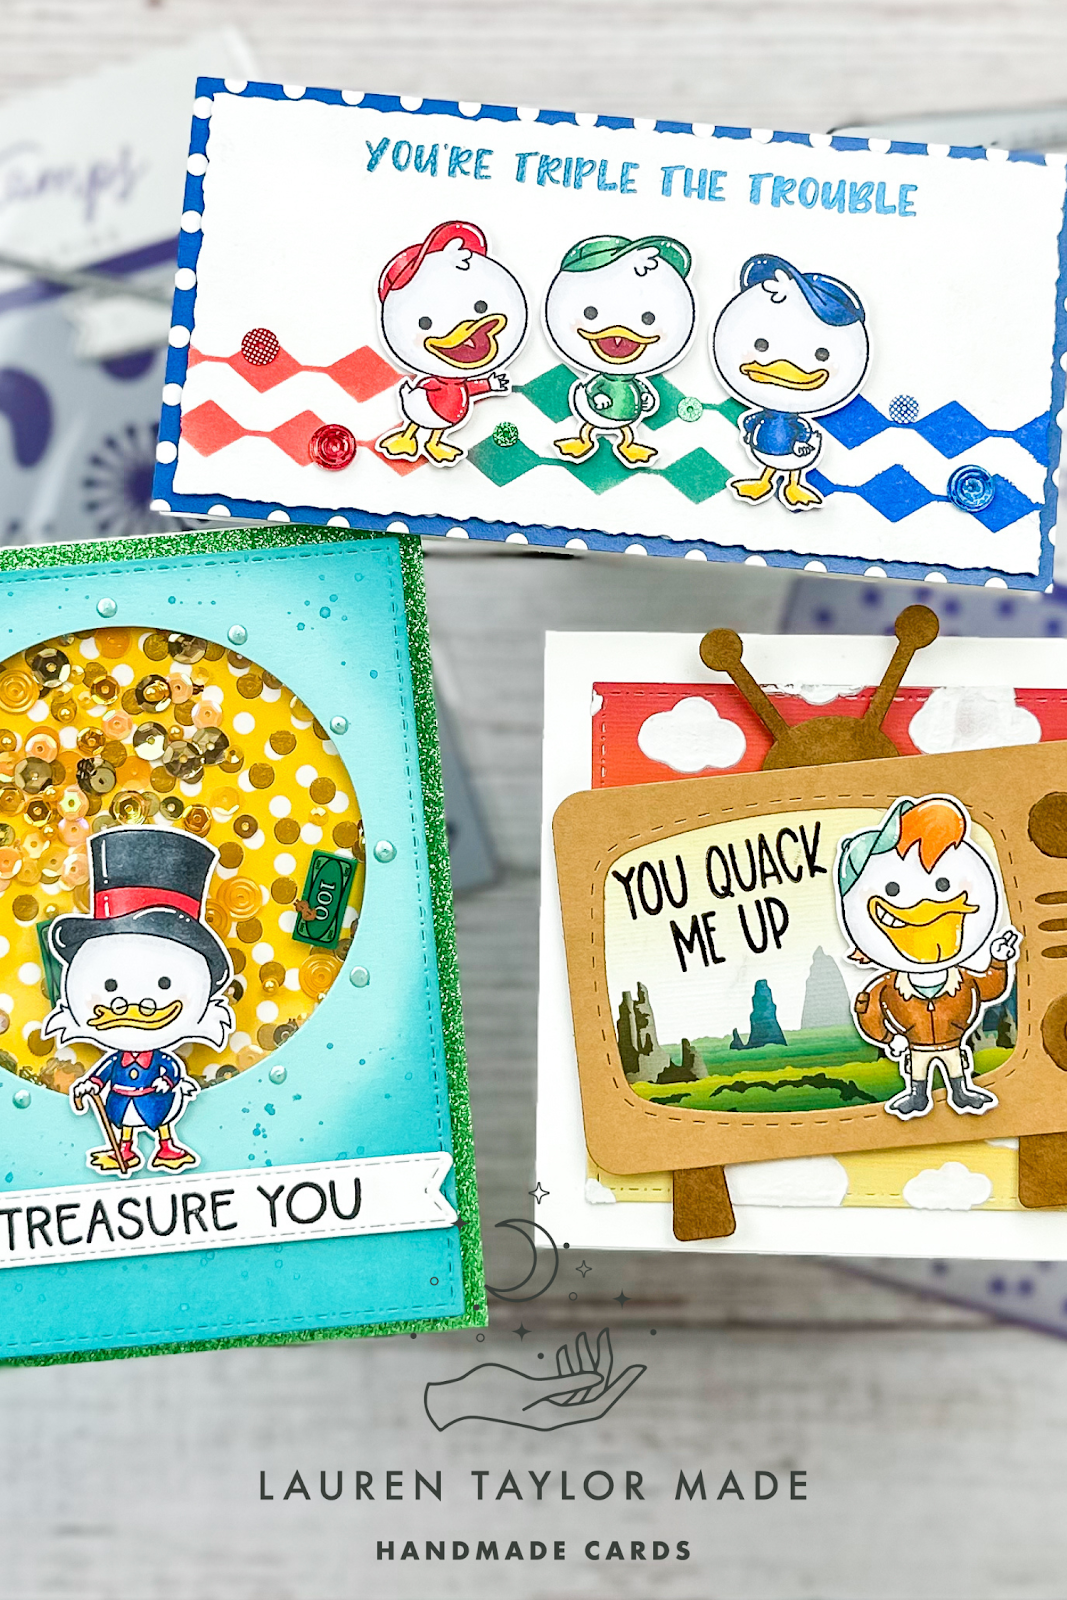
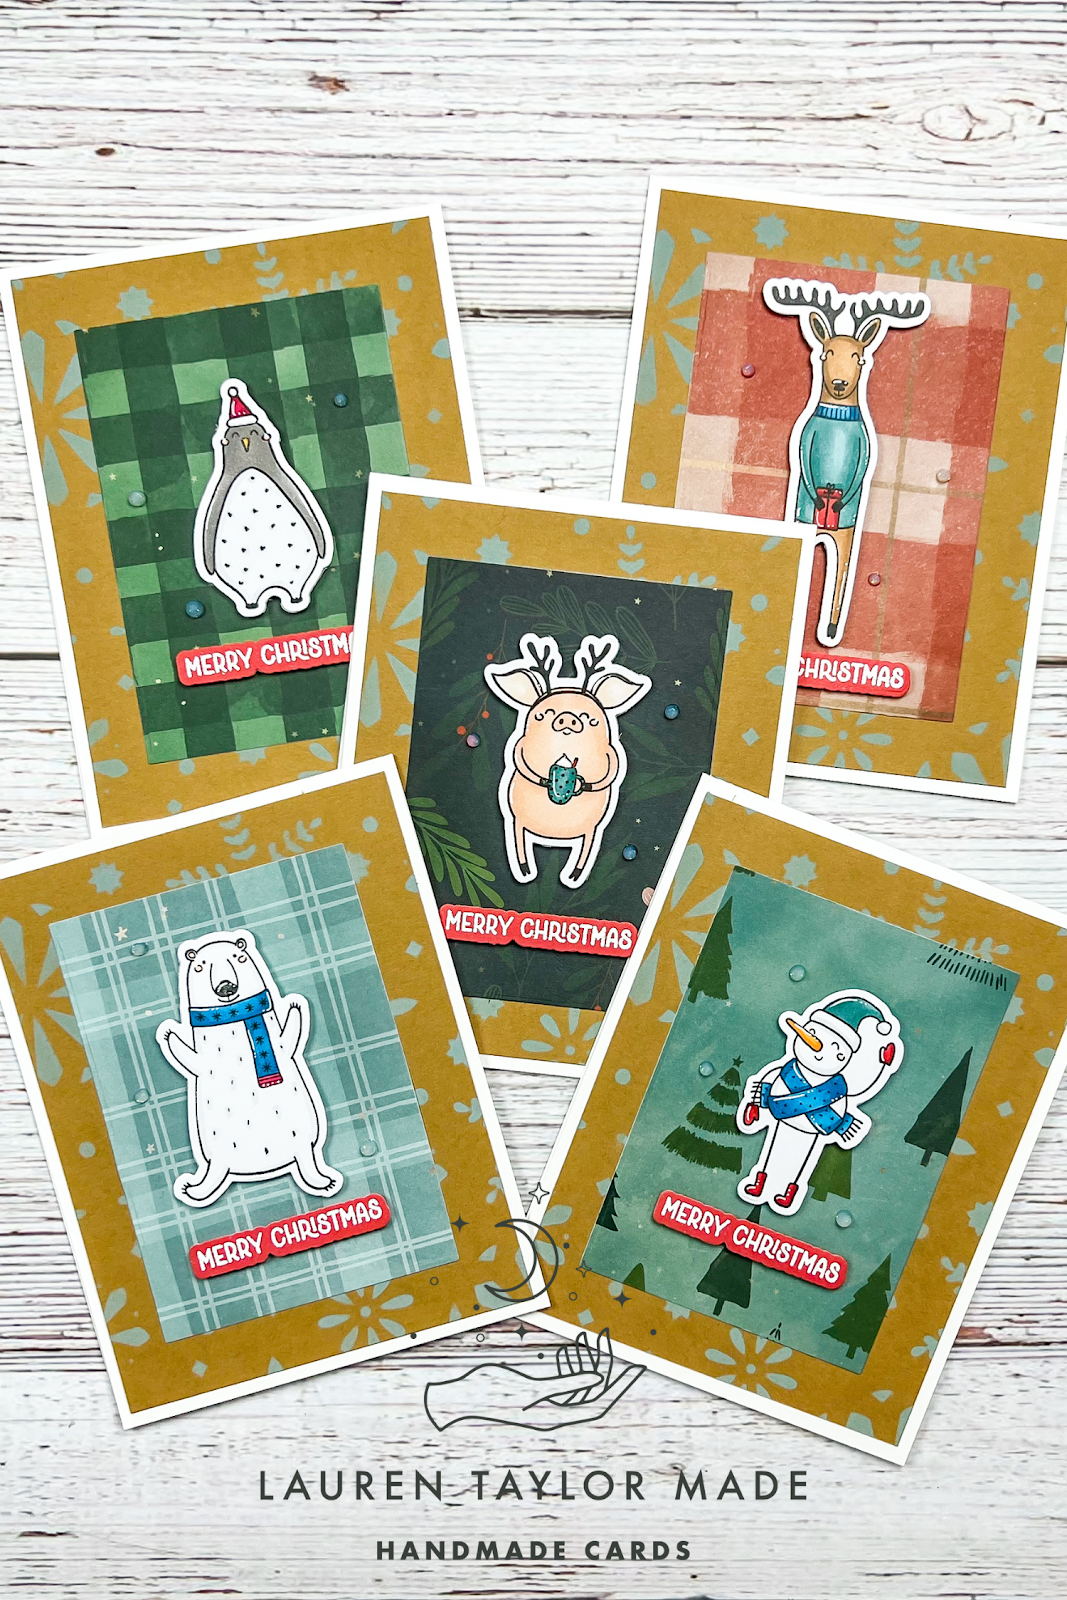
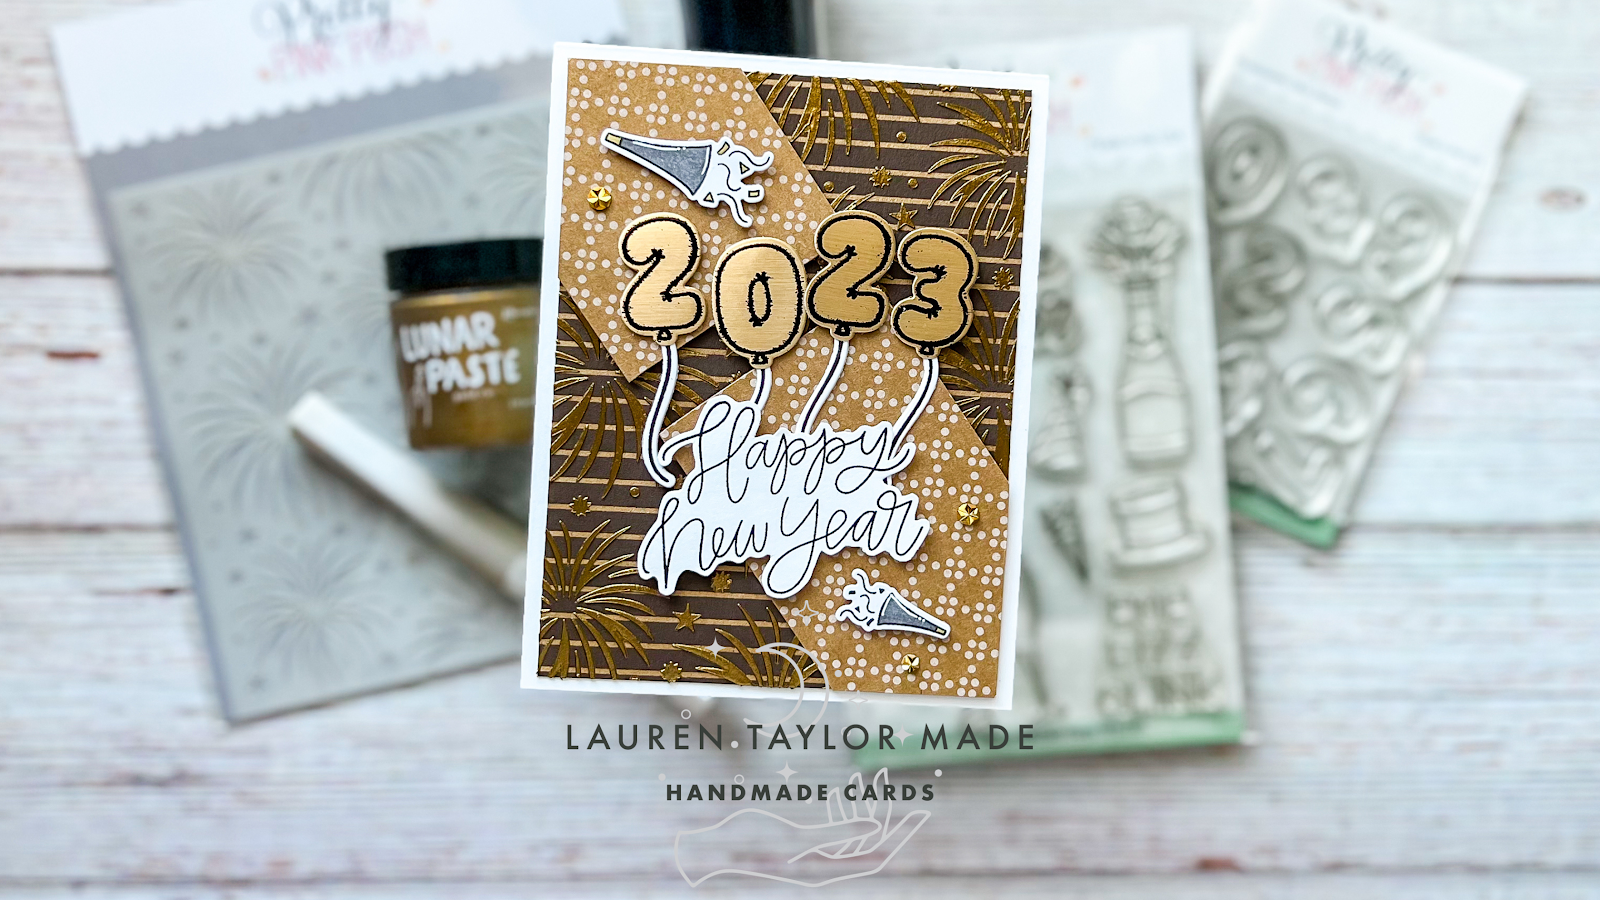
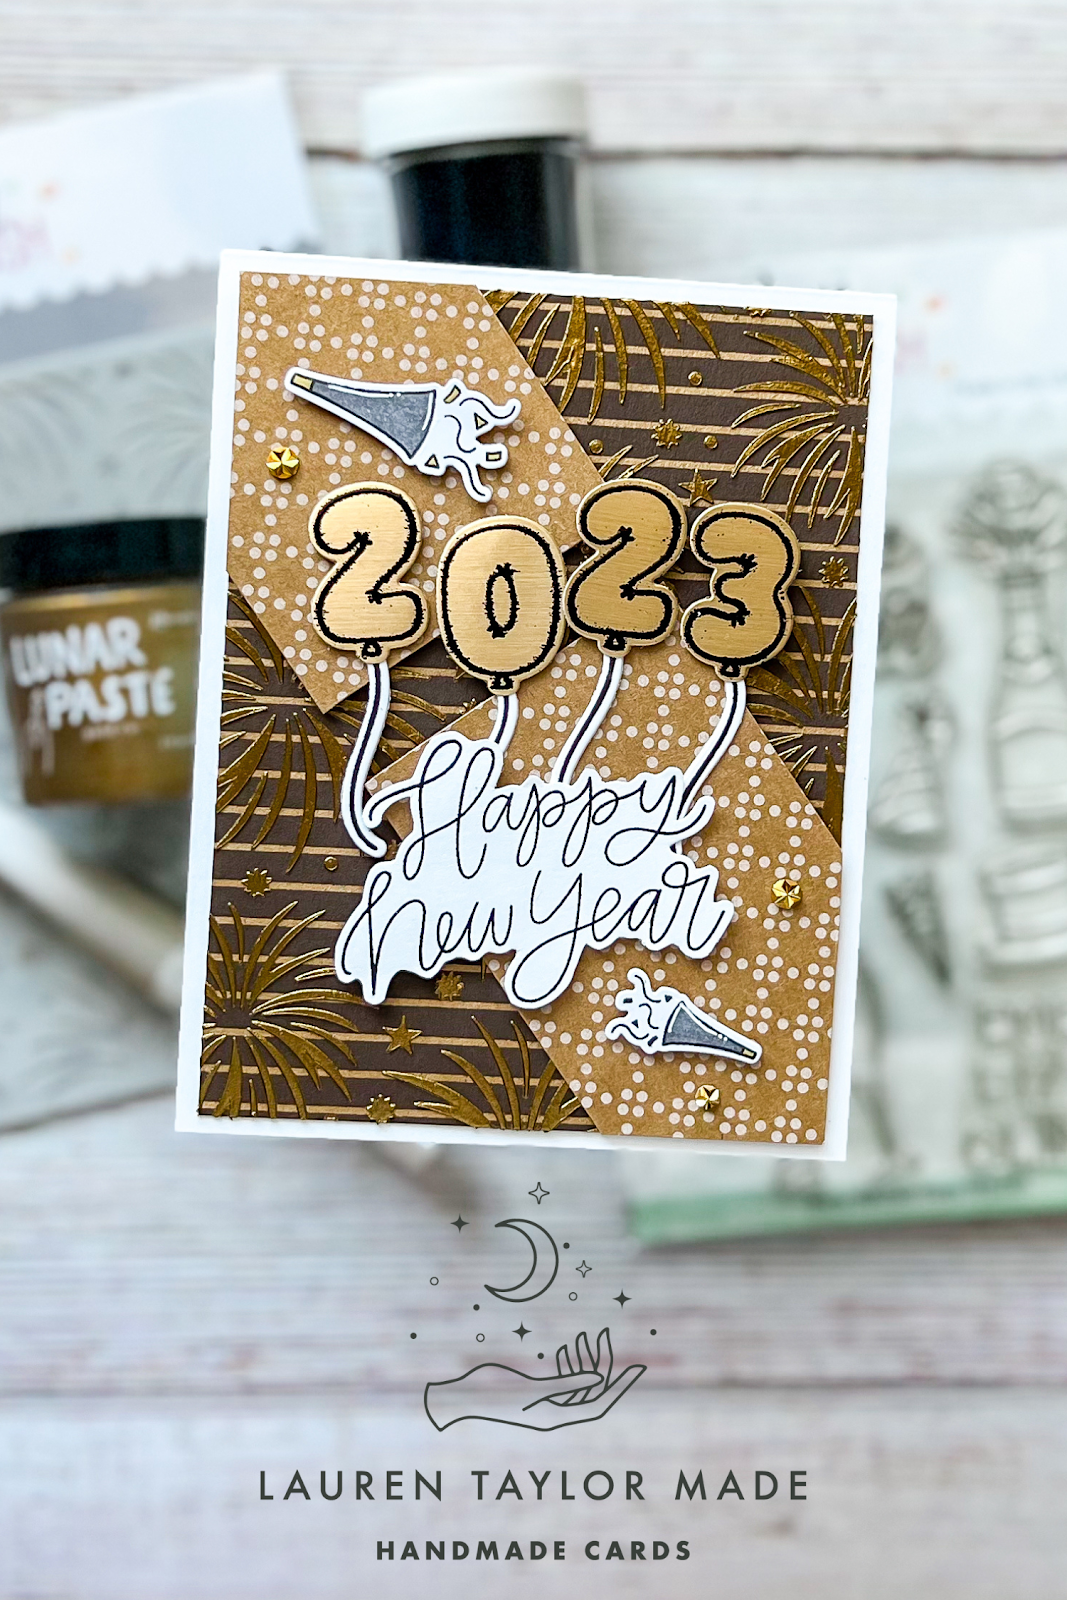
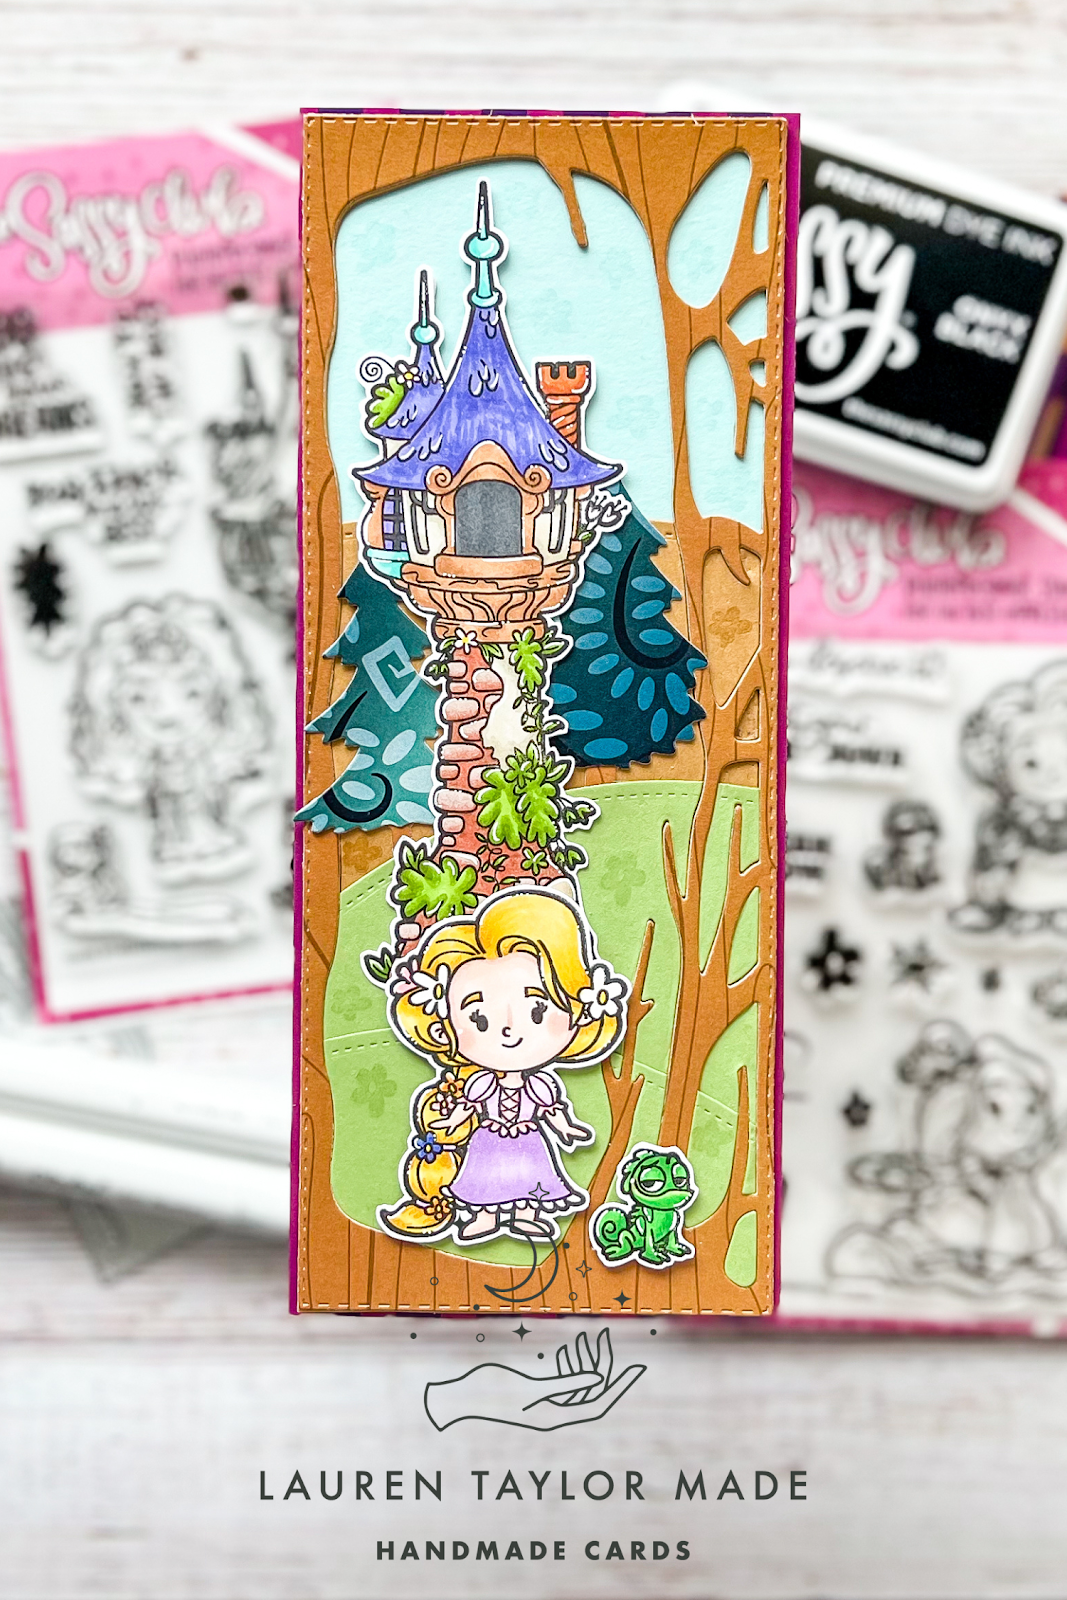
I know I said I wasn't going to post after Christmas until the new year... Well, today is my last post as a Pretty Pink Posh Guest Designer... BUT, I am going to be a full fledged Design Team Member starting in January! I will be on their video team and I am SO EXCITED. I just love Paulina's company and products, so this is going to be a lot of fun. I'm starting to swing into Valentine's Day mode so I thought it would be fun to create a Valentine's Day card to share today to celebrate this announcement.

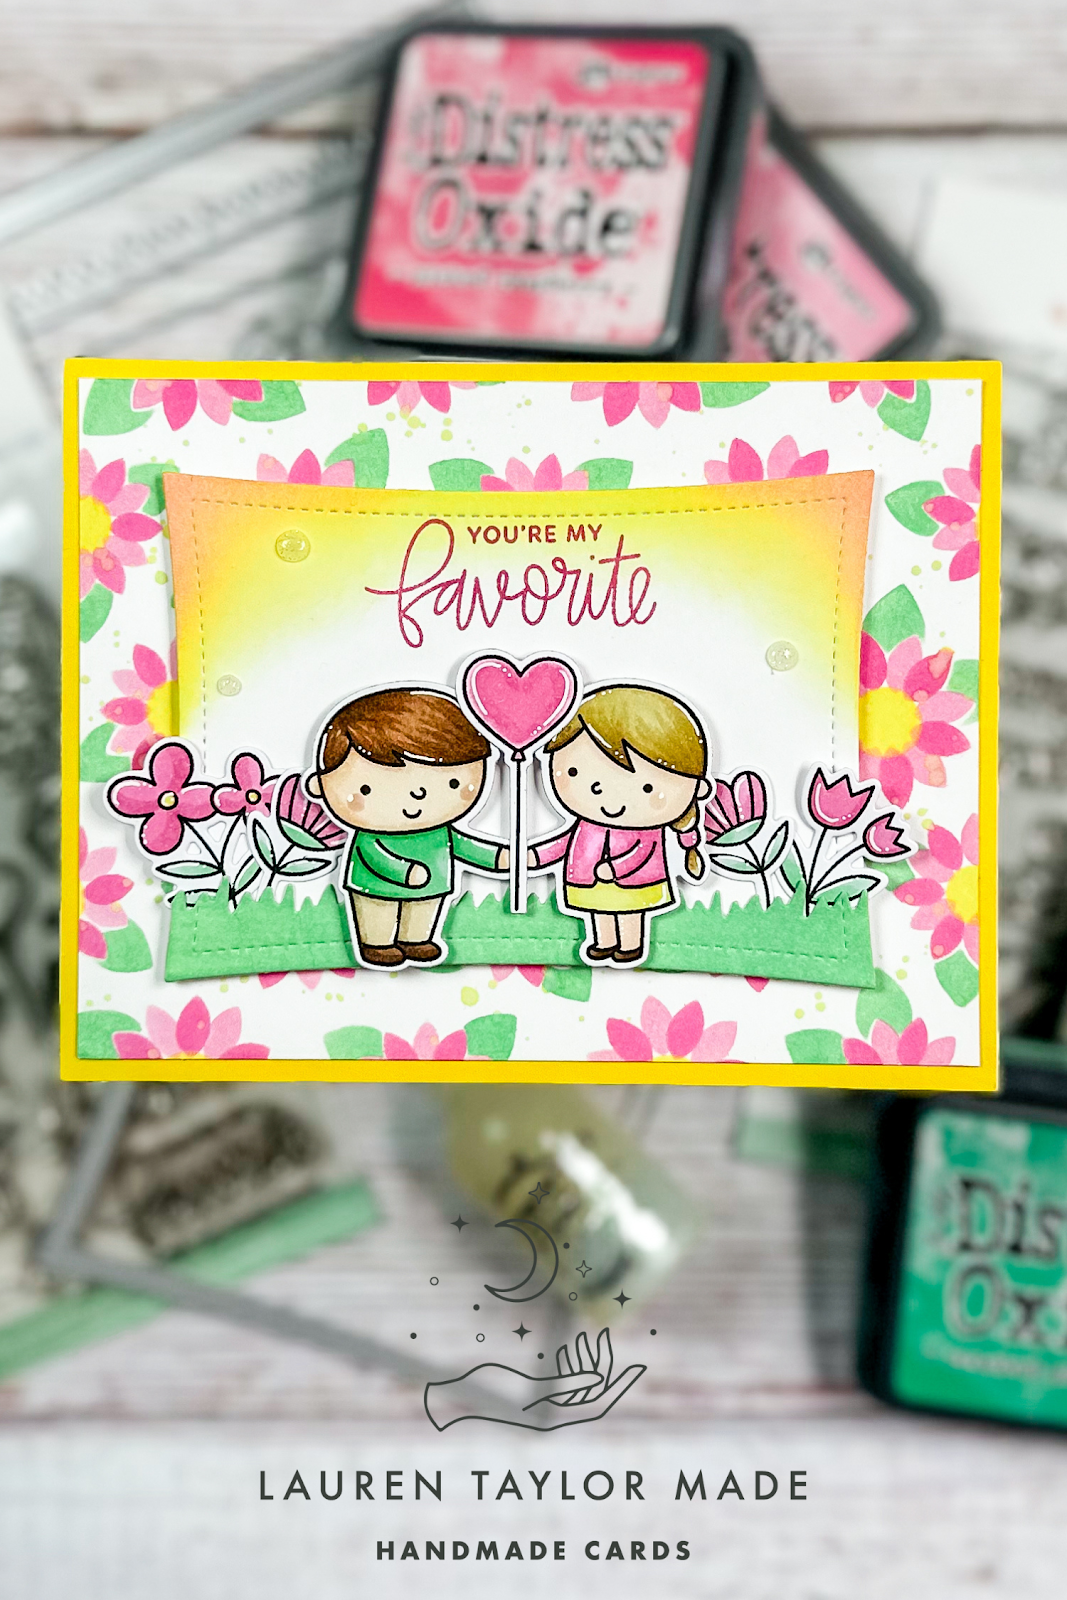
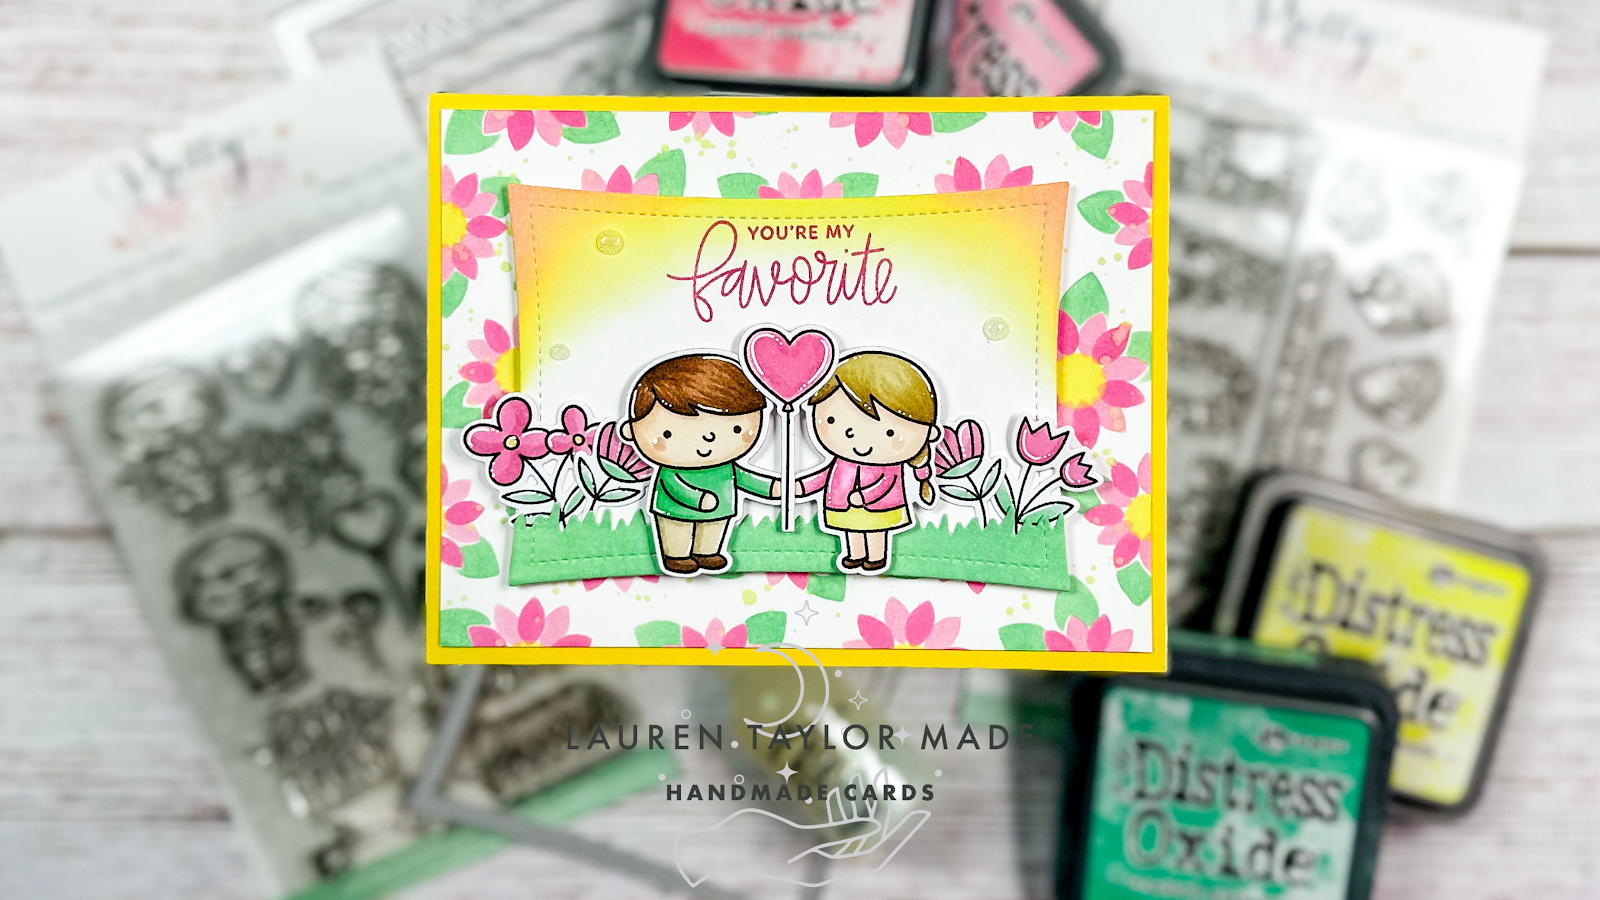
"You're my favorite" is something my family says all the time to each other - so I wanted to recreate a scene with this sentiment with my husband for Valentine's Day. I started with stenciling my background using the Layered Sunflowers with pinks, yellow and green. I used these colors to inspire the rest of my card! I trimmed down the background, layered it onto yellow cardstock and then onto my card base.

I die cut more white cardstock with one of the wonky stitched rectangle dies and added some yellow and pink to create a sky. My sentiment was stamped in a pink ink that went really well with the background. I die cut the grass border from Nature Essentials and the same wonky die to add a border and some dimension. I colored it with the same green Distress Oxide and glued it to the bottom of the other die cut piece.

After stamping, coloring and die cutting out all of my images, I tucked in the flowers behind the grass and popped up my cute couple and their balloon to the wonky rectangle. The wonky rectangle was also popped up to the background and card base. I am looking forward to 2023 and creating inspiration for you with Pretty Pink Posh! Make sure to also check out their blog today for a chance to win a $100 gift certificate!

PIN THIS
SUPPLY LIST

Read More

Happy New Year Shaker Card with Heffy Doodle

Sunday, December 25, 2022

It's Christmas and I'm so happy to spend time with my family this weekend! I wanted to share one more card before taking some time off from blogging and posting and that is my latest Heffy Doodle video project. I created this shaker card using the Royal Mist Sparkle Mix as inspiration so there is a lot of gold and purple on this card.

In my video today,I share the stenciling, die cutting and how I assembled this shaker card. I hope you enjoy this last video of 2022 (and post, too) from me. I wish you all a wonderful holiday weekend and a happy new year! I will have projects ready to share with you after the end of the year, but hugs to you all and thank you for all your support this year.

VIDEO TUTORIAL


PIN THIS
SUPPLY LIST

Read More

Magic Mouse Christmas Sweater with The Sassy Club

Saturday, December 24, 2022

It's "Die-mas" over on The Sassy Club Shop and I was so excited to get my order this week. I wanted to try everything so I combined quite a bit on one card. There is some heat foiling with Deco Foil, die cutting and of course a matching magical mouse that inspired the colors for the rest of the card.

My mouse is stamped with the Onyx Black ink and colored in with Ohuhu markers. I made my foiled background and while it didn't turn out perfect (I'm still figuring out best heat/time/shim situation), a lot of the blemishes were covered by the giant sweater I added. I layered on the die cut frame, then the sweater and finished it off with my stamped image, sentiment and some glitter Pops of Color.

The sweater was also colored with a marker to darken the cuffs and I sprayed it with Gold Glitter Dust Spray. The picture doesn't pick it up, but there is a beautiful shine on the sweater in the light! You can see how this card background comes together by watching my video down below or over on TikTok. Wishing you a Merry Christmas Eve!

VIDEO TUTORIAL


PIN THIS
SUPPLY LIST

Read More

Triple the Trouble Duck Cards from Kindred Stamps

Friday, December 23, 2022

Anyone else grow up watching the magical mouse afternoon shows? These fandom characters are so cute and so fun to color! I used my Ohuhu Art Markers and I am just loving them. They are blending really well together and I'm coming up with pretty good combinations so I'm definitely excited to use them next year for Color & Chat videos.

For this trio of cards, I used every single stamp set - some of the sentiments are on the inside of the card and you'll have to go swipe through on my Instagram to see inside. I started with stamping all of my characters, colored them in and fussy cut them out. Kindred does sell a cut file for these stamps if you prefer to have your machine cut them for you, but I went with just fussy cutting.

For my rich duck shaker card, I wanted to create his vault of money so I grabbed some yellow patterned paper and stenciled on some gold circles. I used Sparkle Blends (Show Me the Money and A Cold One) to create a gold coin, dollars and gems as the shaker bits and made the top of the shaker look like his blue-ish vault by inking around the circle die cut window and added some Pops of Color to be the bolts around the vault door. I layered the shaker on top of some sparkly green paper and added my image and sentiment with thin foam adhesive squares.

The three trouble makers mini slimline card was the easiest card of the batch. I used a stencil and inked across the card with the three colors of each duck's outfit. I embossed the sentiment in a shiny blue and layered the cardstock on top of some blue patterned paper with foam adhesive. I popped up these triplets with thin foam adhesive and grabbed random sequins to match across the stenciled shapes (Show Me the Money and Apple for Teacher Sparkle Blends).

For the square card, I wanted to give a feel of like you're watching the show on tv after school! I die cut a square from patterned paper and aded some white clouds as this duck is an aviator. I put together my tv die cuts using kraft paper and I inked any of the pieces I assembled onto the main rectangle die cut. I stamped my sentiment and then popped up my assembled tv die cut onto the background after gluing it to the center of the card base. I used thin foam squares to add my pilot duck and that finishes the three cards!

I linked everything I could down below - with Kindred Stamps, some times items sell out really quick and once they're gone... they're gone. But that doesn't mean they won't come back when Kindred opens the vault every once in a while!

PIN THIS
SUPPLY LIST

Read More

Cheers! Snowflake Card with Scrapbook.com

Thursday, December 22, 2022

Sometimes I forget how making an ink squishing background is so easy yet so beautiful! I love that no card can ever be the same and just how fun Distress Oxides are with this technique. I started with embossing snowflakes to a piece of cardstock that was trimmed with my Tim Holtz deckle cutter. Using three different blues, I squished the ink onto the background and used my heat gun to dry the layers in between colors.

I adhered it to the card base with foam adhesive once it was dry and layered on snowflake die cuts in blue and silver. The sentiment is tamped and fussy cut out and adhered on top of the snowflakes. Finally, I added touches of Pops of Color to bring out more of the dark blue hues.

Make sure you check out my Instagram Reels (below) or my TikTok to see how I created this background in a short video today. I think this card turned out so pretty and can be used for New Years or a birthday celebration during the winter time. Or Christmas if you're still making those. 😉

VIDEO TUTORIAL


PIN THIS
SUPPLY LIST

Read More

Quick & Simple Christmas Cards with Scrapbook.com

Wednesday, December 21, 2022

I was 20 Christmas card short! I couldn't believe it... With Christmas QUICKLY approaching, I knew I needed to make some quick and easy cards so I could get them in the mail ASAP. I dug through my Scrapbook.com supplies and picked out a couple stamp sets, a stencil and patterned paper that I thought would work well together.

The stamp set Christmas Friends (coming soon) had five images that I knew I could color quickly and simply and still look super cute. So I stamped a bunch out and colored them in with my Ohuhu markers. The stamp set also has matching dies (YAY!) so I was able to quickly die cut them out. There are not any sentiments in this set, so I used Christmas Carolers to emboss the sentiment on red cardstock and used its matching die (YAY!) to cut them all out, too.

The critters and sentiment were popped up onto a piece of patterned paper that I die cut using my nested A2 rectangles. I grabbed some kraft cardstock and stenciled on some snowflakes with Salvaged Patina Distress Oxide, glued this background to A2 card bases and finally glued my patterned paper with my stamped images to the background. I added some final touches of Pops of Color for some shine and was really happy with how quickly I was able to finish 20 cards!

I am excited to be done with Christmas cards for now and I think I'm all set on New Years Day cards... But I will probably still make a few winter cards for January birthdays this week before I move onto Valentine's Day crafting!

PIN THIS
SUPPLY LIST

Read More

New Years Cards with Pretty Pink Posh

Tuesday, December 20, 2022

When I saw December's SheetLoad of Cards, I was really intrigued by the sketch! I liked the diagonal cardstock piece and thought it would be fun to use this layout for more Happy New Year cards. I like to make NY cards to use thank you cards after the holidays and in case I missed sending anyone a Christmas card.

I went pretty bold by using kraft cardstock with white, grey and lots of gold. I thought it would be fun to create gold, mylar balloons with the Balloon Numbers stamp from Pretty Pink Posh and then used the sentiment and party horns from the Happy New Year stamp set. Watch my video down below to see how I stenciled my fireworks background, stamped and die cut all my images and then finally card assembly of one of the twelve cards I made following the sketch!

VIDEO TUTORIAL


PIN THIS
SUPPLY LIST

Read More

Warm Hugs for the Holidays with Heffy Doodle

Monday, December 19, 2022

Can you believe that Christmas is at the end of this week? I'm so happy to have all my shopping and gift wrapping done, but it's still coming so quickly. I have another winter holiday cards to share - it's not very Christmas-y so this inspiration can be used for anything around this time of year. Or if you remove the candy cane, it really can be inspiration for any time of year.

I stamped my images in brown ink colored them with Ohuhu markers and die cut them with their matching dies, but the rest of the assembly can be seen in the Instagram Reels video down below (or you can also see it on my TikTok). I'm hoping to bring you more Reels this week so I can get some tutorials out but with shorter videos (and easier editing) as I'll be taking next week off from posting.

Wishing you merry week with lots of holiday fun!

VIDEO TUTORIAL


PIN THIS
SUPPLY LIST

Read More

Pretty Hair Slimline Card with The Sassy Club

Saturday, December 17, 2022

Have you seen The Sassy Club's latest stamp release? She has adorable fandom stamps for this long haired princess and I wanted to make a slimline card featuring this princess, her little friend and a tall tower. I also used my new set of Ohuhu Markers to I can learn combinations to share with you next year for my Color & Chat videos.

I started with stamping my images and colored them in - I love my princess coloring as well as my little chameleon! I still need to work on my combinations for the tower, but I think it looks pretty good. I created my scene using hill dies as well as the new Stitched Forest Dies from The Sassy Club. I layered them to create a scene and I included die cut trees (as well as the frame die) from the Enchanted 4x9 paper pad.

Once I got my background all set up, I added my princess and chameleon with thin foam adhesive as I had lots of layers of paper, I didn't want it to be too bulky. I wanted to add more to the card, so I grabbed a couple of the flowers from the Pretty Hair stamp set and stamped them with VersaMark so it would give a ton on tone look with the flowers on the cardstock.

I'm going to definitely color another long haired princess and will share my color combination since I really liked how it turned out. I hope this card inspires you and you're having a wonderful weekend.

PIN THIS
SUPPLY LIST

Read More

Craft Roulette: Corgi Hugs with Artful Angel

Friday, December 16, 2022

What a funn night tonight! I was the guest crafter on Craft Roulette with my friend Amanda from Pear Blossom Press as the guest host as Mary is recovering. If you missed the episode, you can watch it down below. The parameters were luckily not too bad for having to craft during the episode and I think my card turned out pretty darn cute!

We had to make a "joy fold" card which I had never heard of before! Turns out it's a lot like a tri-panel or tri-fold card so I made a side folding A2 card, then trimmed down another side folding A2 card down to 4x5-1/4" (when folded). I glued this smaller card in the opposite opening direction inside of the larger card to create my "joy fold" card.

I die cut a circle from the front panel and adhered patterned paper on the second panel. I layered another piece of patterned paper with a larger circle die cut on the front panel - these are my fall colors as well as ombre where were two of today's parameters. I stamped my cute, smiling corgi and colored her in with my Ohuhu markers. I used foam adhesive to adhere the cutie inside the circle and stamped my sentiments.

My sentiment is die cut from ombre patterned paper and I added a little extra color with Distress Oxide. I layered it with kraft cardstock to create a drop shadow effect. I adhered this sentiment to the front of the card, just under the circle. Final touches are adding some Pops of Color and I also stenciled some paw prints after the show because I felt like there was just something missing from the card.

I hope you had as much fun as I did tonight and I cannot wait to see what everyone makes this weekend!

VIDEO TUTORIAL


PIN THIS
SUPPLY LIST

Read More