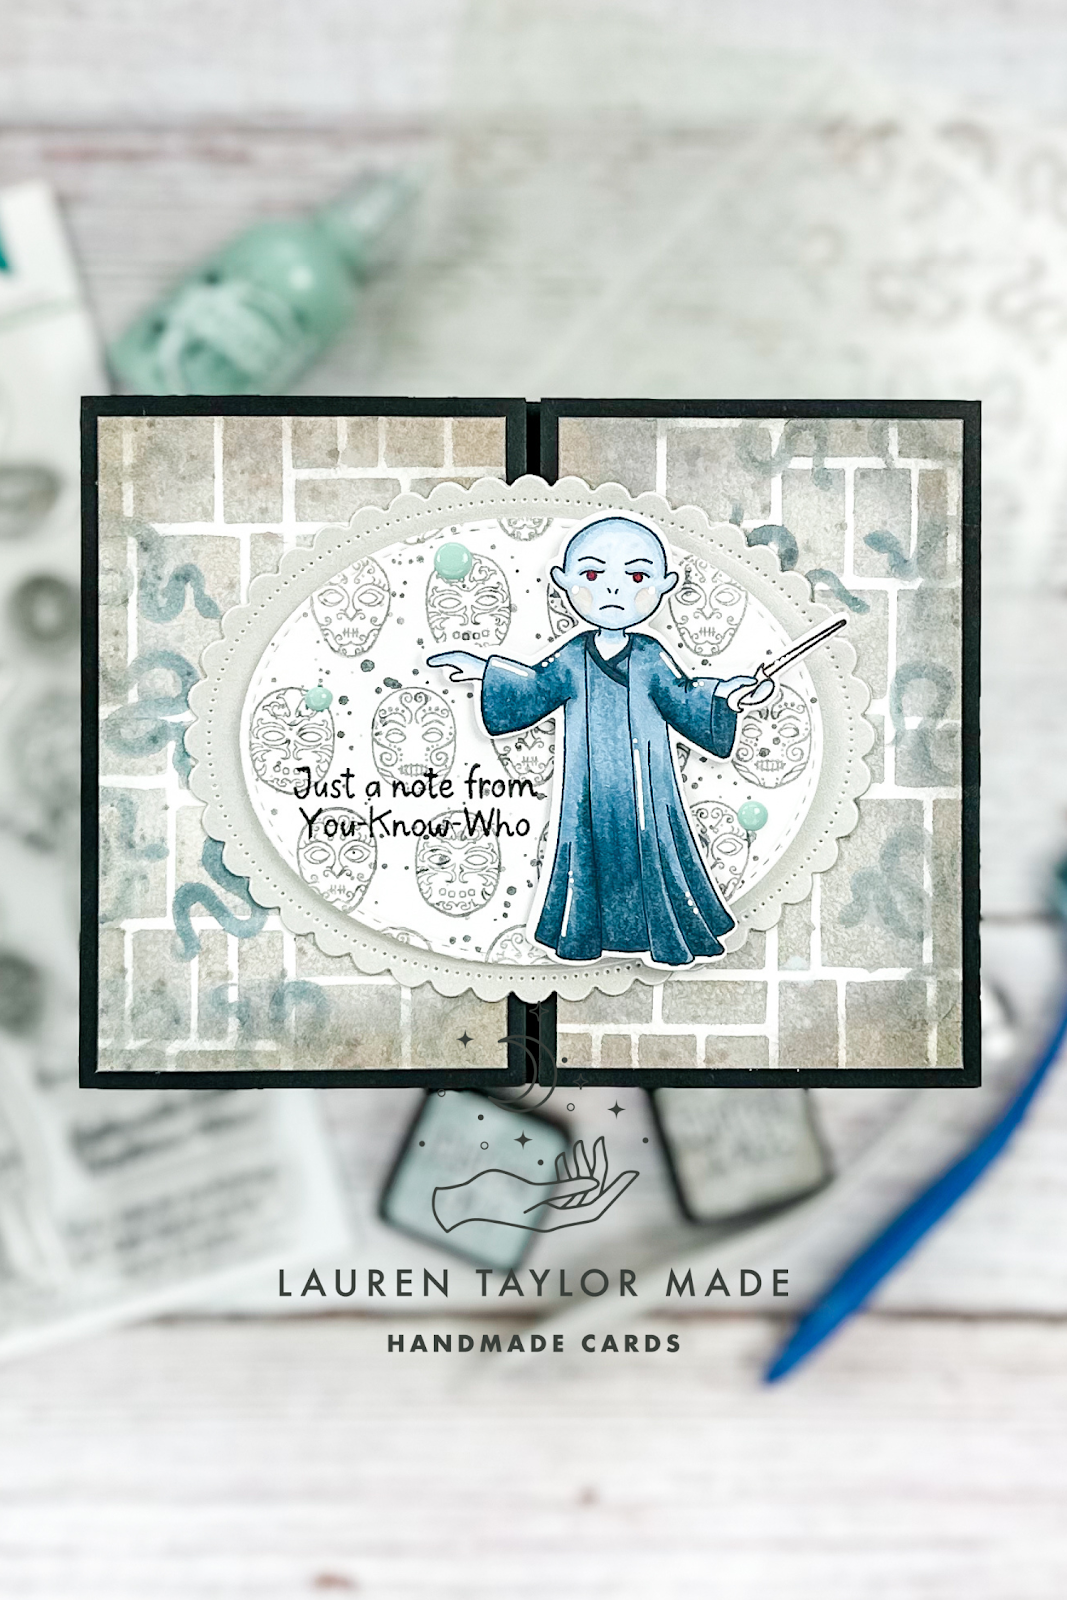
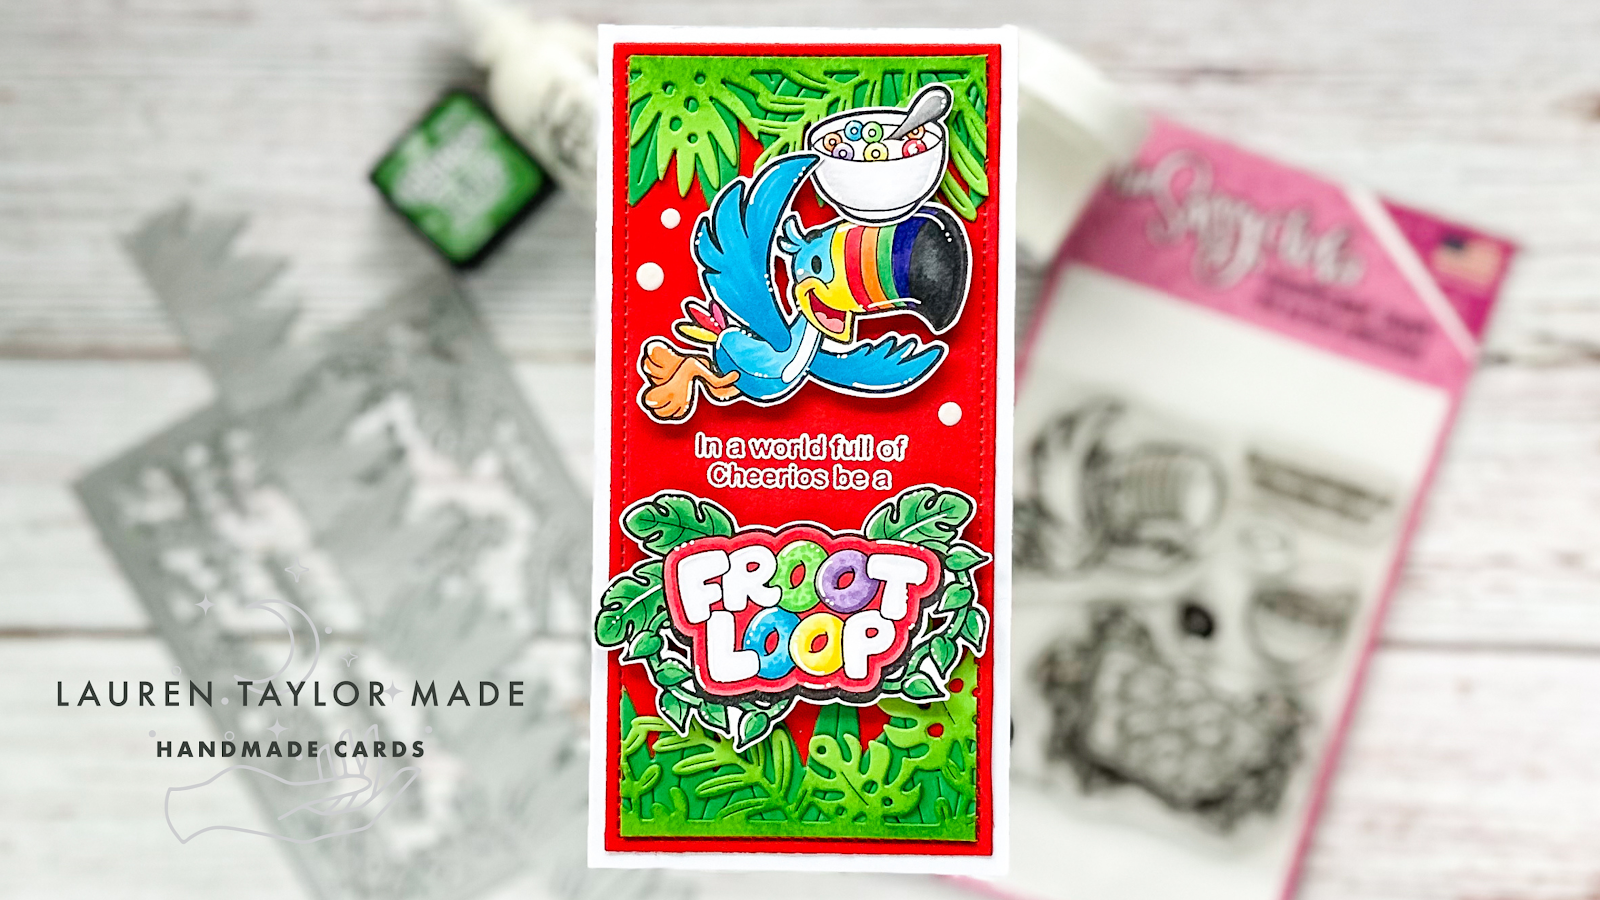
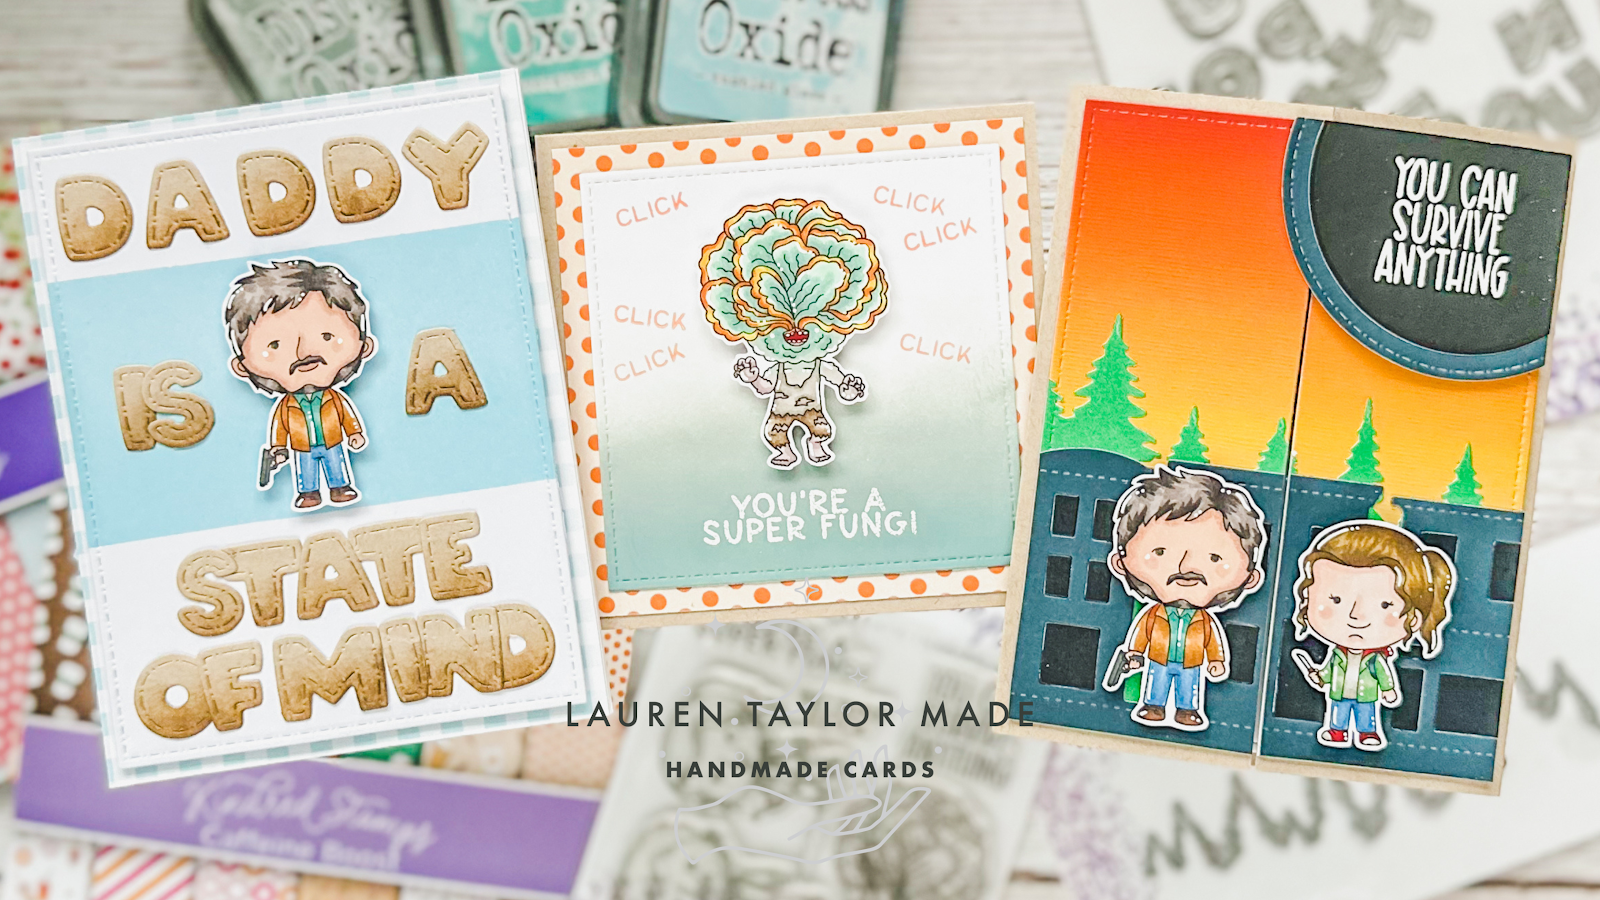
Hello Floral Shaker Card with Pinkfresh Studio Joyful Peonies

Friday, May 26, 2023

We're having some fun with crafty friends today! It's time for our next Card Hoppin' theme and YouTube hop. This month we're creating shaker cards with either vellum or tulle along with flowers. I decided to make my shaker card with vellum and created soft florals with some new products for me from Pinkfresh Studio. Before I started filming, I hot foiled my flowers onto white cardstock with Silver Glimmer Hot Foil. I thought the silver foil with the soft colors would be so pretty together and it really turned out so beautiful!

In my video today, you'll see how I used the coordinating stencils of the Pinkfresh Studio Joyful Peonies to color in my florals and I die cut the florals out with the coordinating die. I used soft colored cardstocks and vellum from my Your Paper Insider boxes that I thought completed the colors really well. The sequins are a retired Sparkle Blends mix and I love the subtle color that peeks through the vellum. I hope you'll join me over on YouTube and hop along to see this month's inspiration! 

VIDEO TUTORIAL


PIN THIS
SUPPLY LIST

Read More

North Pole Christmas Shaker Card with Heffy Doodle

Thursday, May 25, 2023

It's the 25th of the Month and I have some Christmas inspiration to share today! It's a shaker card with an adorable scene using Heffy Doodle products. The shaker blend is a retired Sparkle Blend, but I have some alternatives you could use in my supply list below. In my video today, I share how I added color and texture to my snowy hills, created the shaker and assembling the colored images to my card.

I hope you enjoy today's video and let me know in the comments if you also make Christmas cards throughout the year! You can find all my Christmas inspiration by clicking on the tag "christmas" above this blog post or over on the right side of my blog. 

VIDEO TUTORIAL


PIN THIS
SUPPLY LIST

Read More

You're the Berry Best with Scrapbook.com

Wednesday, May 24, 2023

I have another sweet berry card using products from Scrapbook.com! I just love this collection of products and how well they coordinate with each other. I started with die cutting a background of pink gingham from the Berry Sweet A2 Patterned Paper Pad with my Nested A2 Rectangles. Using the Mini Hearts Stencil, I added some small hearts with Lumberjack Plaid Distress Oxide. I used a domed foam blender to add the soft Piggyback Simon Hurley Ink around the four edges, then shifted my stencil to add more hearts with Cloud Whip. I also splattered on some metallic watercolor to give it some subtle shine!

While my background was drying, I stamped my images from the Berry Sweet Stamp Set in an alcohol marker friendly brown ink and colored them in with my Ohuhu Art Markers. I fussy cut them out and then die cut the label and some leaves from the Berry Sweet Die Set. I used a few pink Ohuhu Art Markers to color the edge of my label and stamped my sentiment from the Berry Sweet Stamp Set. To get the ombre look of the "berry" part of the sentiment, I stamped it first in Piggyback, then using the same domed foam blender, I added Lumberjack Plaid just to the lower part of the stamp. Using a MISTI helps with making sure you get it lined up perfectly!

After my background was dry, I stayed the XOXO sentiment from Sweet Heart in both Piggyback and Lumberjack Plaid in different spots around the background. I glued it down to an A2 card base and started planning out my layout of the leaves, flowers and strawberries. Once I had a layout I liked I added the sentiment label to the card with foam adhesive. Then I added the leaves and flowers with wet glue. For the berries, I added them with foam adhesive and wet glue where they overlapped the label and each other.

For some final touches, I used a white gel pen to add highlights around my label and stamped images. I thought it gave them a nice, glossy look. I also added some Pops of Color in Chocolate Gloss to the upper left and lower right of the card. I think this would also be perfect to make chocolate dipped strawberries and I'm definitely going to try that next! I hope you enjoyed this berry-licious card!

PIN THIS
SUPPLY LIST

Read More

Cereally Tropical Toucan Mini Slimline Card with The Sassy Club

Tuesday, May 23, 2023

I am living for the cereal fandom stamp sets from The Sassy Club! If you missed my earlier post about a lucky cereal, you can find it here. But we're getting tropical with this blue toucan today! I started with stamping out my images in alcohol friendly black ink and cardstock, then colored them in with my Ohuhu Art Markers. I decided to fussy cut them out and used my Gyro-Cut on the spaces inbetween.

My card base is a mini slimline and I went with a 3x6" for this card as it layered well with the Small Mini Slimline dies from Lawn Fawn. I also die cut some tropical leaves from dark and light green cardstock. I added a bit of Mowed Lawn Distress Ink to the lighter green leaves and glued them on top of the dark green. This gave a nice border to the top and bottom of my red background. I tried to keep the colors similar to the cereal box and wanted the red to really pop in the background.

Once my leaves were glued down, I embossed the sentiment in the middle of the card with white embossing powder. I like to use an ultra fine embossing powder on sentiments to make sure you can read it and I like that it pops off the red just like my ceral name image! The images were popped up onto the card base with foam adhesive and I decided to add a few white Pops of Color to balance a bit more on the top to match the balance of images on the bottom.

I hope you like this fun, mini slimline card! My daughter begged for this cereal last time we were at the store because she saw the toucan so now I'm off to enjoy a bowl myself.

PIN THIS
SUPPLY LIST

Read More

Ambitious House Gang with Miss Ink Stamps

Monday, May 22, 2023

I'm going to need new grey alcohol markers after all the coloring of house robes I've been doing lately! I stamped this trio from the Mischief Makers stamp set from Miss Ink Stamps and colored them in with my Ohuhu Art Markers. I also used my Ranger Alcohol Inks and Alloys to create a unique background and you can see how it came together in today's process video.

Using the new Snakes Stencil, I created another background design with Fake Plant Lunar Paste onto a black piece of cardstock. To give my background layers some interest, I used a mini scallop A2 stackable dies. I thought it would be funny to include a floating cupcake as this is a birthday card and some final touches of black Pops of Color. Check out the video below and let me know in the comments which magical school house you belong to by telling me the color and/or house traits without saying the actual name!

VIDEO TUTORIAL


PIN THIS
SUPPLY LIST

Read More

Survivors - New Release from Kindred Stamps

I am so excited to share with you the new Survivors Stamp Set from Kindred Stamps! This show was so incredibly good even not playing the video game and the main character is definitely a well known heartthrob... When I saw this new set, I just had to create with it and I am so glad I was chosen to make some sample cards for you! I have two cards inspired by this fandom and one that is based on a well known meme - I just couldn't resist.

Before making any cards, I stamped and determined the colors I wanted to use to color in my images. I stamped them all with alcohol marker friendly black ink and paper, then colored them in with my Ohuhu Art Markers. Before I fussy cut them out, I also added a few highlights with a white gel pen. I stamped two fungus zombie guys, two guy with a gun and one girl with a knife.

My first card is an A2 gate fold card that I thought would bring interest and fun when you open the card and see the fungus zombie on the inside! The base is kraft cardstock and I die cut my basic shapes with the Card Basics Dies. I used patterned paper for my sunset scene from Galactic, layered on some green cardstock that was cut with the Tree Scene, and layered dark blue buildings using the die set from the Neighborhood Friends Box. I colored the window pieces with a black marker and dropped them back in the windows.

These pieces were are all glued directly to the card base, then I popped up my two main characters. I also popped up the two pieces of the circle with my embossed sentiment that will help keep the card closed. My fungus zombie was glued onto a layer of white cardstock which was then glued to the inside of the card. I love that I have all three images on this card!

My square card is 4-1/4 x 4-1/4" of kraft cardstock and I layered some orange polka dotted patterned paper from Caffeine Boost that was trimmed to 4 x 4". I used the square die from the Card Basics Dies and added my sentiment with white embossing powder. I ink blended with Evergreen Bough Distress Oxide, Iced Spruce Distress Oxide and Picket Fence Distress Ink to create an ombre look to match the color of my fungus zombie. I glued this to the card base and then added the "click" sentiment around the fungus zombie with orange ink.

The last card is a silly card and probably my favorite just because I love this meme! I created another A2 card starting with a blue gingham background from Cherries on Top. Then I die cut the large rectangle again and added some Tumbled Glass Distress Oxide across the rectangle. My sentiment is die cut with the Stitched Alpha Dies with kraft cardstock and I added some Ground Espresso Distress Ink to darken up the letters. I added my sentiment to the card and then popped up my handsome guy on the card. This piece was also popped up onto the card base.

I hope you enjoy these cards as inspiration and you'll have some with coloring these new images. There are so many amazing new stamp sets this month, this release is just so fun!

PIN THIS
SUPPLY LIST

Read More

On a Roll Lunch Notes with Kindred Stamps

Sunday, May 21, 2023

I can't believe Abigail is entering her last two weeks of school! This year has flown by and I hope she's enjoyed all of her lunch notes - most of them were from Kindred Stamps because I was able to stamp and color so many images during the Kindred Stamps Retreat earlier this year. Maybe this summer I'll get some lunch notes made ahead of time so she has plenty for next year... 😂😂 Probably not.

For these two final notes of the year, I used the On a Roll Stamp Set and colored them in with Ohuhu Art and COPIC Markers. I used my Scan N Cut to cut out my images, but I did fussy cut them a little bit because I tried to cut in areas the Scan N Cut didn't cut. I used the square die from the Card Basics Dies to cut out some blue patterned paper from the Cherries on Top Paper Pack and white cardstock. On the white squares, I stamped the sentiments in red and blue ink.

To make some gold rings (sort of), I used the Confetti Stencil on the patterned paper with Shooting Star Lunar Paste. Once they were dry, they were adhered to the white squares and I popped up my images with foam adhesive. I really enjoyed practicing my coloring this year with the lunch notes and I was pretty good at writing down my colors as I went through each of these stamp sets. We'll see what kind of themes I'll come up with next year, but I'm glad to take a little break for the summer.

PIN THIS
SUPPLY LIST

Read More

Hello Sunshine Mini Slimline Beehive Shaker Card with Lawn Fawn

Saturday, May 20, 2023

Did anyone else buy some of the new release from Lawn Fawn?! I just fell in love with all of the bee themed products and I was excited to add to my Hive Five collection. I thought they were also perfect for yesterday's episode of Craft Roulette and it also happened to fit with the current Lawn Fawnatics Challenge! The parameters this week are slimline, tea party colors, word and hand drawn lines. I'll make sure to point out each of these parameters as I explain how this pretty mini slimline card came together!

I cut a piece of Speckled Eggshell Cardstock down to 3-1/4 x 6-1/4 for a mini slimline size and used it as my background for my card front. Next, I took a piece of yellow patterned paper that was a freebie from a previous Lawn Fawn order and die cut the Honeycomb Backdrop. I trimmed it in two pieces so it would fit across the background - there is gap but it is hidden behind my beehive! I glued the pieces down and added some Wild Honey Distress Ink around the edges and splattered on some metallic watercolor.

The shaker is made from the Magic Iris Beehive Add-On that was die cut from another freebie yellow floral piece of patterned paper. I inked the edges with Wild Honey Distress Ink and assembled the shaker in the window with clear seed beads, honeycomb clay bits and it is backed with some grey floral (also free) patterned paper. I adhered this down to cover the gap in the honeycomb on the background. I also cut the bee from the same papers as well as the wings from Pastel Pearlescent Vellum in blue. The flowers were cut from pink floral paper (again, free) and the centers from the yellow cardstock to match the honeycomb background.

I inked the edges of all my flower and bee die cut pieces with Kitsch Flaingo and Hickory Smoke Distress Ink. I assembled the bee and flowers and set them aside. The new Stitched Trails Hot Foil Plates are so cute and I foiled the heart shaped one with Mooniest Hot Glimmer Foil and used the coordinating die to cut it out. The sentiment is die cut from a green floral piece of freebie patterned paper as well as from the Green Textured Cardstock pack. I layered the two die cut pieces together with an offset and I also glued the dark green letters inside of the "sunshine" openings.

The Hello Sunshine sentiment is added to the card base using foam adhesive and wet glue where it overlapped the beehive. I added the pink flowers around the sentiment and my bee and stitched trail to the other side on the beehive. Finally, I added hand drawn lines in white gel pen around the letters of the sentiment and to add little details to my bee. There was a lot of inking and assembling for a mini slimline card, but I think it turned out so darling!

PIN THIS
SUPPLY LIST

Read More

Spellbinders May 2023 Hot Foil + Clear Stamp of the Month Birthday Balloon Card

Friday, May 19, 2023

My Spellbinders Glimmer Hot Foil Kit of the Month arrived this week! Just like last month, I wanted to create some inspiration for you of how you can partner this Glimmer Kit with the Clear Stamp and Die Kit of the Month. I decided to embrace the rainbow vibes as the Rainbow Confetti Hot Foil Roll is just so pretty. I grabbed my Scrapbook.com Rainbow 6x8 Patterned Paper Pad, my Ohuhu Art Markers and got to creating!

I started with hot foiling my Happy Birthday sentiment on some smooth cardstock and used the coordinating dies to cut around the sentiment and the balloon image. I cut around the die cut image with an arch die - the second largest of the nested A2 sized arches from SBC. Using the largest, I die cut a shaped card base and the floral patterned paper from SBC.

When I was layering the card together, I thought the sentiment looked a bit lost, so I added a layer of vellum that was the same size as my white arch piece before popping it up so there is more of a soft look of the balloon and help the sentiment pop off the card! I stamped and colored some of the florals from the Clear Stamp Set of the Month and used the coordinating die to cut out most of the image. I then fussy cut around the different florals and adhered them around the white arch on the card.

I also stamped the Hip Hip Hooray! sentiment in black ink and used its coordinating die, then popped it up under the foiled sentiment on the card. I think it turned out pretty cute and love the bright feel of the card. Let me know which kits you are getting from Spellbinders and if you like to combine them, too!

PIN THIS
SUPPLY LIST

Read More

Congrats Graduation Shaker Mug Card with Pretty Pink Posh

Thursday, May 18, 2023

I purchased some pastel satin hot foil during a Spellbinders sale last month and I was so excited to use it on card. Using new graduation themed products from Pretty Pink Posh, I finally used the mint colored foil on the Congrats sentiment! I thought it went pretty well with all of the paper I used from Your Paper Insider Box 1 as well as the Aqua Shimmer Confetti, don't you agree?

In my video today, I have a shaker card using the Pretty Pink Posh Mug Dies - featuring the new Graduation Mug Addition Dies. I love the mix of blues and yellow as they remind me of our local high school and this could definitely be a card I use later for inspiration one day for when Abigail graduates. But I definitely don't want to think about day any time soon, haha!

VIDEO TUTORIAL


PIN THIS
SUPPLY LIST

Read More