Mini Halloween Shaker Cards with Pretty Pink Posh

Saturday, September 30, 2023

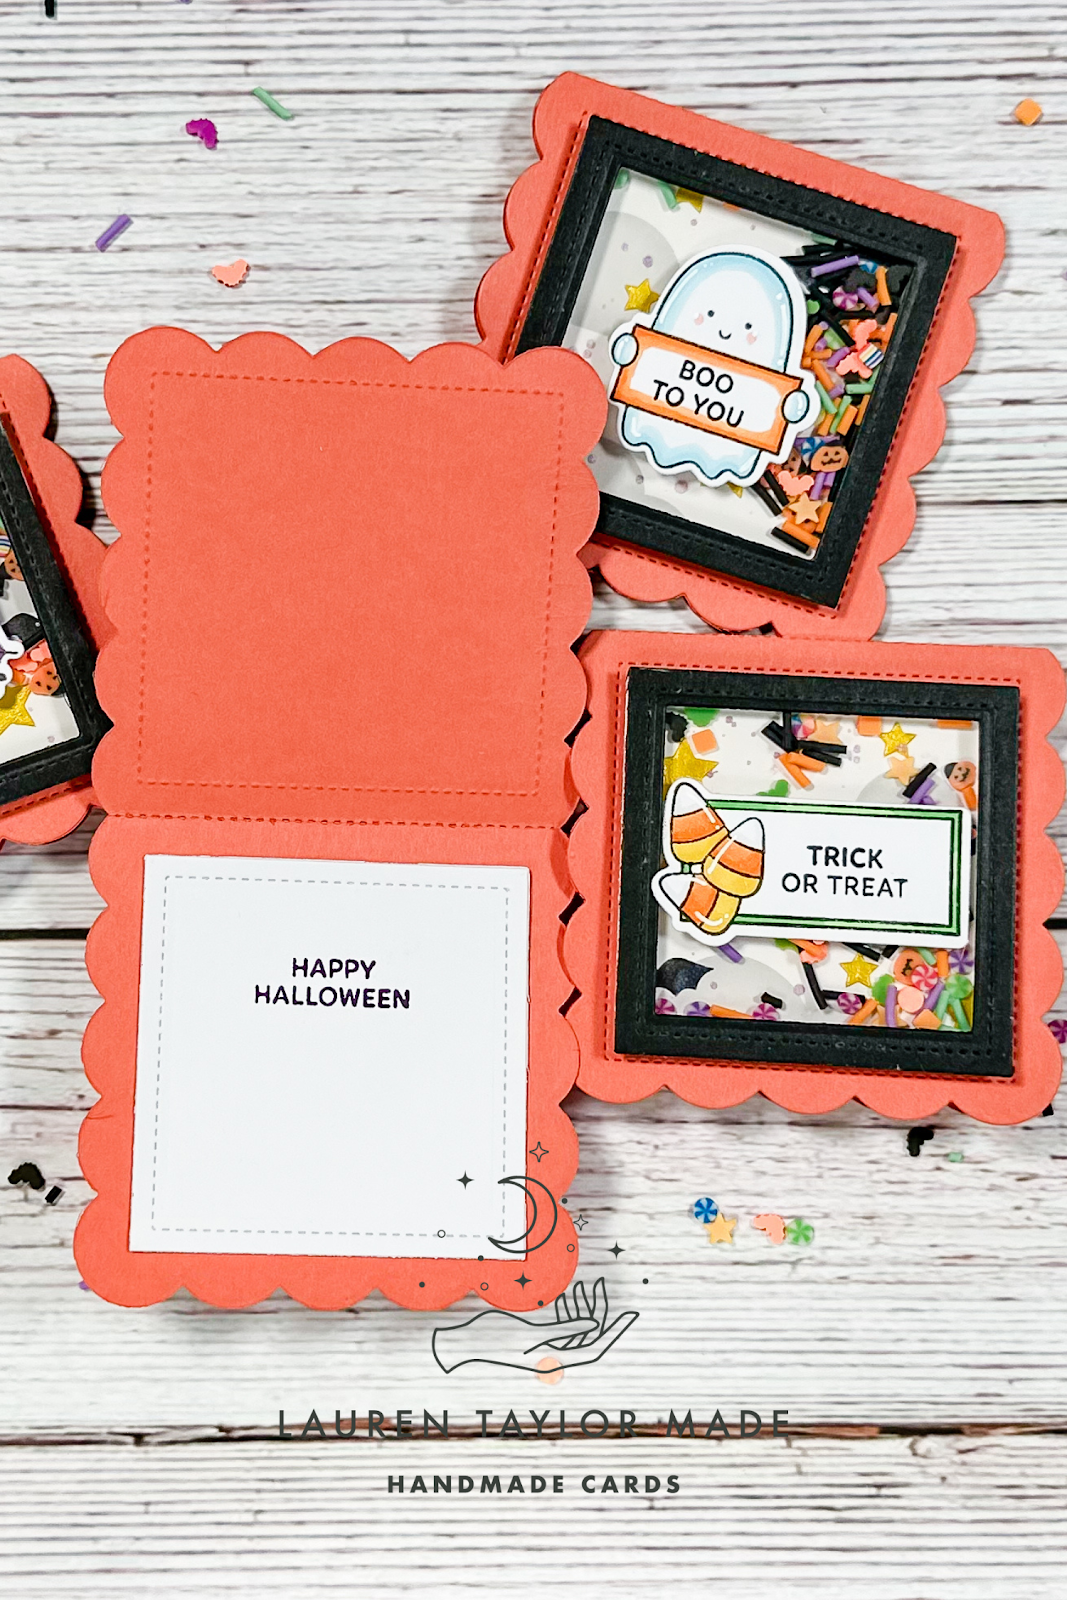
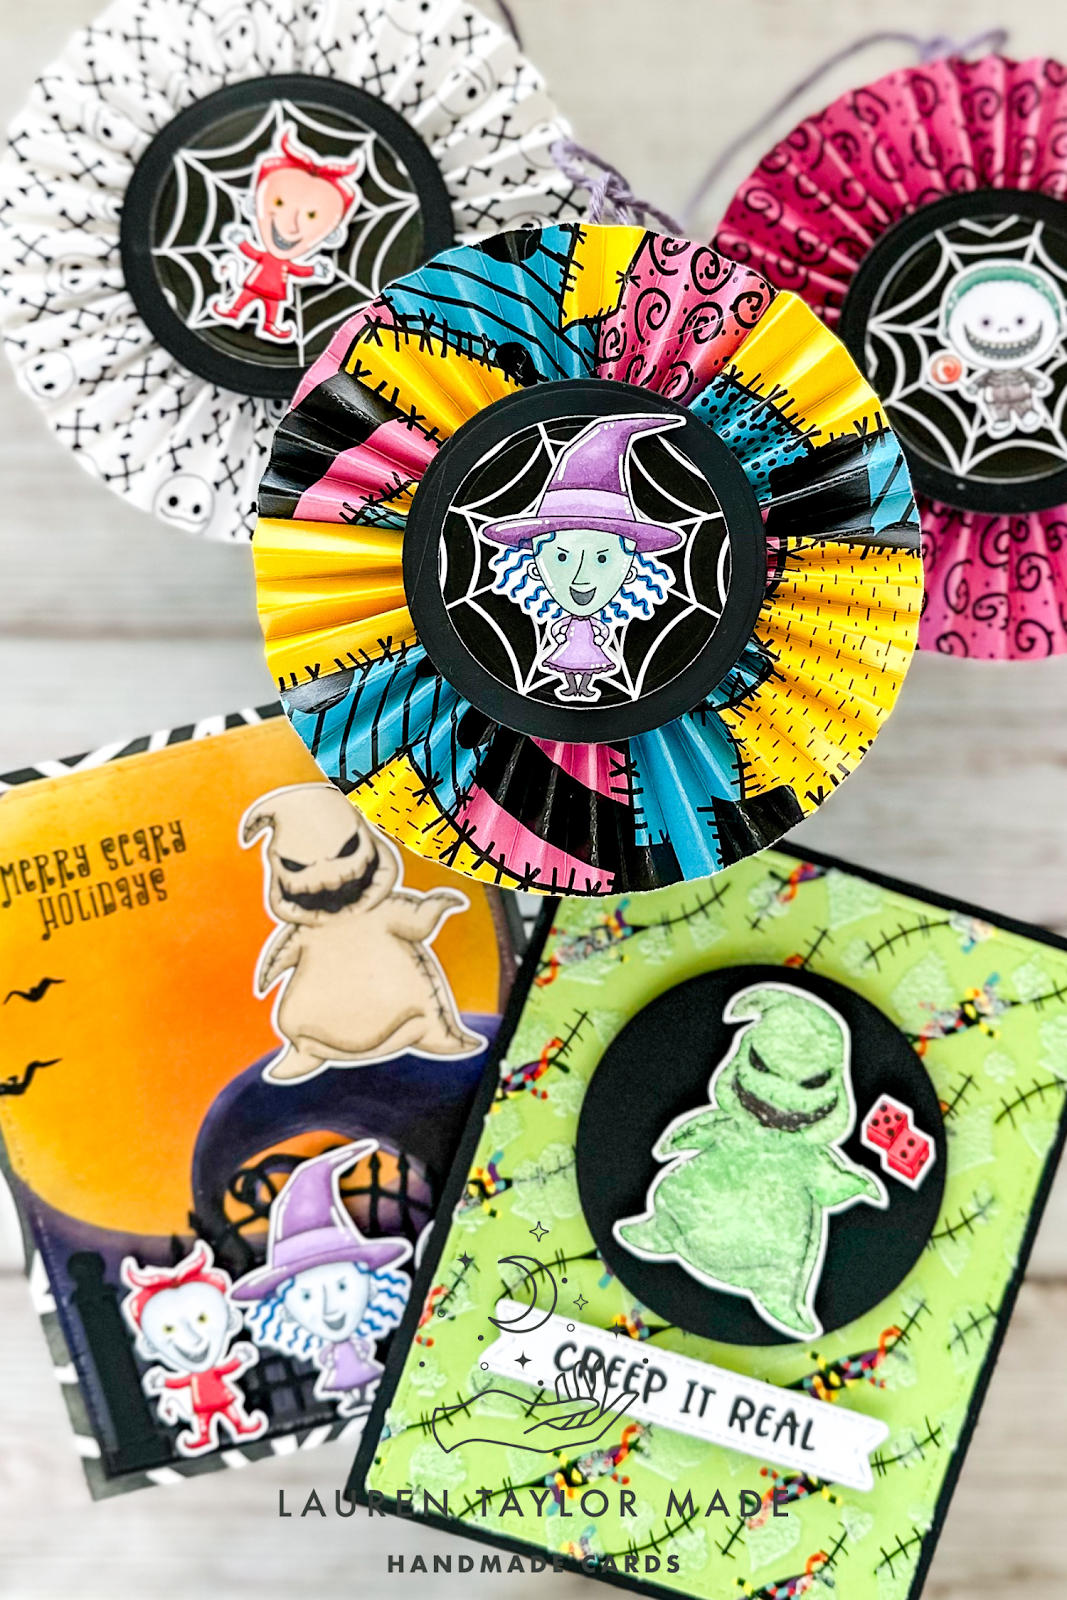
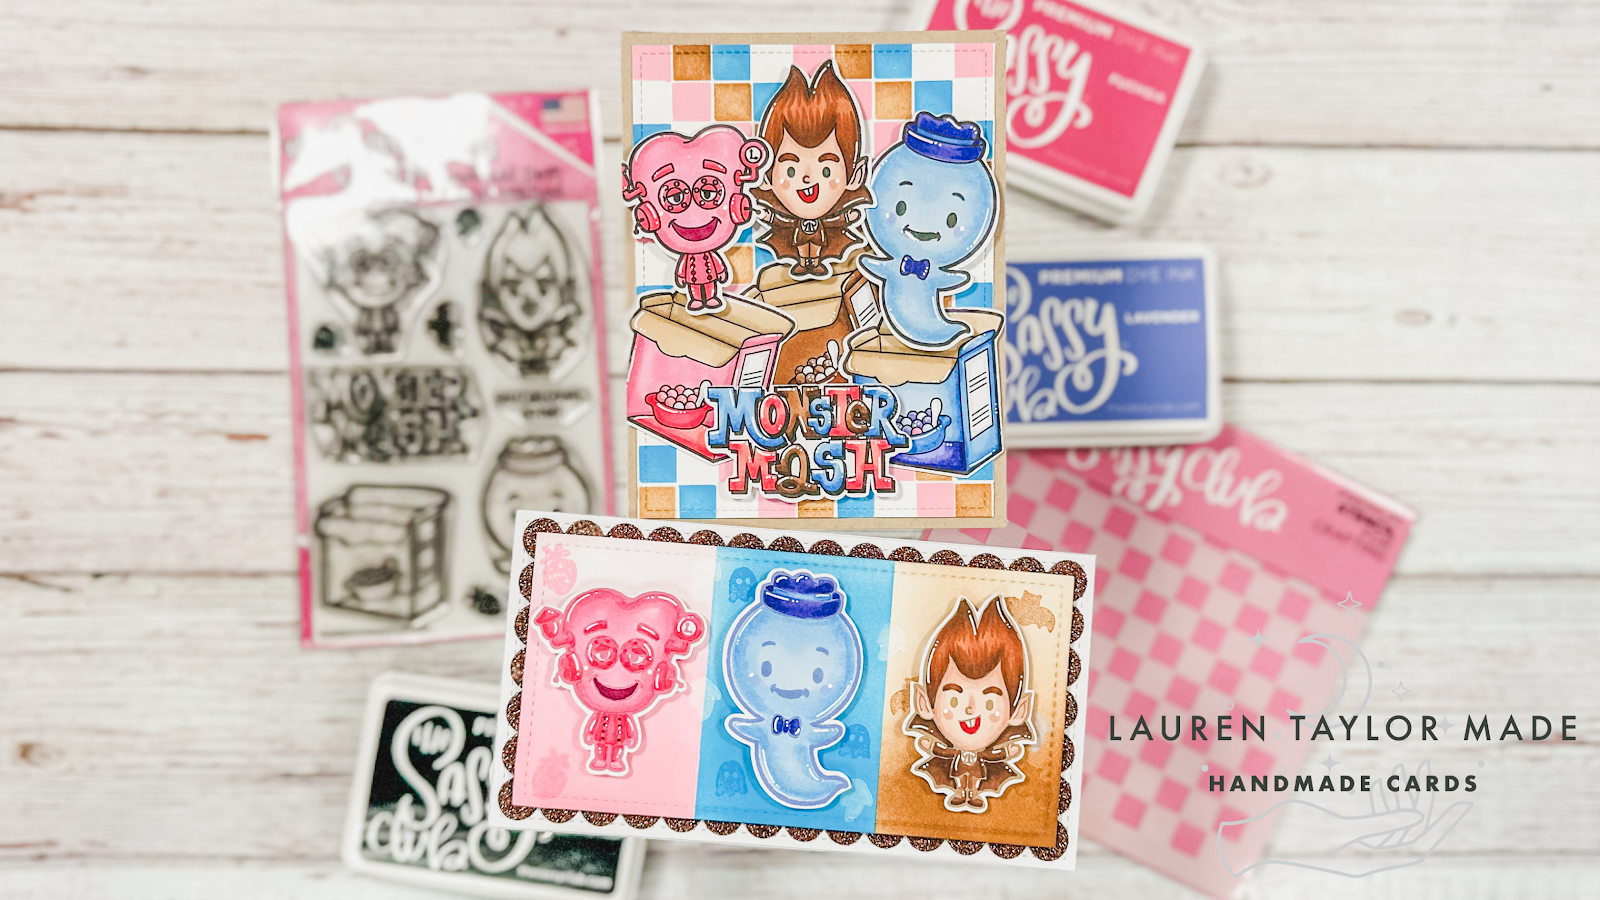
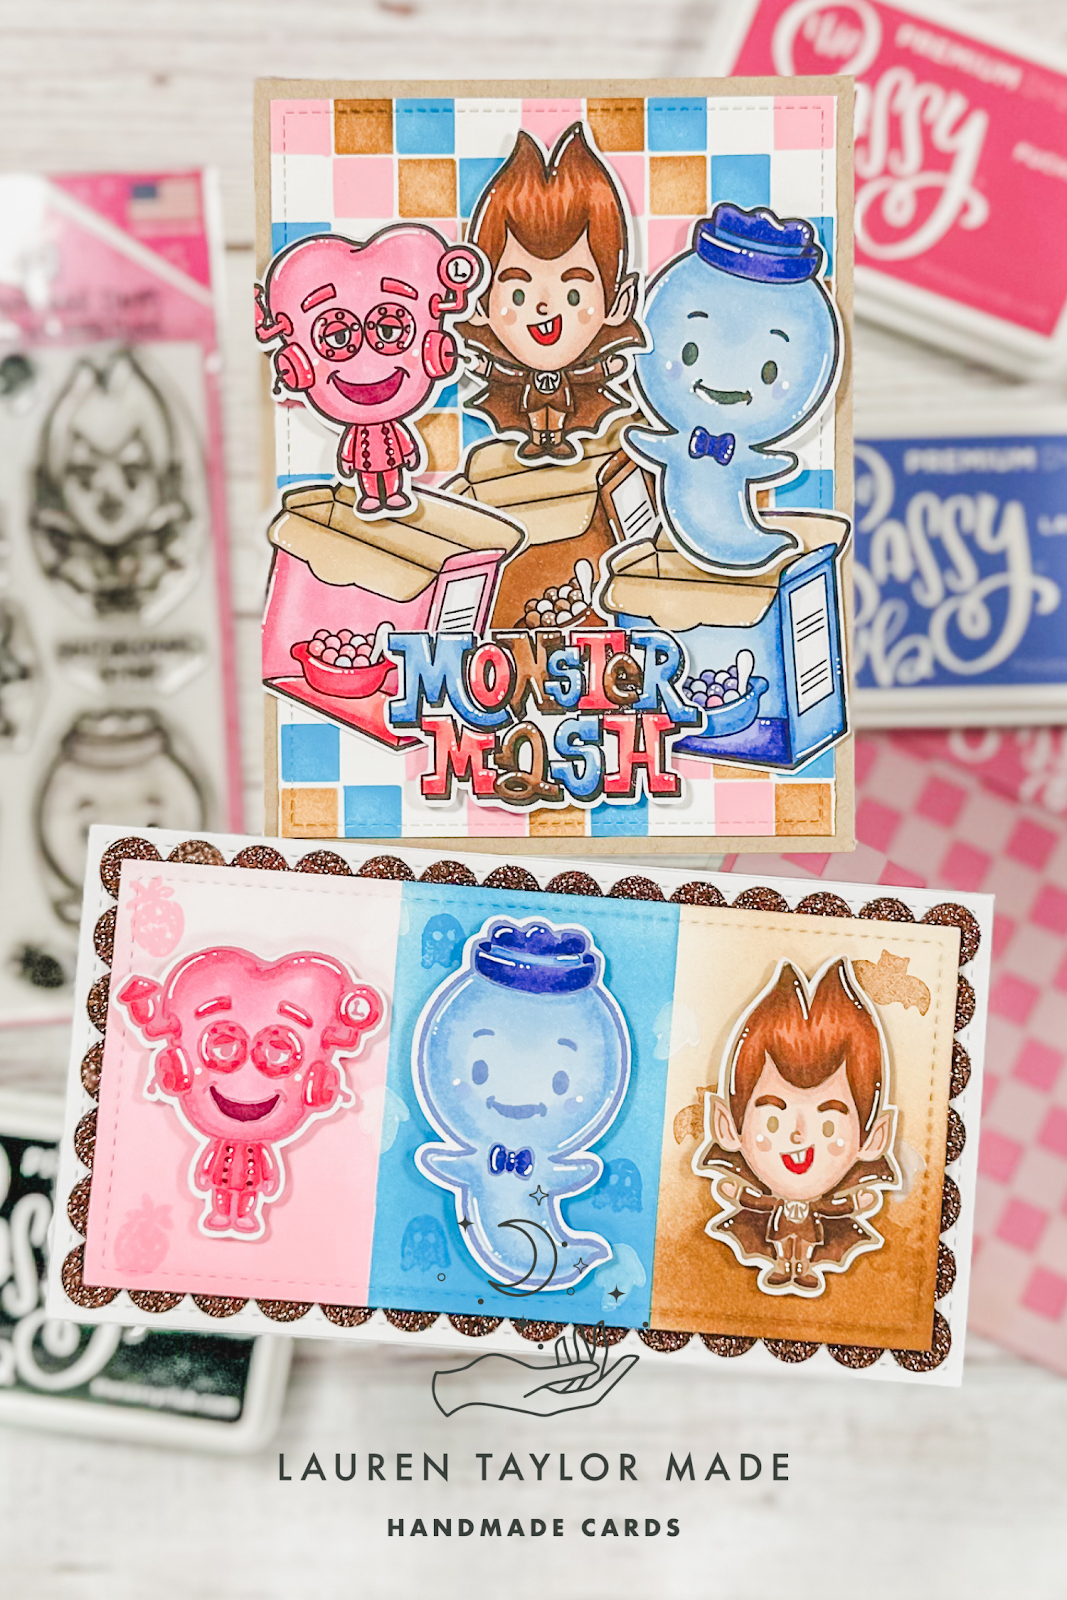
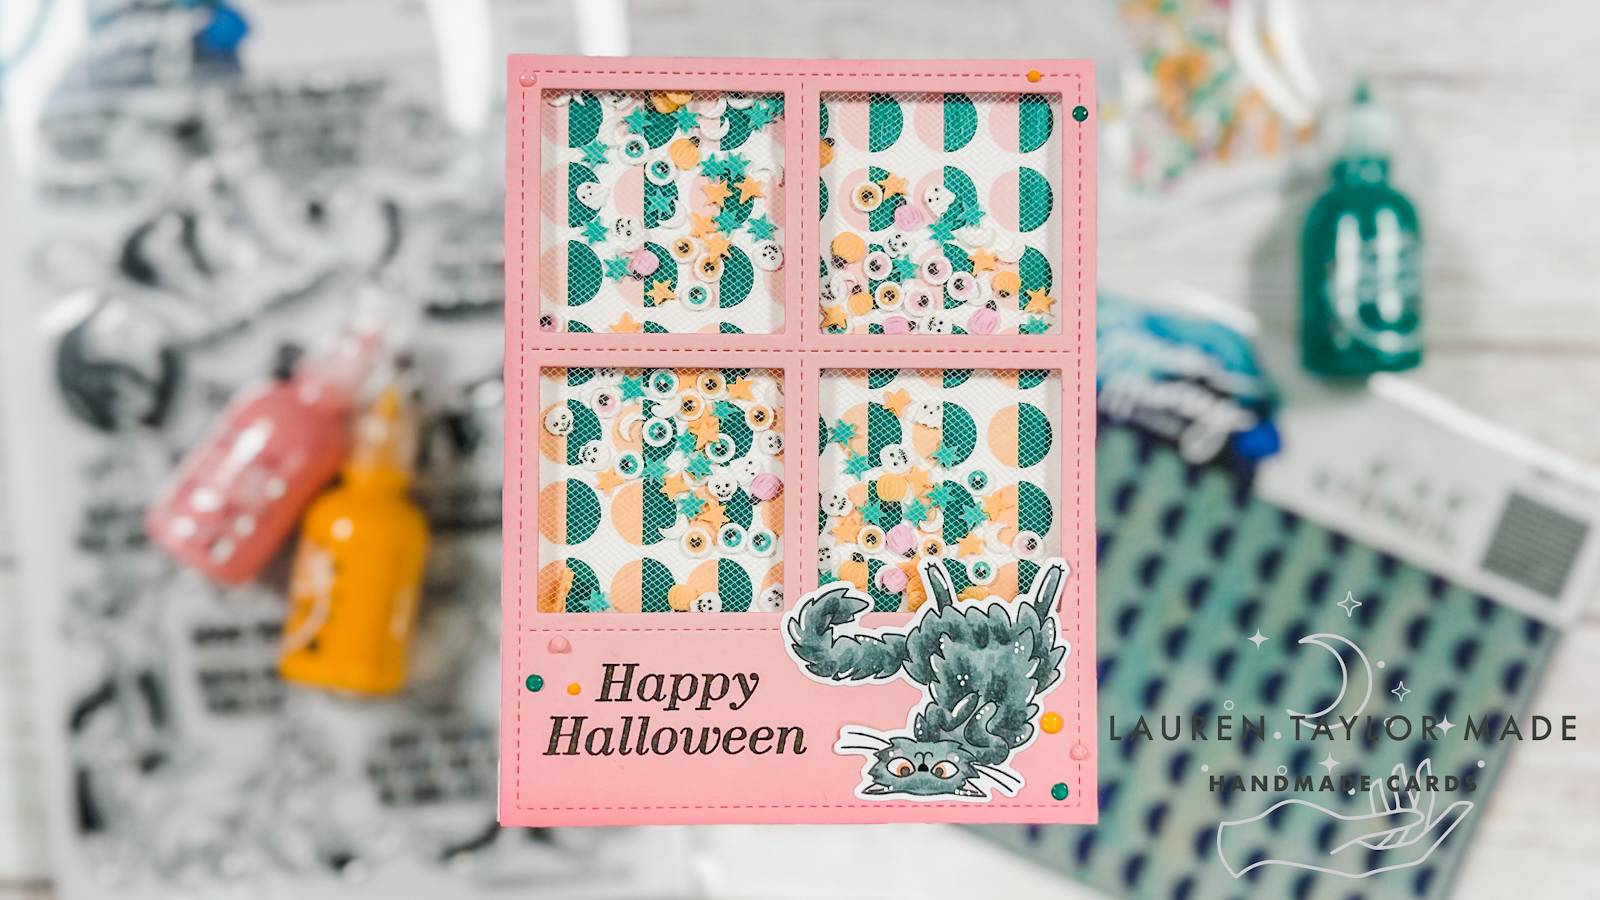
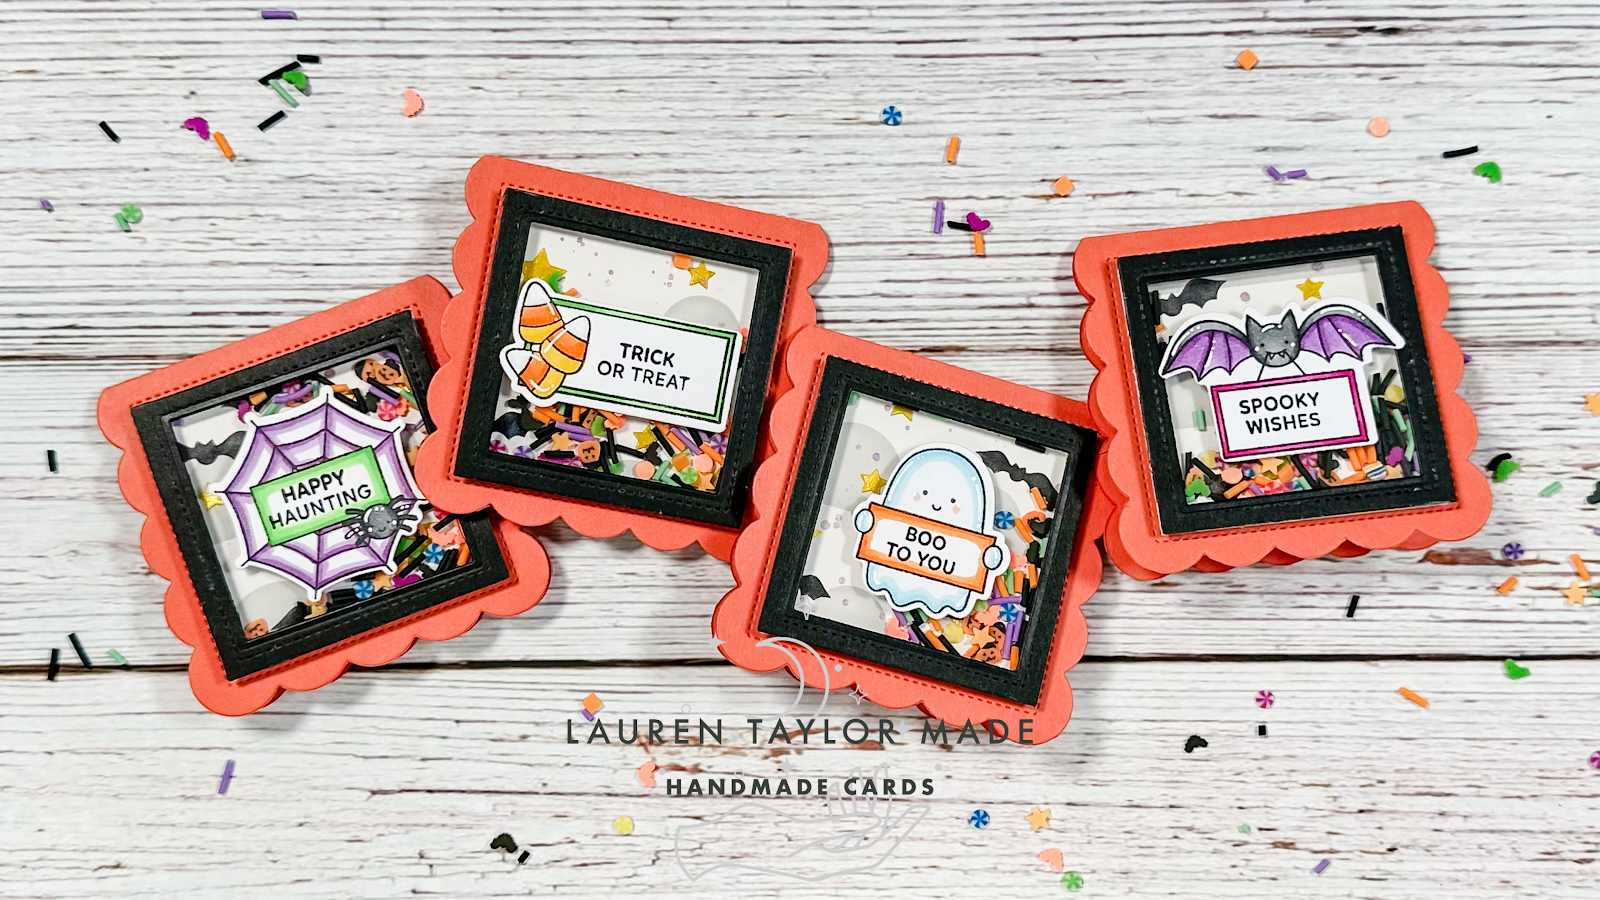
I love the idea of having something non-treat related for the holiday and these tiny shaker cards are perfect for such occasions. Before starting the video, I cut my Mini Scallop Card Dies with some orangey-pink cardstock and made shaker frames with black cardstock and a generic nested square that fit nicely inside the stitched square in the die set.

I start with making the background since it needs the most time to dry. Using white cardstock, I stenciled the Spooky Sky Stencils with Distress Oxides (Lost Shadow for the clouds and Black Soot for the bats) and stencil paste. I used yellow to make the stars pop!

While the background was drying, I stamped and colored my Halloween Signs Stamp Set images with alcohol markers. I used the Halloween Signs Coordinating Dies to cut them out. With black ink, I stamped different sentiments into the signs and they are just the cutest! My background was dry enough so I splattered on some purple metallic watercolor and trimmed them down to just slightly smaller than 2.5x2.5”.

I assembled the shaker panels with acetate and thick foam tape, you can see each step in today’s video! I then adhered the panel to my orangey-pink mini cards as well as white square on the inside with a Halloween sentiment stamped in purple. I hope you like these mini notecards and they inspire you to make some cute mini cards for Halloween!

VIDEO TUTORIAL


PIN THIS
SUPPLY LIST

Read More

Merry & Bright Frost Bite Cafe Christmas Card with Trinity Stamps

Friday, September 29, 2023

I can't get over how cute these penguins are from Trinity Stamps! Look a their cute snacks, too! I love coloring critters and I definitely went whimsical with my blue penguins. I also wanted it to be a holiday card, so I added in green and pink. Since I was making a Reels for this card, I started with stamping, coloring and die cutting out my images.

Next I made my stenciled background so it would dry while I worked on the rest of the card. I die cut out my sentiment and used the Rip & Stick sheets for the glittery letters so they were easy to add to the shadow backgrounds. When the background was dry, I layered it on to my A2 card base with a snowy bank that I cut with the new Embossed Edge Hill dies. My igloo cafe and penguin drinking out of their mug are adored with liquid glue and the rest of the die cuts are popped up with foam adhesive.

Some final touches are the adorable snowflake clay pieces and you can see the process down below!

VIDEO TUTORIAL

@laurentaylormade Merry & Bright Penguins #crafttok #diy #handmadecard #handmade #trinitystamps ♬ Kid On Christmas (feat. Meghan Trainor) - Pentatonix

PIN THIS
SUPPLY LIST

Read More

Tricks and Treats New Release from Kindred Stamps

The new release from Kindred Stamps is here and it makes my Halloween fandom (and I guess Christmas fandom, too) just so happy! I was so excited that I was given the Tricks and Treats stamp set to create samples for you because it has my favorite gambling character from this story. I already had a good idea of what I wanted to make with him, but I hope you like all of the inspiration today!

After coloring all of my images twice, I fussy cut them out and I started with putting together this fun banner with the new Holiday Town Paper Pad. I chose three different patterns and trimmed them into 2 inch strips. I scored them every 1/4"and created paper lollies with hot glue and black circle die cuts. I added die cut circles of spiderwebs and then popped up the scary kids. I also hot glued a loop of purple twine to the backs and used more twine to create a banner!

What's great about the paper pad is that it also makes creating scenes so easy! I used the patterned paper with the moon and cut it with the rectangle from the Card Basics die set. After using the Spiderweb Stencil with Black Soot Distress Oxide, I trimmed it down to A2 in size and adhered the patterned paper to the center. I stamped my sentiment with black ink and glued my gambling villain to the top of the hill. Next I added a Spooky Fence die cut from black cardstock and popped up my scary kids again to the bottom of the card in front of the fence.

My final card is all about my favorite character! I started with cutting my green bug patterned paper with the rectangle from the Card Basics die set and stenciled on some glow in the dark stencil paste with the Deck of Cards stencil. I also used my finger to add the same glow in the dark paste to my gambling villain and used a sharp tool to remove any paste from the eyes, mouth and wherever I went outside the lines. While those dried, I cut a black cardstock circle and stamped my sentiment with black ink on a Sentiment Strip die cut from white paper.

When everything was dry, I glued the card panel to an A2 piece of black cardstock, popped up the black circle and sentiment and even popped up my gambling man and his dice. I just LOVE how this card looks when it's glowing in the dark and really reminds me of the movie! I hope you have fun shopping and you have to go check out all the other new stamp sets!

PIN THIS
SUPPLY LIST

Read More

A Christmas Hello with Picket Fence Studios

Thursday, September 28, 2023

I am back today with another guest designing project for Picket Fence Studios! This beautiful stamp is called A Christmas Hello and it has this beautiful images that was just asking to be watercolored. But first I started with my background because we're going to get a little mixed media-ish for it. I cut an A2 panel of woodgrain cardstock and die cut a few of the Giant Christmas Trees out of the same cardstock.

Using liquid adhesive, I glued trees all over the panel, trimming where they went off the panel and using those pieces in other areas of the panel. Next I added a few sprays of Distress Mica onto the background and then just using my fingers, I added some Snowfall Grit Paste around the panel. When it tried a bit, I used Vintage Photo Distress Ink to darken the edges of the panel.

My image and sentiment were stamped in Pinecone Versafine Clair on mix media cardstock and I used my Distress Watercolor Pencils to color my image. When it was dry, I fussy cut around the sentiment and image and I just love how beautiful it looks! My background was glued to my card base and I popped up my sentiment and image.

Finally, I added some iridescent sequins all around the card - this sequin mix is so pretty and has some white sequins with the same shine. I hope this card gives you some inspiration today and I also hope you're proud of me for doing a little bit of mixed media again, hehe.

PIN THIS
SUPPLY LIST

Read More

Monster Mash Halloween Cereal Cards with The Sassy Club

Wednesday, September 27, 2023

My favorite time of year also means really fun cereal releases! I'm so excited Sassy Club is continuing their cereal series with these three types. I have two cards to use all the images and even two different ways to use them - stamping with black ink and stamping with their theme colored ink! I started with stamping all of my images and I colored them in with my Ohuhu Art Honolulu Markers. There are not currently any dies, so I used my Scan N Cut to cut them out.

For my first card, I am using my three characters that I stamped with a coordinating ink color. I used my PopsicleSticks dies to make a mini slimline, too. I cut the largest rectangle out of white cardstock, the scallop die out of brown glitter paper and the smallest out of my ink blending white cardstock. Using Distress Inks, I masked off the slimline in thirds and blended on the ink. I also stamped the cereal images with the same Distress Ink colors and the ghost image in white ink. After layering the images together on the card base (3.5 x 6.5" when folded), I popped up my images with foam adhesive.

For my second card, I stenciled the background with the same Distress Inks using the Checkered Stencil and masking off squares to create a pattern with pink, brown, blue and white onto a white cardstock panel die cut with a stitched rectangle die. I glued the cereal boxes to the stenciled panel and the panel to an A2 piece of Kraft cardstock. This was also adhered to an A2 card base before I added my characters and sentiment with foam adhesive.

I just love how these cards turned out and I hope you do, too! Check out all of the fun Halloween release items from The Sassy Club's latest release as well as their fabulous ink colors that are alcohol marker friendly.

PIN THIS
SUPPLY LIST

Read More

Colorful Halloween Shaker Card with Simon Hurley Create

Tuesday, September 26, 2023

I'm having some fun with colors and a silly kitty for Halloween for today's card! I am using new products from Simon Hurley with Ranger Ink and coordinating dies from Spellbinders as well as I think my favorite Halloween clay mix from This Calls for Confetti. The card layout and colors are also inspired by last Friday's episode of Craft Roulette (as usual, I will bold the elements I used to meet the requirements in this post).

As I normally do, I started with making my stenciled background since I'm using some Lunar Paste and it needs time to dry. I used the Flip Flop Circles stencil to blend pink and orange Distress Oxides, then flipped the stenciled 180 and used Lunar Paste to be the other half of the circles. These three colors were inspired by my vegetable garden colors in the confetti mix - there are pink and orange pumpkins with green!

While it was drying, I stamped and colored in my fuzzy black cat from the new Purrfect Cats stamp set and used the coordinating die to cut him out. Then I die cut my A2 card front out of pink cardstock and used some Distress Inks to darken up the edges of the die cut. I also stamped my sentiment in black ink to the left so my cat will fit on the right.

When my card was ready to assemble, I created my shaker windows with tulle as a screen cover for the shaker windows rather than acetate. I have foam adhesive to section off the four square windows so there are mini shaker windows. I also added some Pops of Color around the card after I glued the upside down cat down. I just love how fun this card turned out and these colors are just so pretty together!

PIN THIS
SUPPLY LIST

Read More

All Is Calm Quick & Easy BetterPress Christmas Cards

Monday, September 25, 2023

Remember my quick and easy BetterPress cards earlier this month? I had some questions about my backgrounds so I am making more Christmas cards with Spellbinders BetterPress today. I'm sharing how I made my inky backgrounds and how I stepped up these cards just a bit with die cuts. I have two different looks but using the same BetterPress sentiment plate.

My backgrounds were inked with Distress Oxides and splattered with Distress Ink as well as some Distress Mica Sprays. For the traditional green and red card, I added in some leafy die cuts from the July 2023 Large Die of the Month, while my blue and pink card had some hot foiled snowflakes in silver. I also added some Glitter Pops of Color to finish off the cards. I hope this helps with how I made my backgrounds and how to step up BetterPress impressions on cards!

VIDEO TUTORIAL


PIN THIS
SUPPLY LIST

Read More

Speeding By to Say Happy Birthday with Kindred Stamps

Sunday, September 24, 2023

I hate when I have an idea for a card and it just doesn't turn out exactly how you imagined. Now, I like this card a lot. But I'm not thrilled about my sentiment reveal when you pull on the slider tab... It's fine, but definitely let me know in the comments if you have any ideas to step up my reveal. It's totally great as is, but I think it just feels a little anti-climactic. But, we're going with it and I think the card still looks great!

In my video today, I'm sharing how I made my background, colored my Kindred Stamps Vroom image and assembled my card including using the Kindred Stamps Pull and Slide Die Set! I hope it gives you some tips on coloring this fandom character as well as assembling a pull tab slider card. Let me know if there are any other interactive dies I can show how to assemble or maybe any fandom sets you would like to see colored in the future!

VIDEO TUTORIAL


PIN THIS
SUPPLY LIST

Read More

Fandom Witch Sisters Box Card with The Sassy Club

Saturday, September 23, 2023

SISTAAAAHS! I am in love with these trio of fandom characters dressed up as the three witch sisters for Halloween from The Sassy Club! I stamped and colored them out with my Ohuhu Art Markers and fussy cut them out. I wasn't sure what I wanted to do with them as I just really wanted to color them... But I figured why not a box card! I used the Pretty Pink Posh dies out of purple cardstock to build my box card base.

For the "shelves" inside the box card, I used some black and orange Halloween patterned paper with a stitched hill die and trimmed them to fit on the box card "shelves" (trimmed to just fit on the 3.25" panels). The back and side pieces of the box card were hot foiled with purple foil with an upcoming hot foil plate with mouse balloons! I die cut those pieces and assembled the box together. 

I added my cute characters with my head witch in the middle, but I'm loving all three of them! For the front and back panels, I used another sneak of a new product which is a mouse balloon layering stencil. You guys are going to need these new products if you're a magical theme park fan and they'll be out next month! I layered the stencils with orange and purple inks and used the scalloped dies from the box card set to cut them out.

For my sentiments, I used some banner die cuts from PopsicleSticks and stamped my sentiments in purple ink. I hope you like this fun, birthday box card and it's inspires you to create today! I can't wait to see these sisters when I go the parks this season. YAY!

PIN THIS
SUPPLY LIST

Read More