Showing posts with label school. Show all posts

Happy Summer Godparent Fandom Card with The Sassy Club

Saturday, May 24, 2025

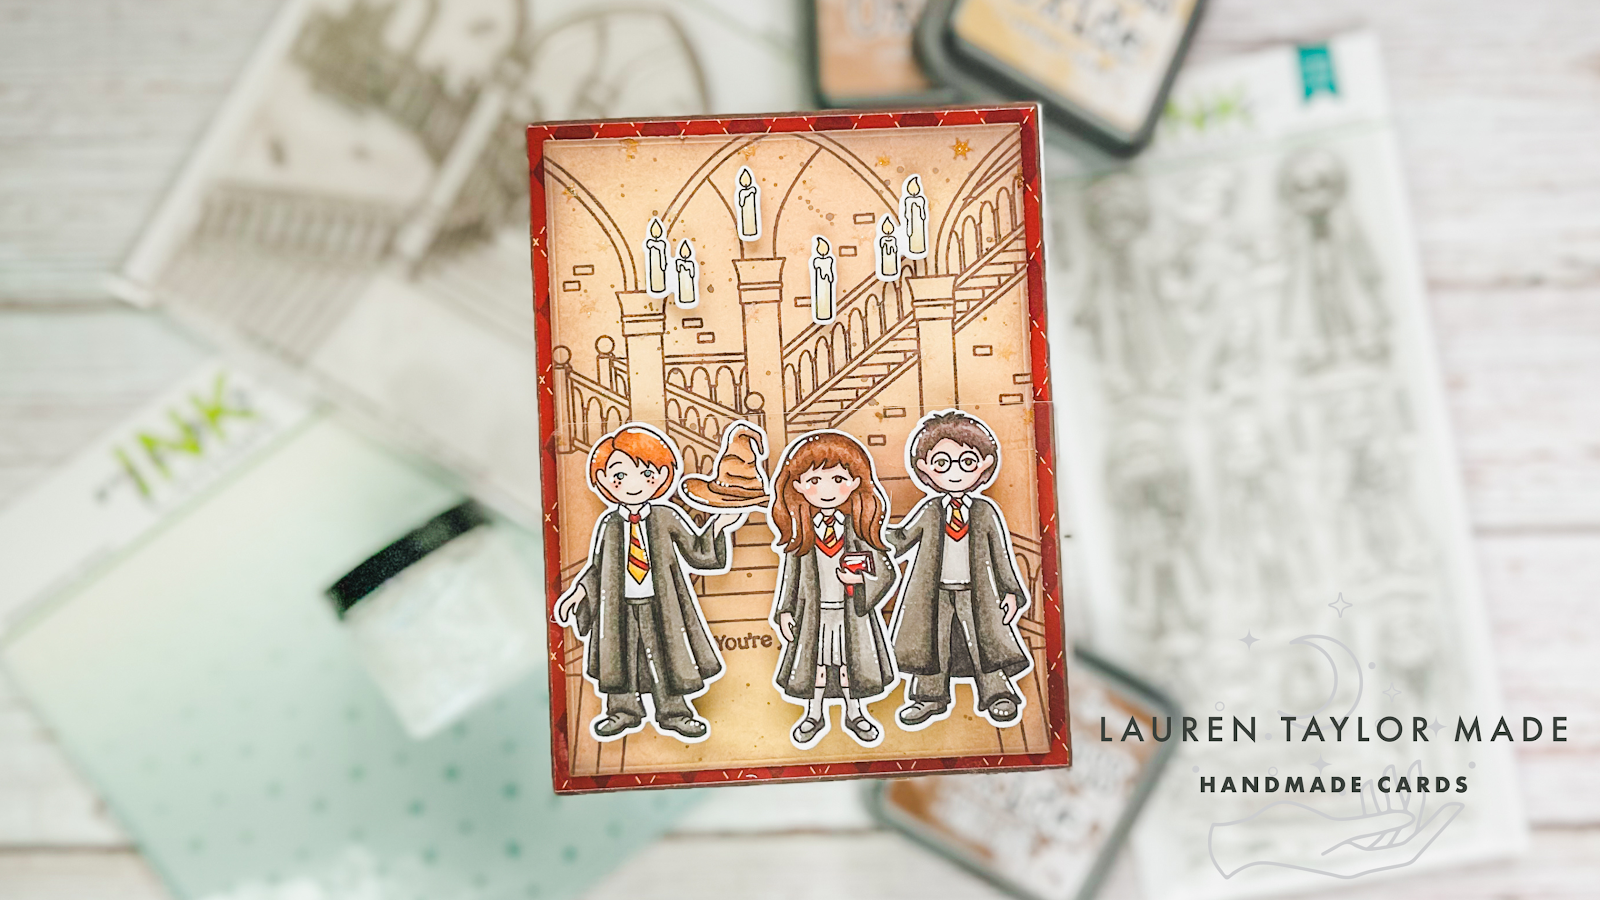
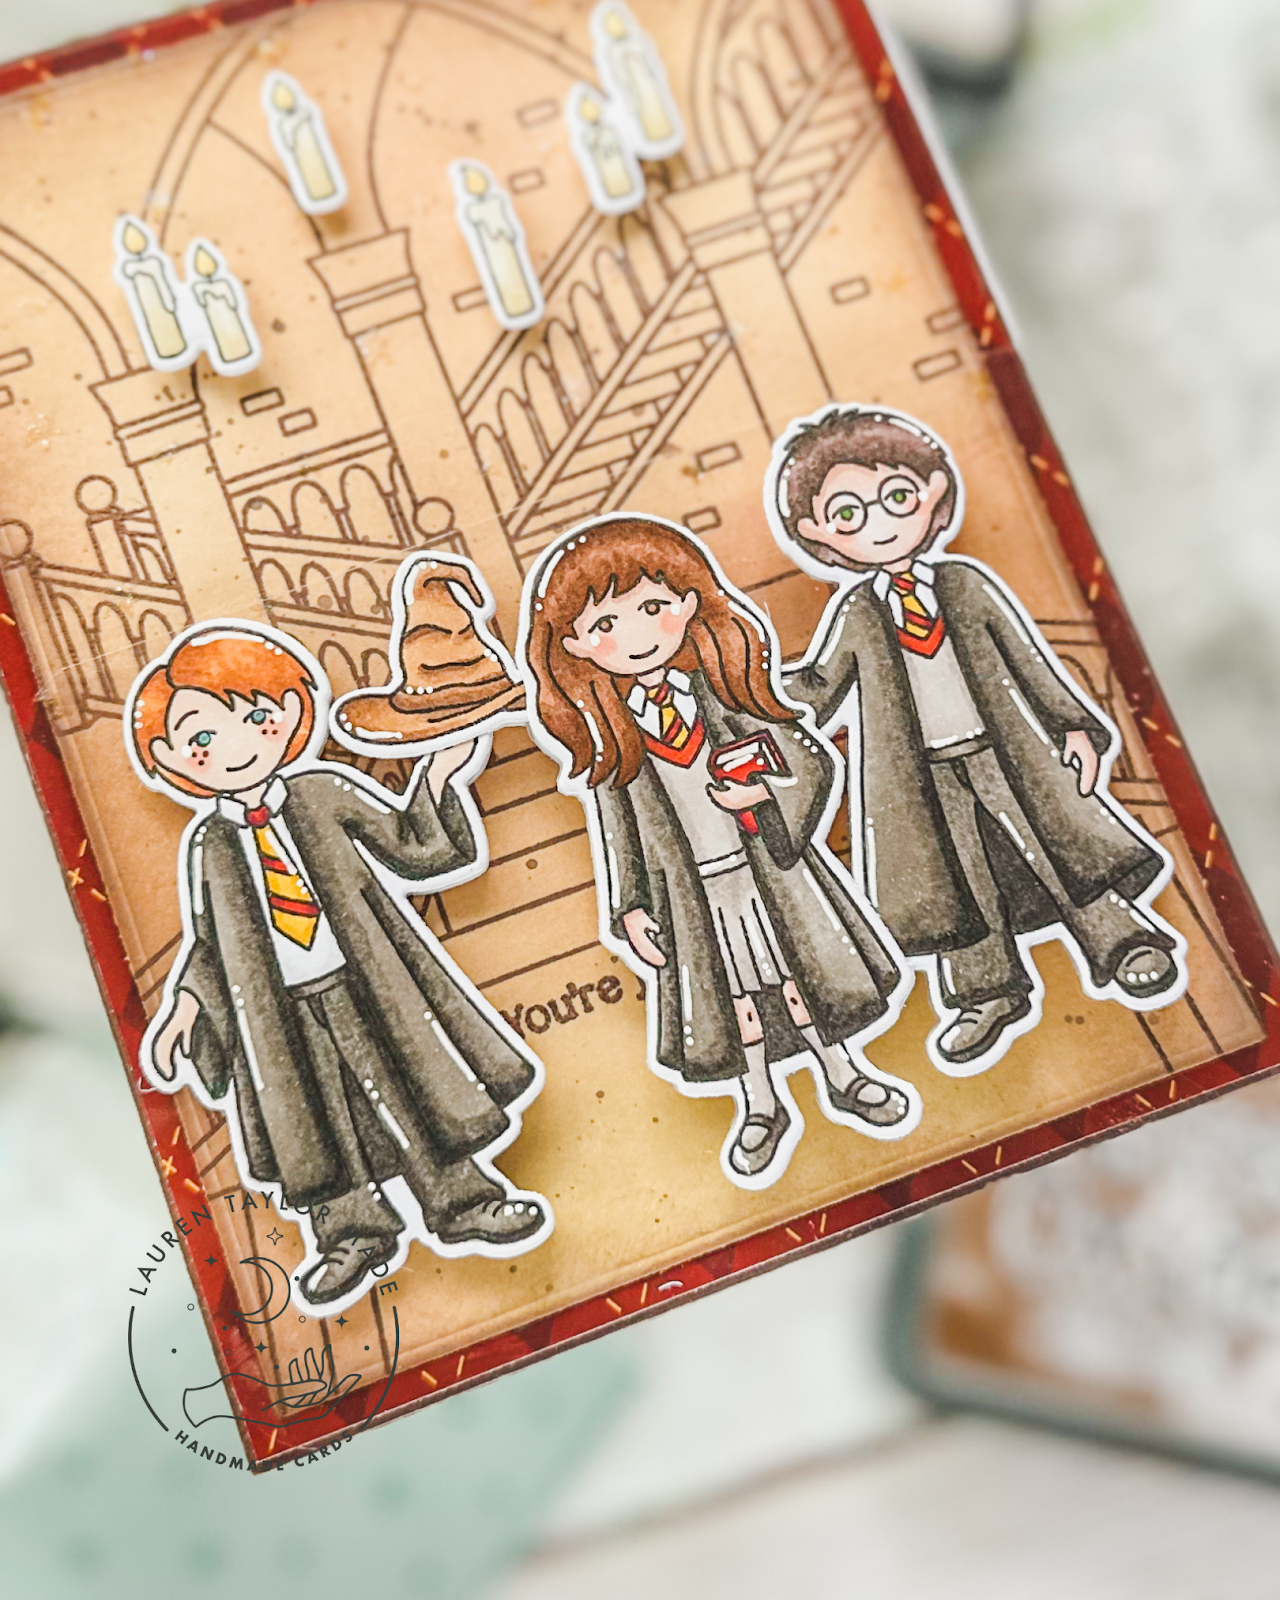
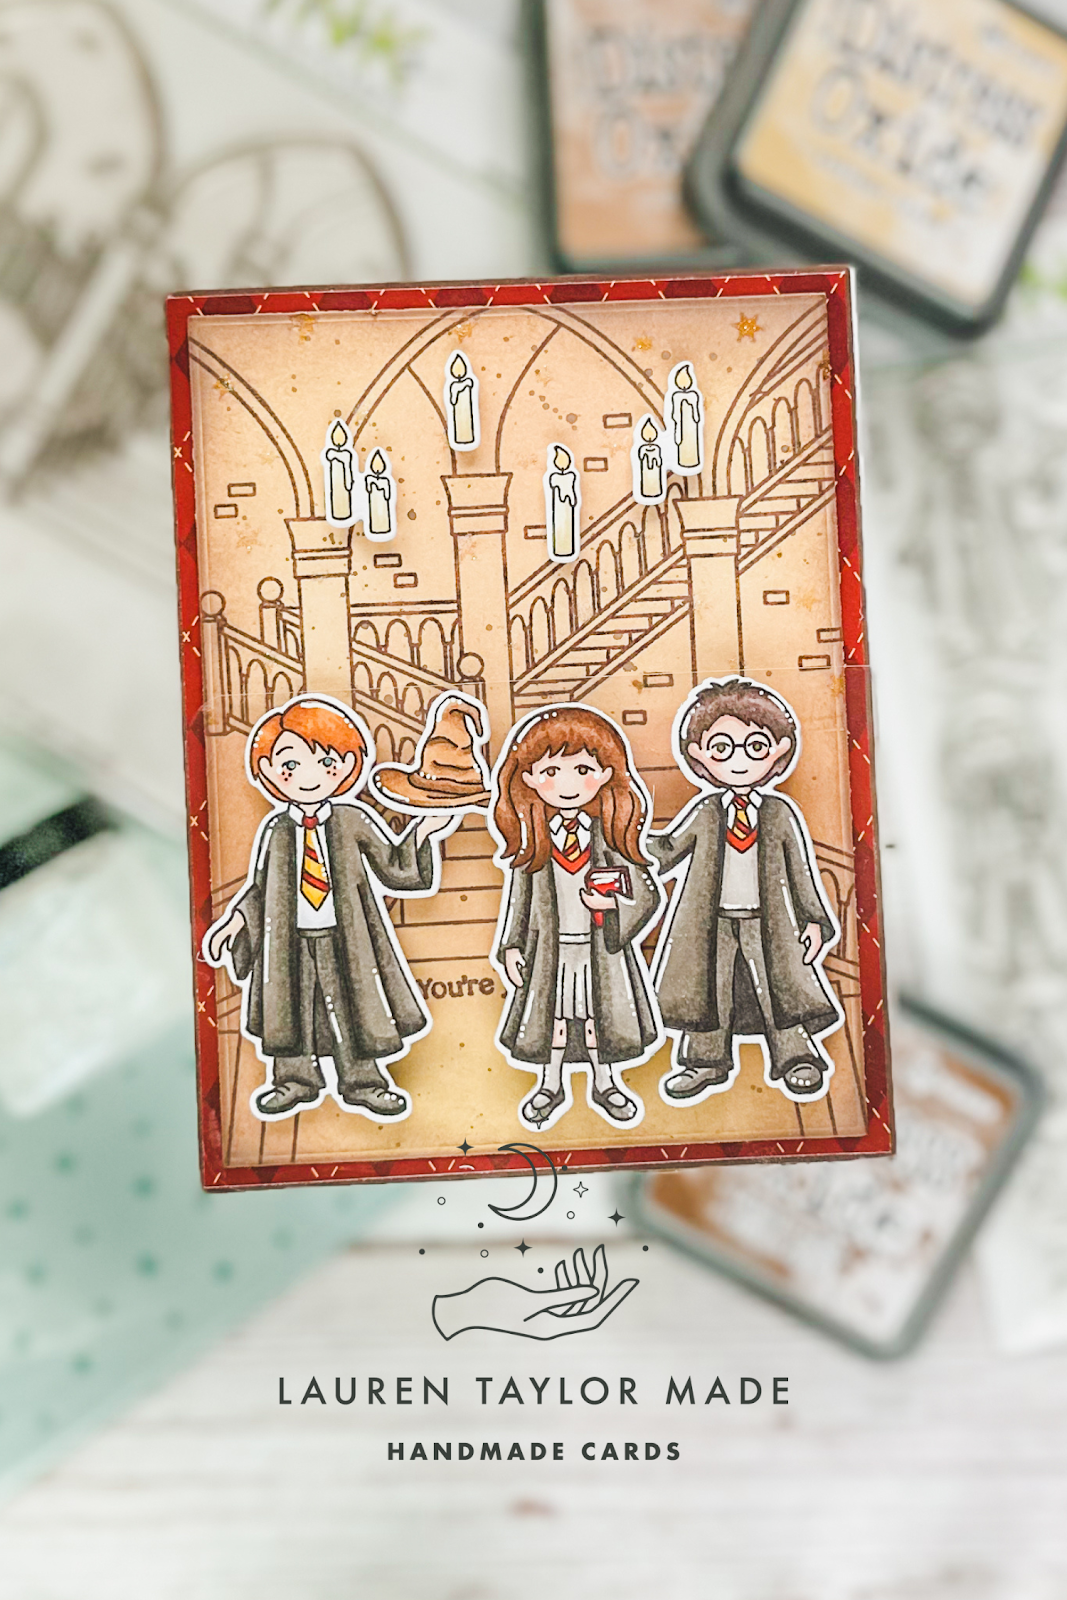
Hello, friends! Thanks for joining me in my craft room today. I'm so grateful to have you here for another mashup of Fandom Friday and Sassy Saturday! After two weeks of work travel, I'm thrilled to be back in my craft room, catching up on projects and sharing this super fun card with you. This week, I'm featuring The Sassy Club Da Rules stamp set, the Slime Frame die set, a Circle Layers die plate, and I even created my own sentiment with the Funhouse Alpha die set. I also dug out a very old and retired The Sassy Club star stencil for a fantastic background effect. If you don't have this exact stencil, don't worry! Any star stencil or a fun background pattern you have in your stash will work beautifully. Get ready for a dose of crafting inspiration because this card was also created for Craft Roulette Episode #268, with the parameters of a card for a student, modern colors, an element of clothing, and abstract blobs!

In today's video, I'll walk you through how I made this card, featuring a relaxing student and his two "fairy godparents" in fun pencil form. You'll see how I colored these delightful images, created a vibrant stenciled background using the pink and green inks, and assembled the die-cut circle layers to frame the scene. I'll also show you how I incorporated those essential "abstract blobs" and created a custom "Happy Summer" sentiment that really pops. While I faced a few funny mishaps along the way (jet lag is real, my friends!), I love how this card turned out, and I hope it inspires your own crafting adventures. So grab your supplies, settle in, and get ready to craft along with me! You won't want to miss the full process and all the tips and tricks in my latest YouTube video.

VIDEO TUTORIAL


PIN THIS
SUPPLY LIST

Read More

Back to School Thank You Teacher Box Card with Pretty Pink Posh

Tuesday, September 17, 2024

Hi, friends! I am back with a new video using Pretty Pink Posh today. I am continuing my box card series for the year and thank you for your feedback on creating a card for “Back to School!” August and September are kind of weird months with no major holidays, but I think this is a fun “holiday” for kids and teachers who are ready to get back to school.

I started with creating my own school supplies by making a pencil and lined paper using the Get Well Mug Additions Dies and Graduation Mug Additions Dies. I created a pencil using the thermometer, pill and heart dies and a “yay!” paper from the prescription pad and sentiment dies. You can follow along in my video today if you need to see a step by step of how I glued them all together. Next I stamped and colored in my cute little school children with alcohol markers from the Friends Forever Stamp Set and used the Coordinating Dies to cut them out. I also colored two blocks from the Baby Basics Stamp Set and used their Coordinating Die to cut them out as well. 

Moving on to using the Layered Apples Stencils to create my background, I used Distress Oxides in Candied Apple and Scorched Timber for my apples (A) stencil and stems (C) stencil. Lastly, I used the leaves (B) stencil with Fake Plant Lunar Paste to create some texture and shine. For my sentiment, I cut Sentiment Strips Dies in the medium sized rectangles and stamped “Thankful for You” from the Sentiment Strips: Fall Stamp Set. When the stenciled background was dry, I cut the Scallop Box Card Dies base from red cardstock and the scallop pieces from the Layered Apples background.

I assembled the box card together with my sentiment on the front of the box card, my school children on the middle “shelf” of the box, and attached the school supplies to the back arch piece of the box card. I hope you like my take on back to school and let me know what you would like to see for next month!

VIDEO TUTORIAL


PIN THIS
SUPPLY LIST

Read More

Apple of My Eye Cards for Fall with Trinity Stamps

Sunday, August 13, 2023

The new Apple of My Eye Die Set from Trinity Stamps are perfect for the Fall Season! I just love the different ways you can use them with the Creepy Candy Apple Add-On Die Set and Apple Core Coordinating Stencil. In my video today, I am sharing three different ideas for back to school, Halloween and Thanksgiving. My first card is a shaped card and I walk through how I added the stencil details, adhered all of the die cuts together and how I made my shaped card base.

The second card is probably my favorite as I just love the green poison dripping down! I shared how I used a hinge method with repositionable tape to die cut the eyes in my poison on both the green cardstock and the glitter cardstock. Finally, the last card has a caramel apple and I shared how I added details from all three products - the apple die set, creepy candy die set and core stencil. The video is a little on the longer side, but I hope you find inspiration with these cards! 

Let me know in the comments which card is your favorite! I do love the shaped card, but that dripping poison just brings so much joy! I really want to combine that die set with a Snow White themed card, too. How perfect would that be with the Evil Queen?

VIDEO TUTORIAL


PIN THIS
SUPPLY LIST

Read More

Magical Sorting Dutch Fold Card with Miss Ink Stamps

Wednesday, May 3, 2023

I was perusing Instagram a couple weeks ago and saw a card by the ever so talented Davina from PopsicleSticks and was introduced to Miss Ink Stamps! I bought pretty much the whole magical release and was so excited to use some of the products in my latest card for Craft Roulette. The parameters from Friday's episode were: dutch fold card, campfire colors, include a hat/cap and book page.

Starting with my background, I stamped the Ups and Downs background stamp as well as my sentiment with Acorn Versafine Clair ink and embossed it with copper embossing powder. I inked on Distress Oxides to give it a vintage paper feel. I wanted to give it a little more texture, so I used the Magic Stars Stencil and some clear Glitter Glaze on the top half of the background. 

While the background dried, I got to stamping and coloring. I stamped my three magical students, an old hat and floating candles with alcohol friendly black ink and colored them with my Ohuhu Art and COPIC Markers. Using their coordinating dies made it super easy to cut them out and I also cut out a second set of students and hat with just white cardstock. Once my background was dry, I layered it with some red and gold argyle patterned paper onto an A2 piece of brown cardstock. I also tucked in a small magnet and glued it under the stamped background towards the bottom left.

I made my dutch fold with a piece of acetate that is cut to 3x4-3/4". I scored it at a 1/2" so that way the part that overlaps the front of my card is 4-1/4" which is the size of my A2 card base. I used a bone folder to really fold over the acetate as it's pretty heavy duty. I adhered the 1/2" of my acetate to the back of the brown cardstock (which has my layered background adhered to it) creating the dutch fold. I then glued the whole front of the card to a side folding A2 card base.

Next I figured where my other magnet needed to go on the clear acetate to help keep the card closed and glued it to the front of the acetate. Using thin foam adhesive squares, I adhered my red-headed student to the acetate so that he covers the magnet! I then glued the extra die cut of him to the back side of the acetate to hide the foam adhesive and magnet. I repeat this with the hat and two other students! I also used foam adhesive to add my floating candles to the top of the card.

I know the magnet part was probably difficult to picture since I didn't film myself making this card. So let me know in the comments if you'd like to see me use magnets in a future video! My crafty friend Carrie Rhoades has used them in her videos (here's one here) but I'll definitely incorporate them in future videos if you'd like to see them in action. Make sure to leave a comment letting me know what you think of my interpretation of the Craft Roulette parameters!

PIN THIS
SUPPLY LIST

Read More

12 Days of Christmas: Kindred Stamps + Students of Magic Lunch Notes

Friday, December 9, 2022

Continuing my 12 Days of Christmas and Day 9 is another favorite brand - Kindred Stamps! Now I love pop culture stamps... I'm not sure if you can tell from my recent lunch notes for Abigail (October was Salem Sisters and November was Time and Space Travel) but she has a thing for Kindred Stamps, too.

Now, I have to say that Kindred Stamps sets are always limited. So it's grab them while they're available because they don't last forever. So I have to apologize that everything I've used today for these lunch notes are currently retired. I know! I'm sorry! But Abigail specifically requested Kindred Stamps and for them to be *magical* themed.

But I love how many different pop culture stamps I have from them and excellent dies, stencils and paper as well. I've collected many clay bits and embossing powders from them, too! So while the items I've used today are not currently available (but that's not to say they won't be back), give them a follow to see what sets are in stock or coming out soon! You can check the shop out by clicking on my picture below to see all my products so far for the 12 days.

For my lunch notes today, I die cut circles from the patterned paper and white cardstock. I stenciled on some moons and stars to the white cardstock in matching colors to the patterned paper and stamped on a sentiment. I glued these circles together and on the front I adhered four characters to each circle based on their school house with foam adhesive. They're pretty simple this month, but I wanted the patterned paper to shine!

PIN THIS
12 DAYS OF CHRISTMAS
SUPPLY LIST

Read More

Crescent Creation Best Teacher Digital Stamp Card

Monday, August 16, 2021

Did you get a chance to hop along last week for the new Crescent Creation online store?

There are some adorable digital stamps and you can check out my video below of how I used the Appreciate You digital stamp set with their adorable Fall Leaves Clay Bits. I show how I arranged the digital stamps on my computer, then printed them out, did some die cutting and coloring to put this cute card together.

Do you like using digital stamps?

VIDEO TUTORIAL


SUPPLY LIST

Read More