Love You Forever Zombie Shaker Card with Whimsy Stamps

Tuesday, October 31, 2023

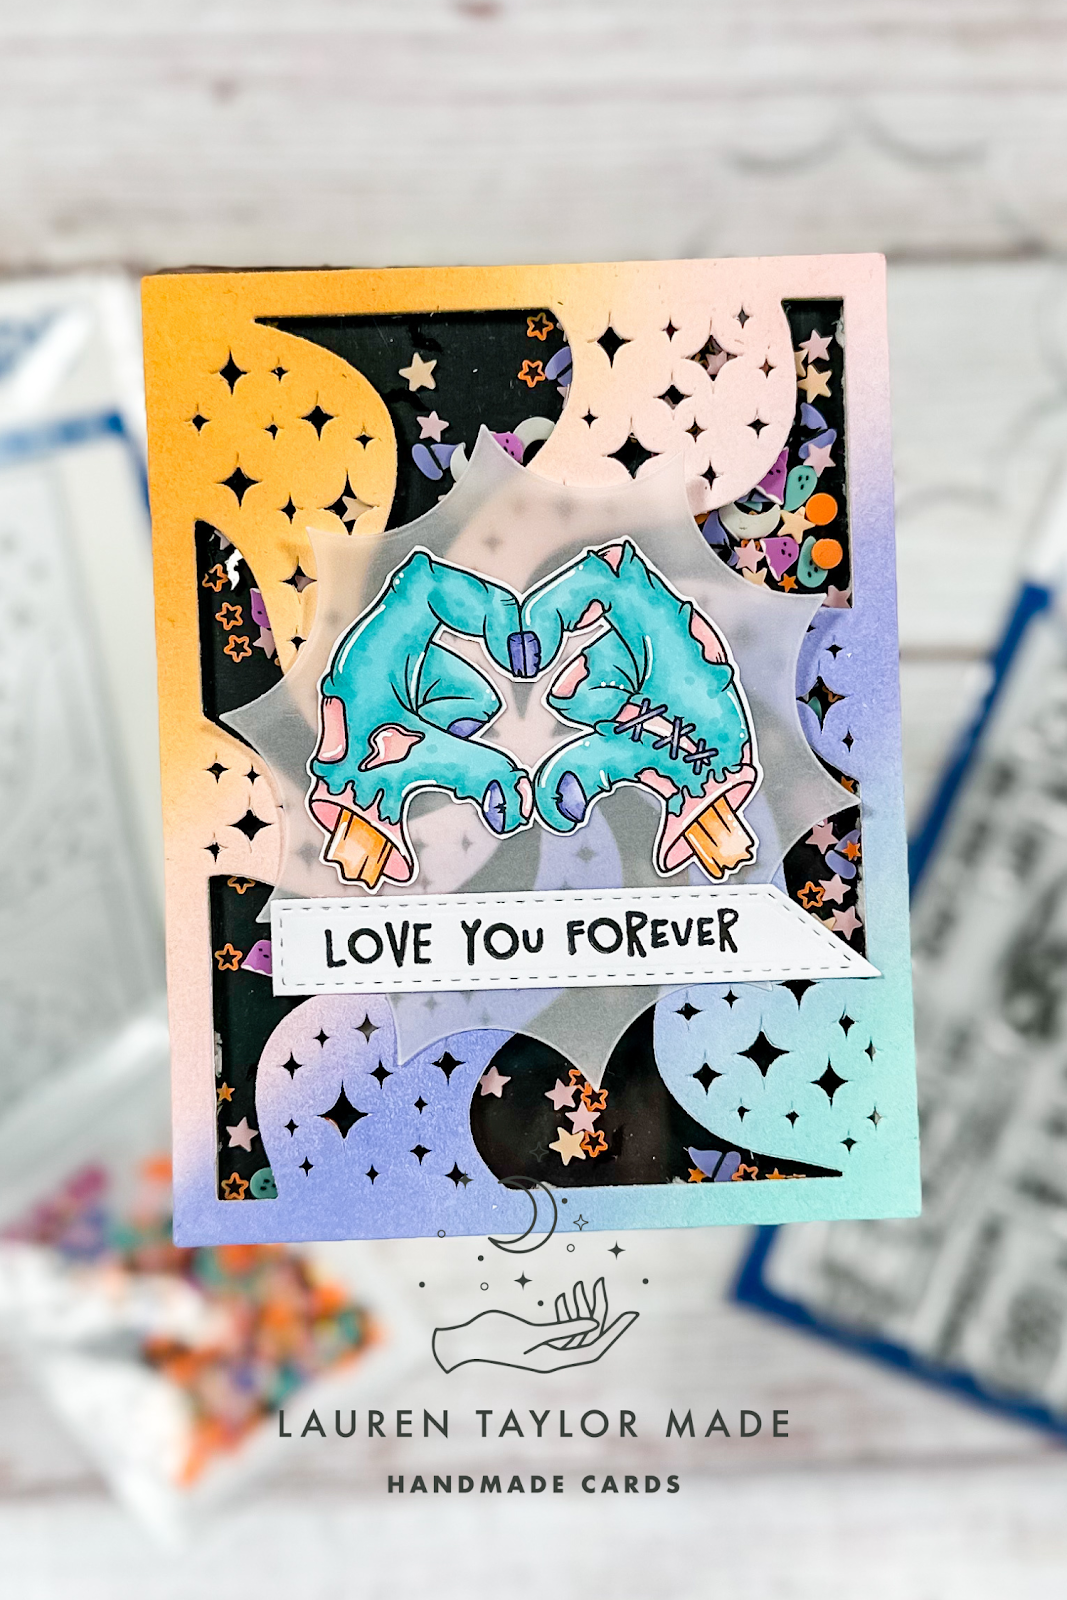
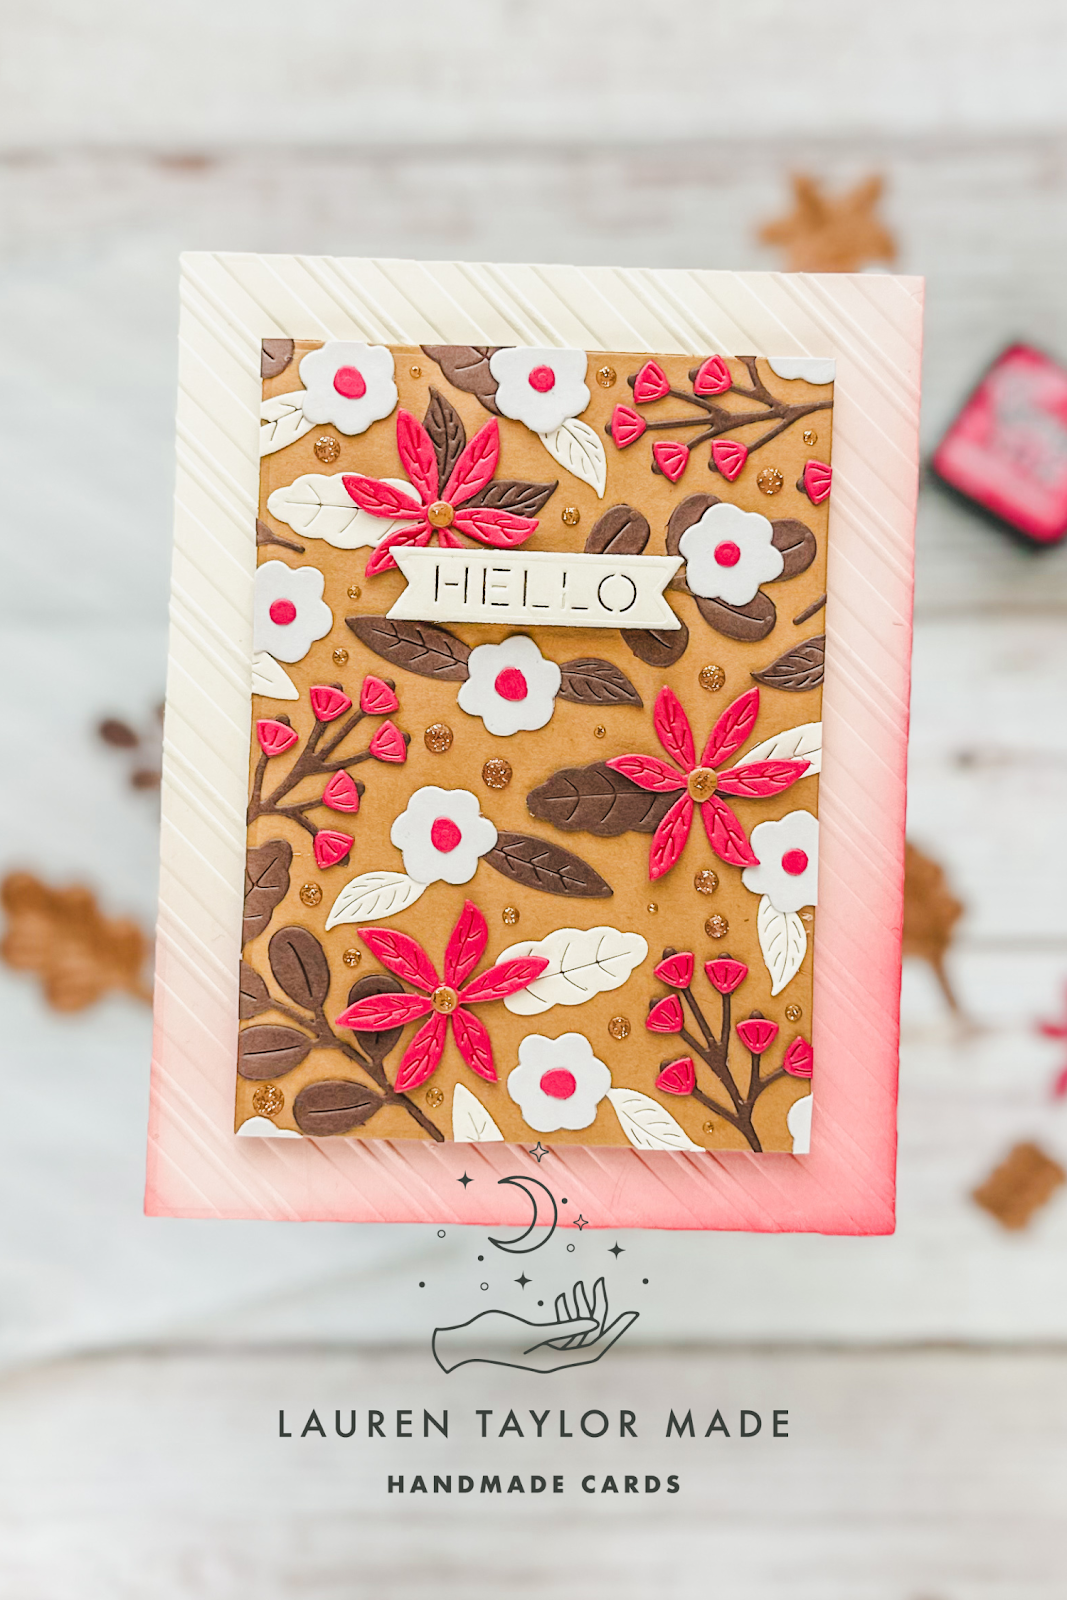
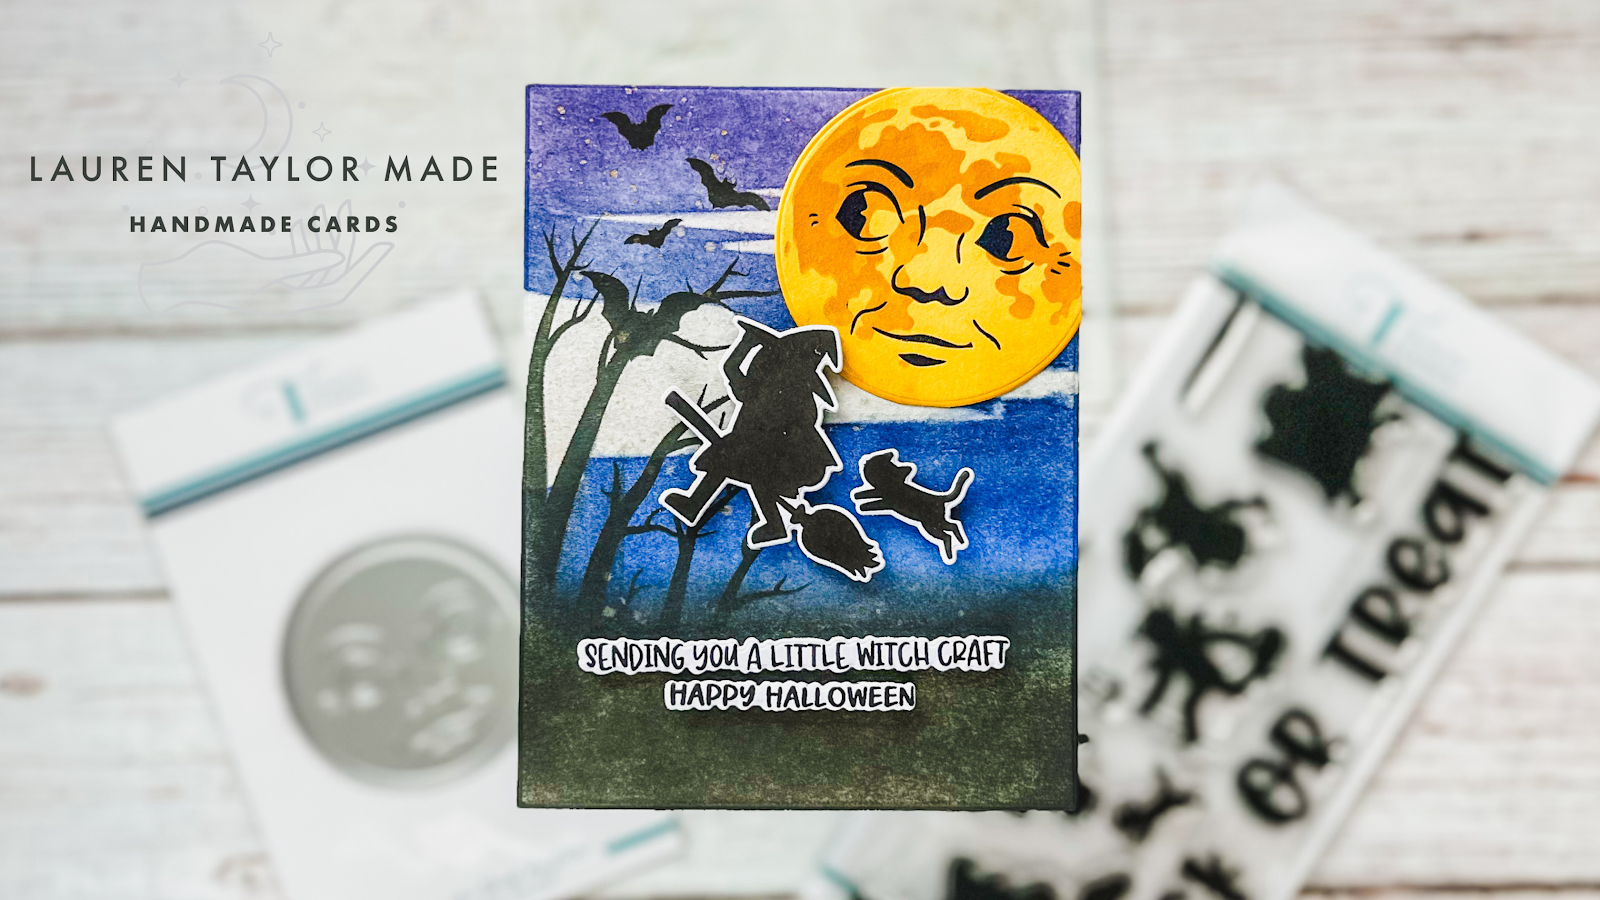
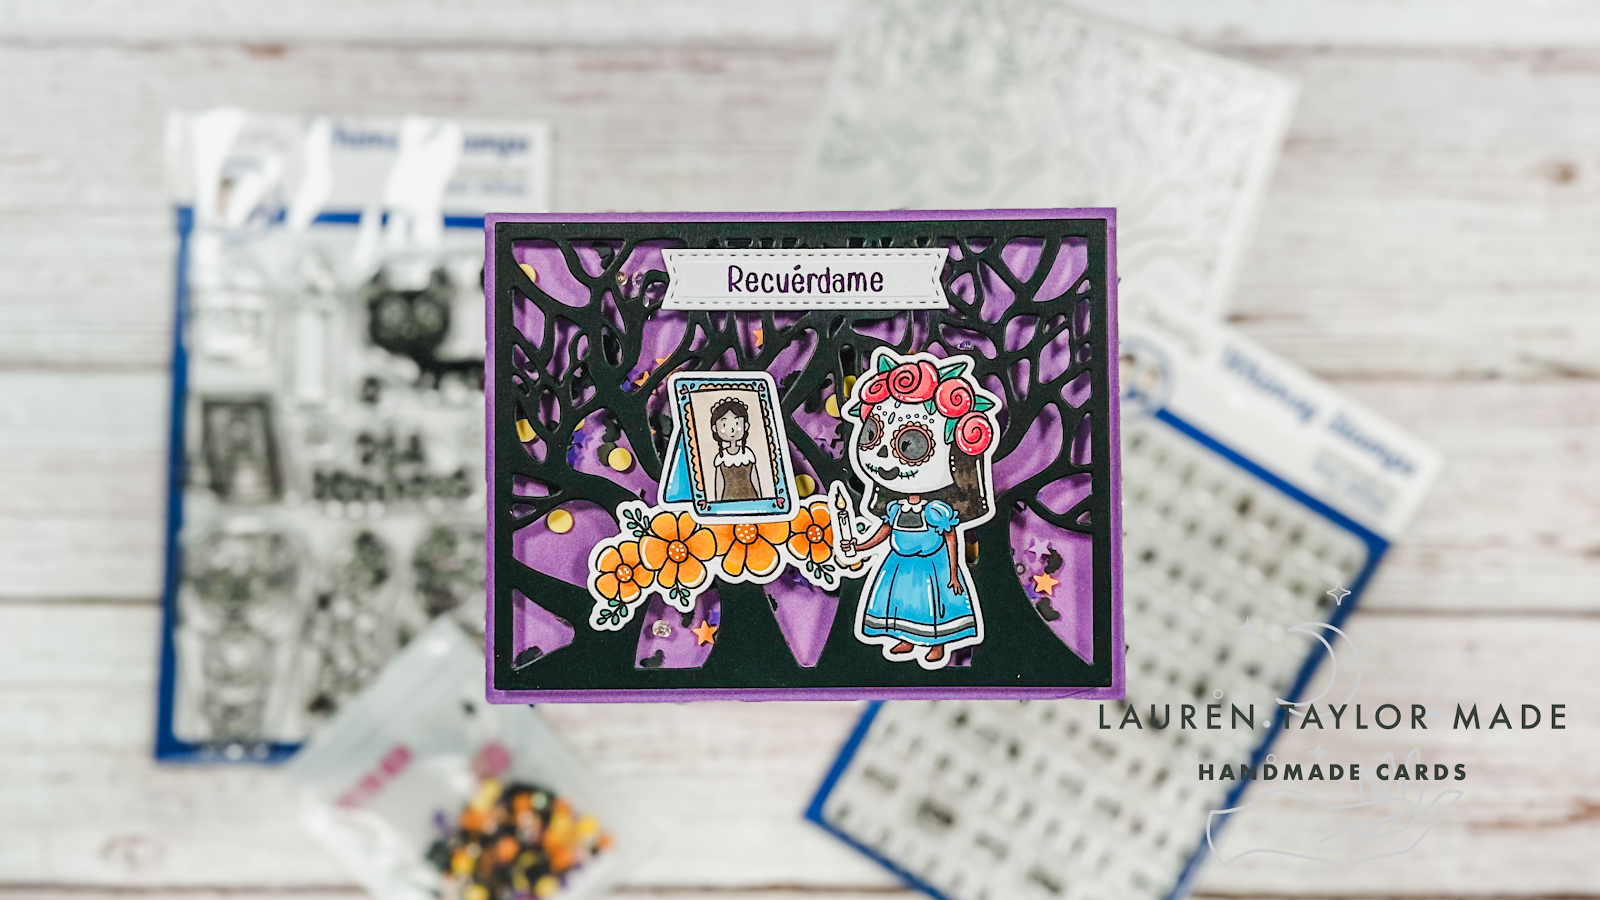
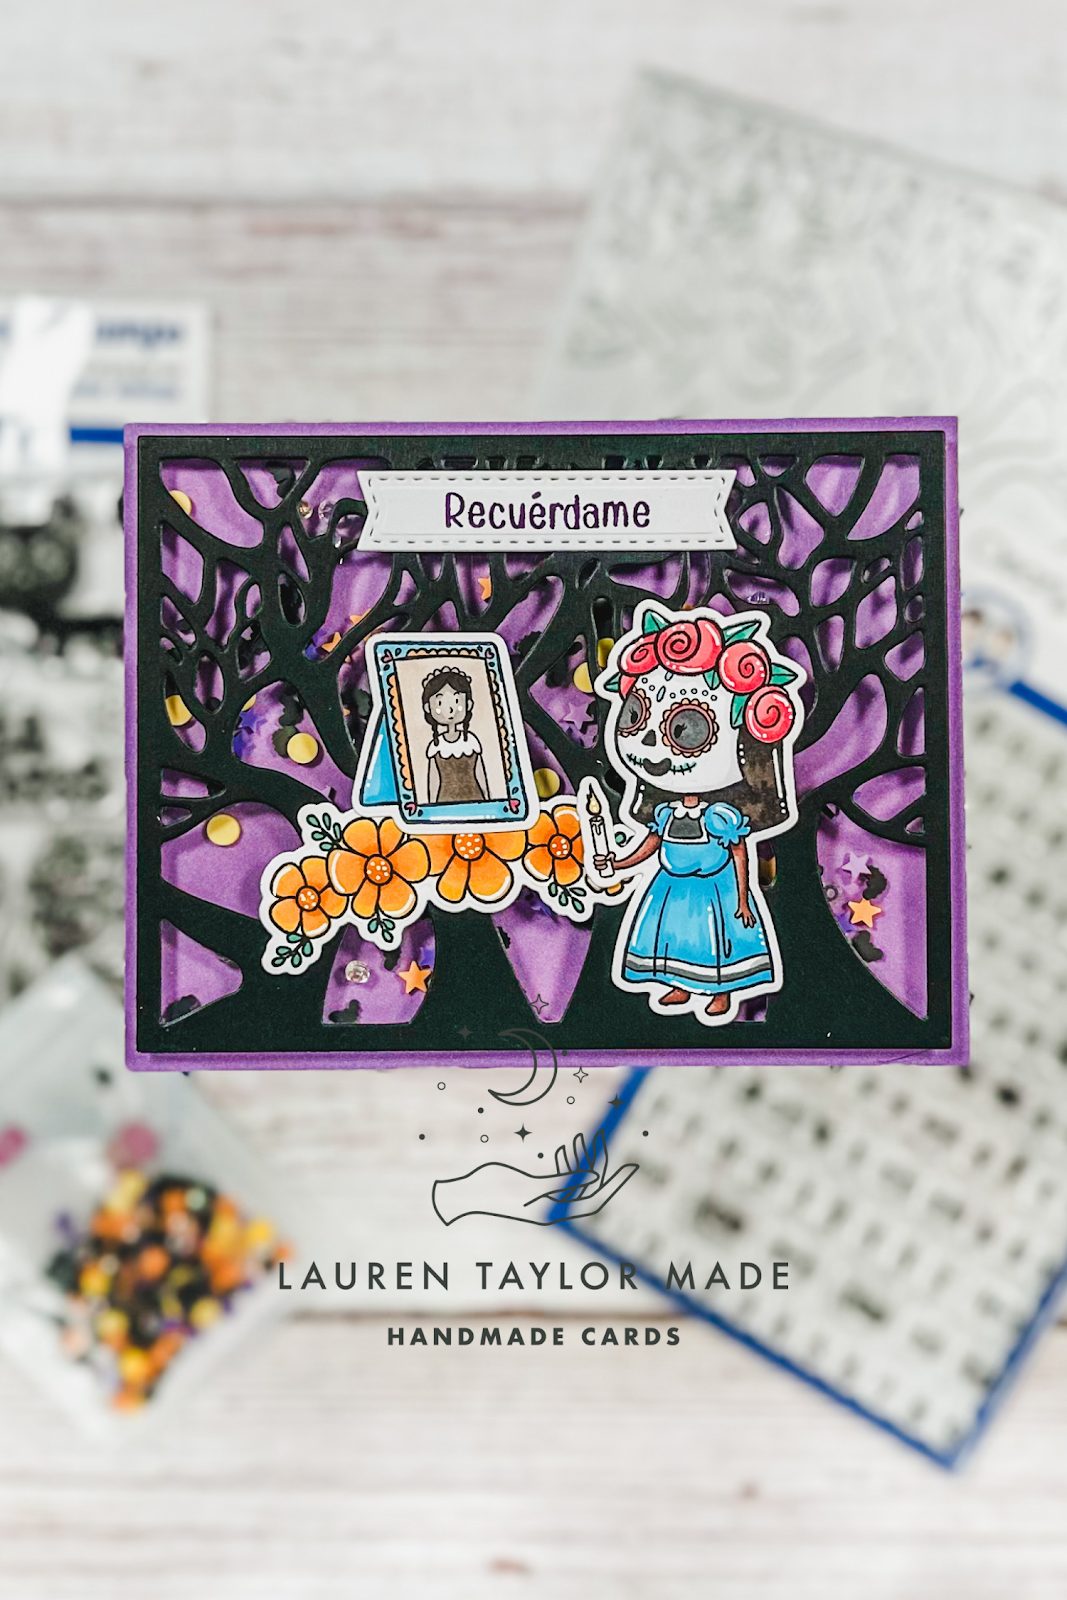
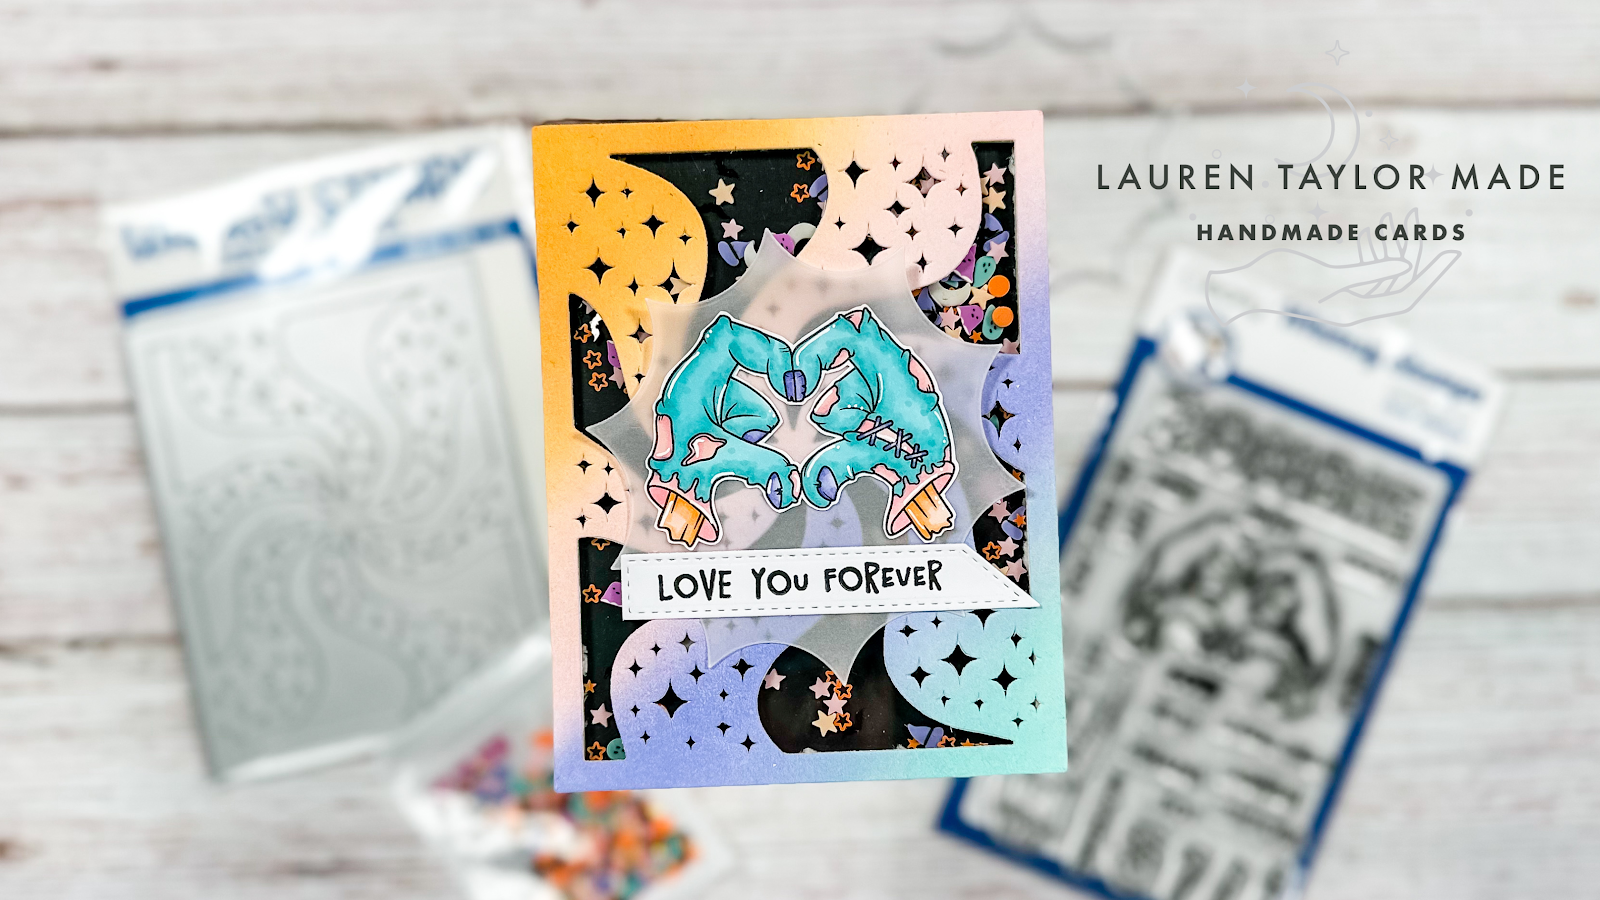
Happy Halloween! It's hard to believe that October is ending, but I'm going out with a shaker card with Whimsy Stamps and This Calls for Confetti. We're hopping along over on Instagram today to finish the Halloween Team time with Whimsy Stamps. I'm also excited that we're all using products from This Calls for Confetti and I just had to make a shaker card.

In my video today, I'm showing how I created my ink blended background, creating my shaker panel and quick coloring of my zombie hands. All the colors are inspired by the This Calls for Confetti Spooky Sparkles Confetti Mix that I think is just beautiful and I love that the moons got in the dark. I tried to show that in my last photo - can you see how the moons look a little bit green?

It was a fun few months working with Whimsy Stamps again for Halloween this year and I'm grateful for working with such a generous and wonderful company. I'm hoping you enjoyed the different styles of Halloween cards I made since August! Stay safe out there my friends and Happy Halloween!

VIDEO TUTORIAL


PIN THIS
SUPPLY LIST

Read More

Christmas Tree Shaker Card with Pretty Pink Posh

Sunday, October 29, 2023

I love how easy shaker cards can be with the new Pretty Pink Posh Tree Cover Plate Die and we’re going to make one together today. I am starting with some watercolor cardstock and adding different Distress products to create my own colorful paper. Using Cracked Pistachio Distress Oxide, I ink squished the color on my glass mat and added water. I dabbed my paper into the ink and used my heat gun to dry the paper in between layers.

Once I was happy with the lighter green, I also added some Lucky Clover Distress Oxide. The green was looking so pretty, but I wanted to tie in some pink to match the Christmas Tree Mix, so I sprayed on some Distress Mica Spray in Sugary Gumdrop. Once the watercolor cardstock is dry, I used the Tree Cover Plate Die to cut out my panel for the front of my shaker.

You can watch the video below to see each step of the shaker assembly, but I layered the Tree Cover Plate with acetate, foam adhesive and a white and gray speckled background paper. This panel will be attached to an A2 card base. For my sentiment on the card, I am mixing dies and stamps - I used the Merry Script to die cut out of a dark and light pink cardstock and glued them together to create a drop shadow look. I also stamped a sentiment from the Sentiment Strips: Christmas Stamp Set in green on die cuts from the Sentiment Strips Dies. I layered the stamped sentiment on white with yellow and pink cardstock.

Since my card already has plenty of dimension being a shaker card, I adhered my die cut and stamped sentiments to the card with liquid adhesive. I hope you like this interactive Christmas card inspired by the colors of the Christmas Tree Mix and that you have lots of fun making cute christmas cards with this latest release!

VIDEO TUTORIAL


PIN THIS
SUPPLY LIST

Read More

Merry & Bright for Any Time of the Year with Spellbinders

Saturday, October 28, 2023

Don't you love it when a holiday set can really be used any time of year? I was gifted a couple items from the Spellbinders Merry & Bright Collection and I used them with shades of brown, grey and pink to create a "Hello" card. I started with adding some Distress Ink to the lower corner half of cream cardstock and embossed it with the new Peppermint Stripes Embossing Folder. This piece adheres directly to an A2 card base and I also used a nested A2 die to cut a piece of light brown cardstock.

Next I die cut a BUNCH of different elemnts from the Petite Blooms and Sentiments dies in cream, grey, dark brown and pink cardstock. I layered the pieces together and glued them randomly to the light brown rectangle. Once everything was dry, I trimmed off any of the die cut pieces that extended past the panel and even glued some of the excess to open parts of the panel. I popped this panel up to my card base with foam adhesive.

For final touches, I die cut my sentiment banner out of cream cardstock and layered a dark brown banner behind it so the letters are easier to read. This was popped up on my card with foam adhesive as well. I also used some Copper Glitter Pops of Color around the card background to fill in open spaces and to add some shine! I also added a little bit to the center of my pink flowers. I hope this card brings you inspiration today - especially to use Christmas themed products for any time of year!

PIN THIS
SUPPLY LIST

Read More

Holiday Clause from Kindred Stamps - 2 Cards for the New Release!

Friday, October 27, 2023

It's time for a new release from Kindred Stamps today! I am so excited to share the Holiday Clause stamp set with two fun cards. One is a spinner card and the other has my favorite North Pole duo. For my duo card, I started with ink blending my sky with blue inks and added my die cut tree line. I added some splatter to help give the background a little more interest. I wanted to make a workshop, so I used the Barn Dies to give that look behind my stamped duo. To finish off the card, I stamped my sentiment on a strip and added it above my stamped and fussy cut characters.

For my second card I die cut a circle out of my card base front and lined up my patterned paper and cut the circle so my card front would have some color. I stamped my sentiment towards the bottom and embossed it in white embossing powder. I die cut two smaller circles in white cardstock and stenciled on cookies (sorry, this is a retired stencil set! Kindred Stamps brought it back for this release!) with brown inks.

Using gold string, I added a strong from the top and bottom of the circle on my card base and adhered it in place. Then I adhered my patterned paper, lining up the circle opening. Finally, I glued my circles to sandwich the string in between. I adhered my characters - one on each side of the cookie circles. For just a few more touches, I added a garland die cut just under the circle and above the sentiment and added some Pops of Color in glitter colors for some shine!

I hope these bring you some inspriation and you have lots of fun shopping!

PIN THIS
SUPPLY LIST

Read More

A Little Witchcraft Silhouette Halloween Card with Trinity Stamps

Trying to sneak in a little more Halloween before the big day next week! I wanted to have some inky fun for today's card so I'm focusing a little more on stenciling a silhouette background for today's card. You can follow along with my Instagram Reels below! I started with stenciling my background sky and while I was was waiting for my watercolor splatter to dry, I stenciled some details on my hot foiled moon. I love the vintage look of this foil and die set!

Next I finished off my background with adding a dark ground and stenciled trees and some bats as part of my silhouette card. My moon is added to the upper right hand corner (even though I know it's impossible for clouds to be behind the moon), and a cutie witch with her pet cat flying off to celebrate the holiday. I used two different sets to create a sentiment for my card and that finishes it off!

I hope you like this quick silhouette card for Halloween using Trinity Stamps and that you have some fun following along in my short video.

VIDEO TUTORIAL


PIN THIS
SUPPLY LIST

Read More

Thankful Fall Wreath Card with Grateful Gnomes Bundle from Scrapbook.com

Thursday, October 26, 2023

Have you seen the latest Livestream Deal from Scrapbook.com? In case you missed it, you can watch the replay over on the site and do some shopping while you're there! I used the bundle to create my card today and I am in LOVE with the colors of the Daybreak A2 Paper Pad. I used every color on this card becuase I just could not narrow down what I wanted to use and they all just look so beautiful together!

I used the darker purple to be my background on my card base and die cut the lighter purple with the Geo Squares A2 Plate die. Before I glued them together, I sprayed them with Distress Mica Spray and this adheres to my card base. Next I took the two red colors and die cut them with the Cozy A2 Wreath die and added a little bit of Aged Mahogany Distress Ink to the center of the darker red. I adhered the lighter red behind the other, off centering the design but making sure the holes in the inner circles aligned.

Just like my purple paper, I added more Distress Mica Spray and then adhered the wreath to my background. I used the oranges and yellow papers to cut out a bunch of different leaves from the Autumn Leaves and Autumn Foliage die sets, added a light amount of Aged Mahogany to the leaves and also sprayed them with Distress Mica Spray. Lots of subtle shine on this card! I glued them around the weath to make it look fuller and with different leaves and colors.

I used the light grey brown paper to stamp three pumpkins and my sentiment from Grateful Gnomes in a light brown ink. I used the coordinating dies to cut out my pumpkins as well as my sentiment; I also cut out an additional two sentiments and layered them together to create a sturdy base. I added all of these die cuts to my card with foam adhesive. 

For some final touches, I added Pops of Color in different sizes around my wreath in Vanilla Bean Gloss and I just LOVE how this card came together. Make sure to check out the Livestream Deal before it sells out or ends; it's such a great deal for stamps, dies AND paper!

PIN THIS
SUPPLY LIST

Read More

Simon Hurley Christmas Cards with Spellbinders

Wednesday, October 25, 2023

Hi, friends! I just want to say... today's cards did not turn out how I imagined. But it's been a few days since I've been in the craft room and my crafty mojo was just not turning. So while these cards are not exactly how I imagined and my lighting was just terrible... I hope you still have some fun hanging out with me in my YouTube Channel today and find some inspiration from all of my blunders.

I will definitely be using these products again in the future so there will projects that feel more my style in the future. Now that I'm done making these projects, I already want to make a pink and white poinsettia card. How pretty would that be?! And I want to use the Geo Quilt for a Disney themed card because it's totally giving me EPCOT vibes. Let me know how you would use these products and help me get my mojo back!

VIDEO TUTORIAL


PIN THIS
SUPPLY LIST

Read More

Happy Fall Jar & Wreath Card with Pretty Pink Posh

Tuesday, October 24, 2023

Hi, friends! I am back with a new video using a mix of older and new Fall themed stamps from Pretty Pink Posh! I love that the new products work so well with previously released stamps so you can bring in what you already have in your crafty stash with your new products. As always, we’re starting with our stenciling because I’ll be using some stenciling paste and I want to make sure our background has plenty of time to dry. I used a panel of woodgrain cardstock trimmed to 4x5.25” and blended on Ground Espresso Distress Ink through the Deco Leaves Stencil.

When I was happy with the color, I cleaned off the stencil and added some stencil paste - this one is called Overheated Solar Paste. While the background is drying, I stamped the images I wanted to use from the Autumn Wreath Stamp Set and Fall Jar Stamp Set with a brown ink that is alcohol marker friendly using a MISTI. I used my Ohuhu Art Markers to color them in and then put them back in the MISTI to stamp the images again with Pinecone VersaFine Clair. Since I kept the stamps in the same spot, I now have a vibrant, brown outline to all of my images and I just LOVE how they look.

I used the Autumn Wreath Coordinating Dies and Fall Jar Coordinating Dies to cut out all of my images and by now my background is dry and we’re ready to assemble. I added the background with a tape runner to the center of my A2 card base in white cardstock. I glued down my wreath with liquid adhesive and added my jar with foam adhesive. I layered in the rest of the images with a mix of liquid adhesive and foam adhesive to give everything some dimension! I hope you liked this card and remember to check out the video to see all the details of the card come together!

VIDEO TUTORIAL


PIN THIS
SUPPLY LIST

Read More

Dying to See You Haunted Bride Card with The Sassy Club

Monday, October 23, 2023

You know I love my fandom sets and I am using the new Quick Sand sets from The Sassy Club to play along with Craft Roulette this week! The project is a card for a dude and while my project looks a little more on the non-dude side, it's a card for my dude. I thought it would be a fun anniversary card! You can watch my coloring and process in today's video, but I'll give a quick summary of how I met this week's requirements.

For library colors, I wanted a vintage and old book feel and luckily a couple of my new sheets of paper from the latest Your Paper Insider box helped me accomplish that feel. I also needed to figure out how to incorporate large flowers so I used a Scrapbook.com Stencil as the background for my haunted bride. Lastly, I have stitches by using stitched dies to cut all my cardstock! I hope you enjoy this fandom fun today and check out all of the haunted characters over at The Sassy Club.

VIDEO TUTORIAL


PIN THIS
SUPPLY LIST

Read More

Recuérdame Dia de Muertos Card with Whimsy Stamps

Sunday, October 22, 2023

Back to back Whimsy Stamps projects, but I have been meaning to get this card up and shared all month! I just love these sweet images and while it is a retiring set from Whimsy Stamps, hopefully you have it in your stash already or something similar. I started with stamping and coloring my images and used the coordinating dies to cut them out. I used the alphabet stamp set to stamp out my own sentiment in purple ink and cut it out with a sentiment strip die.

While I was die cutting, I also die cut the new Enchanted Forest Die to use it as the front of my shaker panel. I added a piece of acetate behind the panel and outlined the four sides with a thick foam tape. My backing is a piece of purple cardstock that is A2 in size. I added my confetti mix to my purple panel and then closed up my shaker with the tree panel. I added my images with liquid adhesive as well as my sentiment.

I think the theme of this card is so beautiful and I hope you like it, too! (And in case you need a translation, Recuérdame means "Remember Me."

PIN THIS
SUPPLY LIST

Read More