Eek! Cats & Bats Halloween Card with Whimsy Stamps

Thursday, August 31, 2023

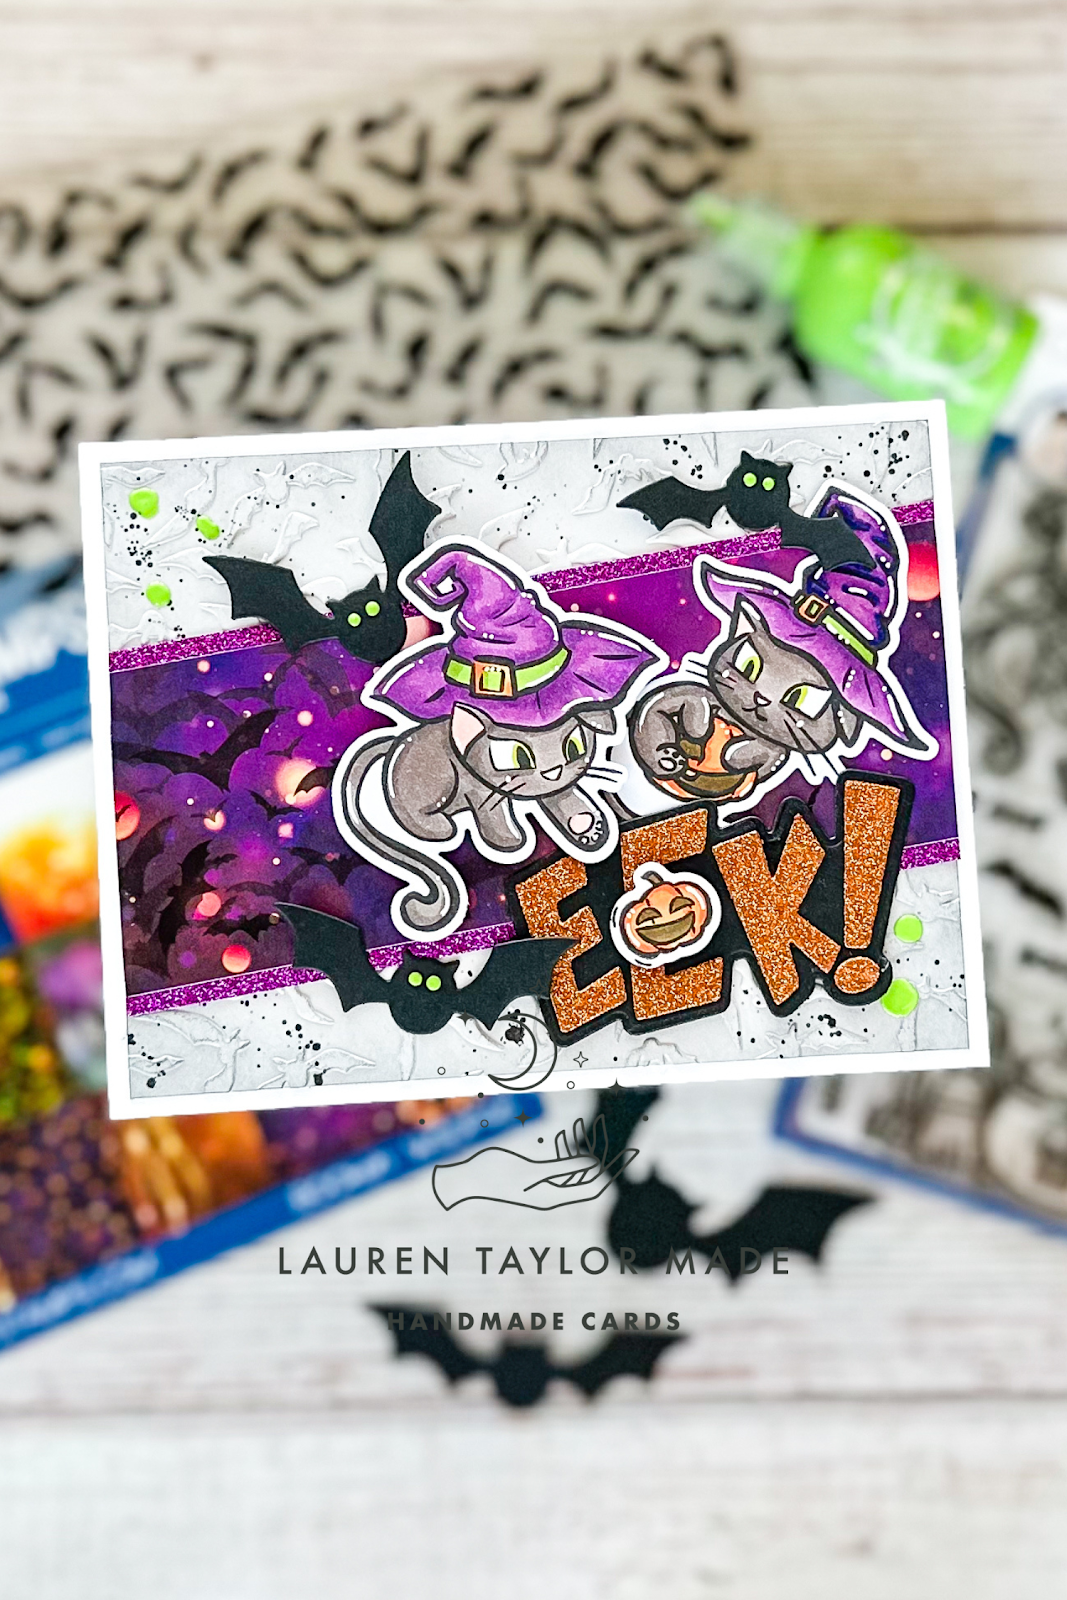
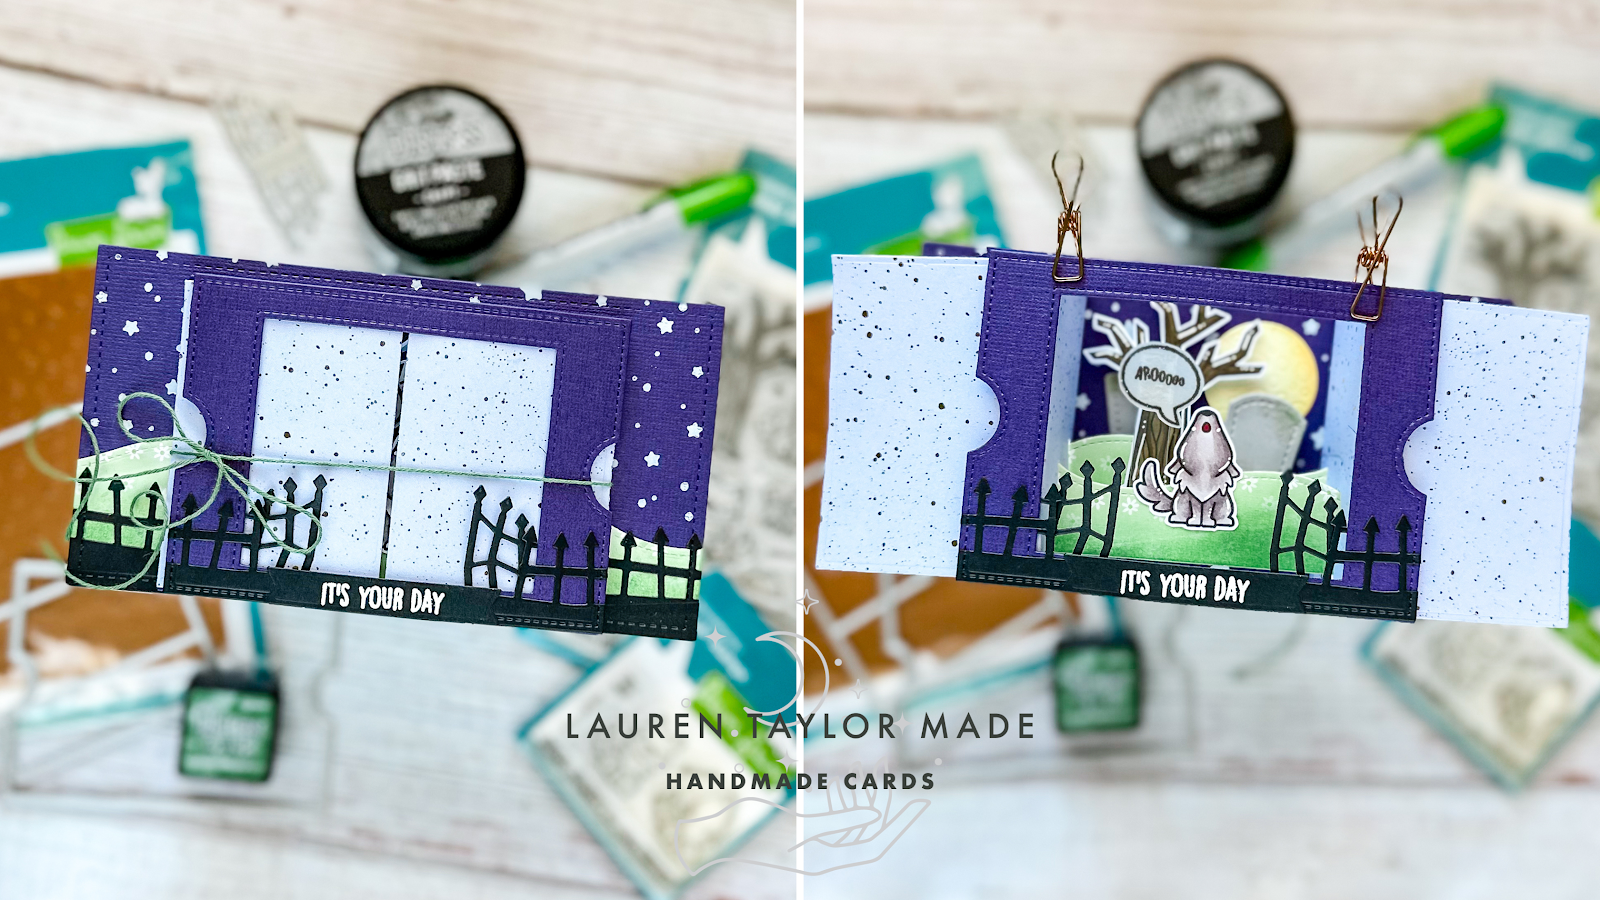
The last day of the month really snuck up on me and I did not get a video done in time to get it edited and up, but don't worry... There will be one tomorrow. But I still wanted to share something Halloween related so I have my next Whimsy Stamps Halloween project to share using a mix of older and new Halloween products. Also, my sketch is inspired by the August 2023 Show Us Your SheetLoad from Call Me Crafty Al

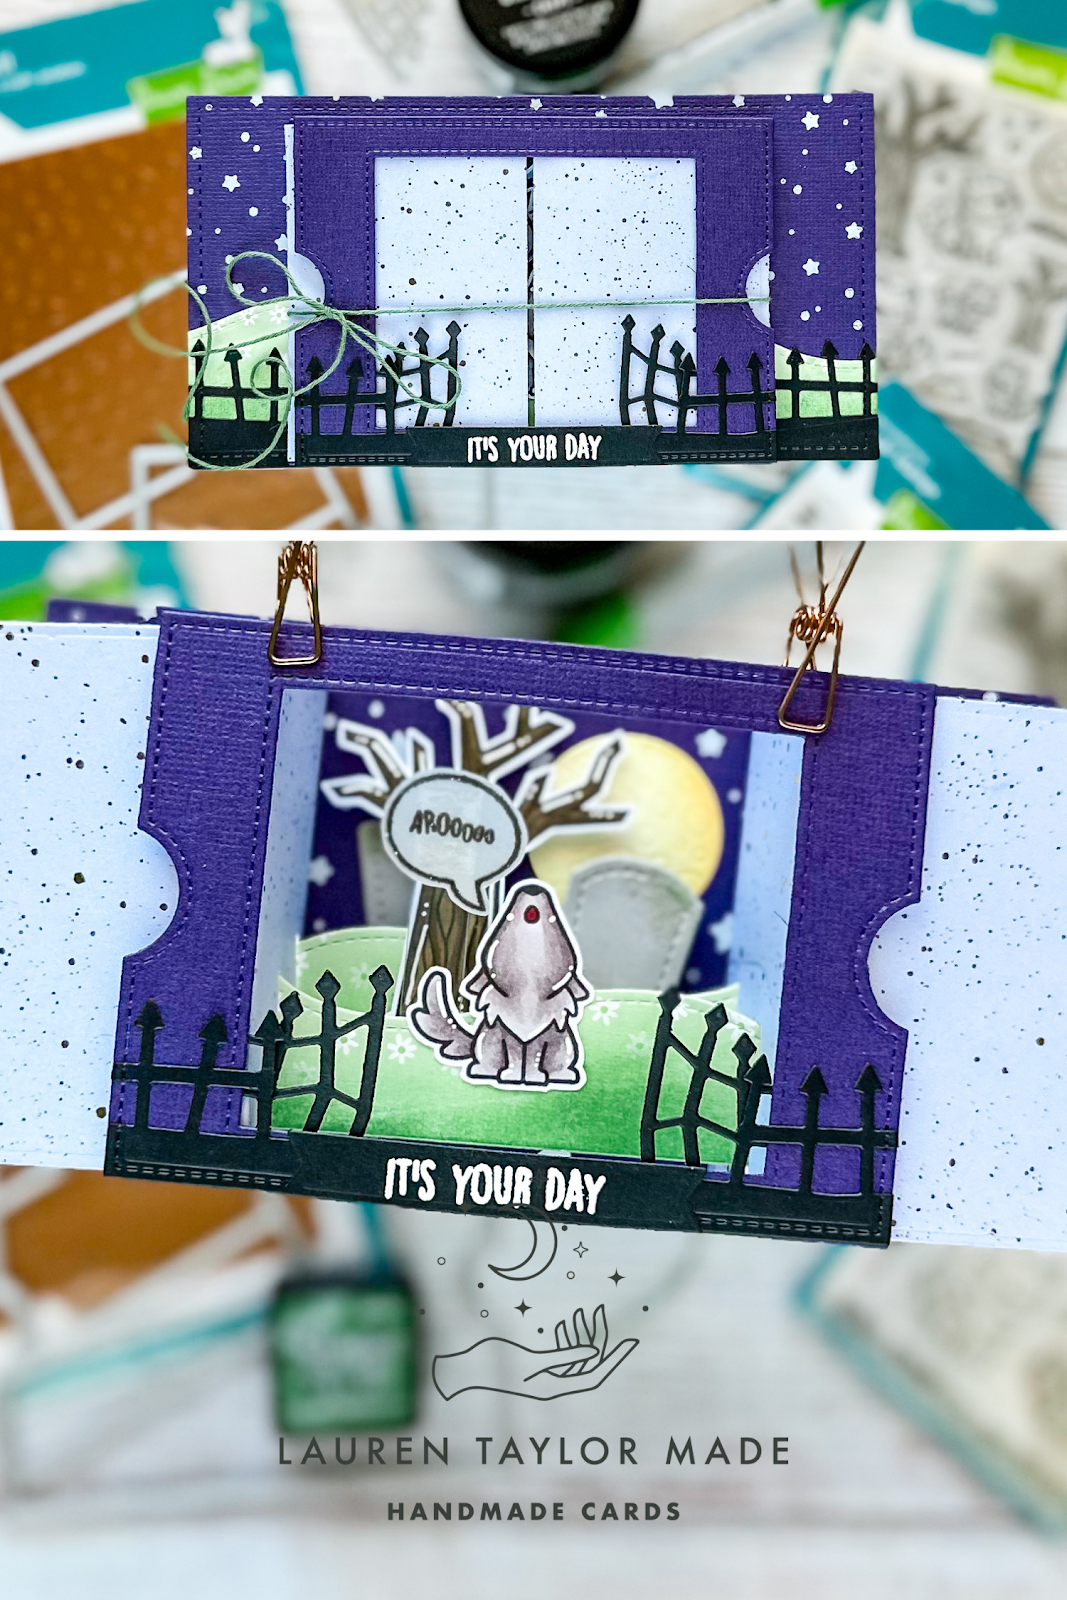
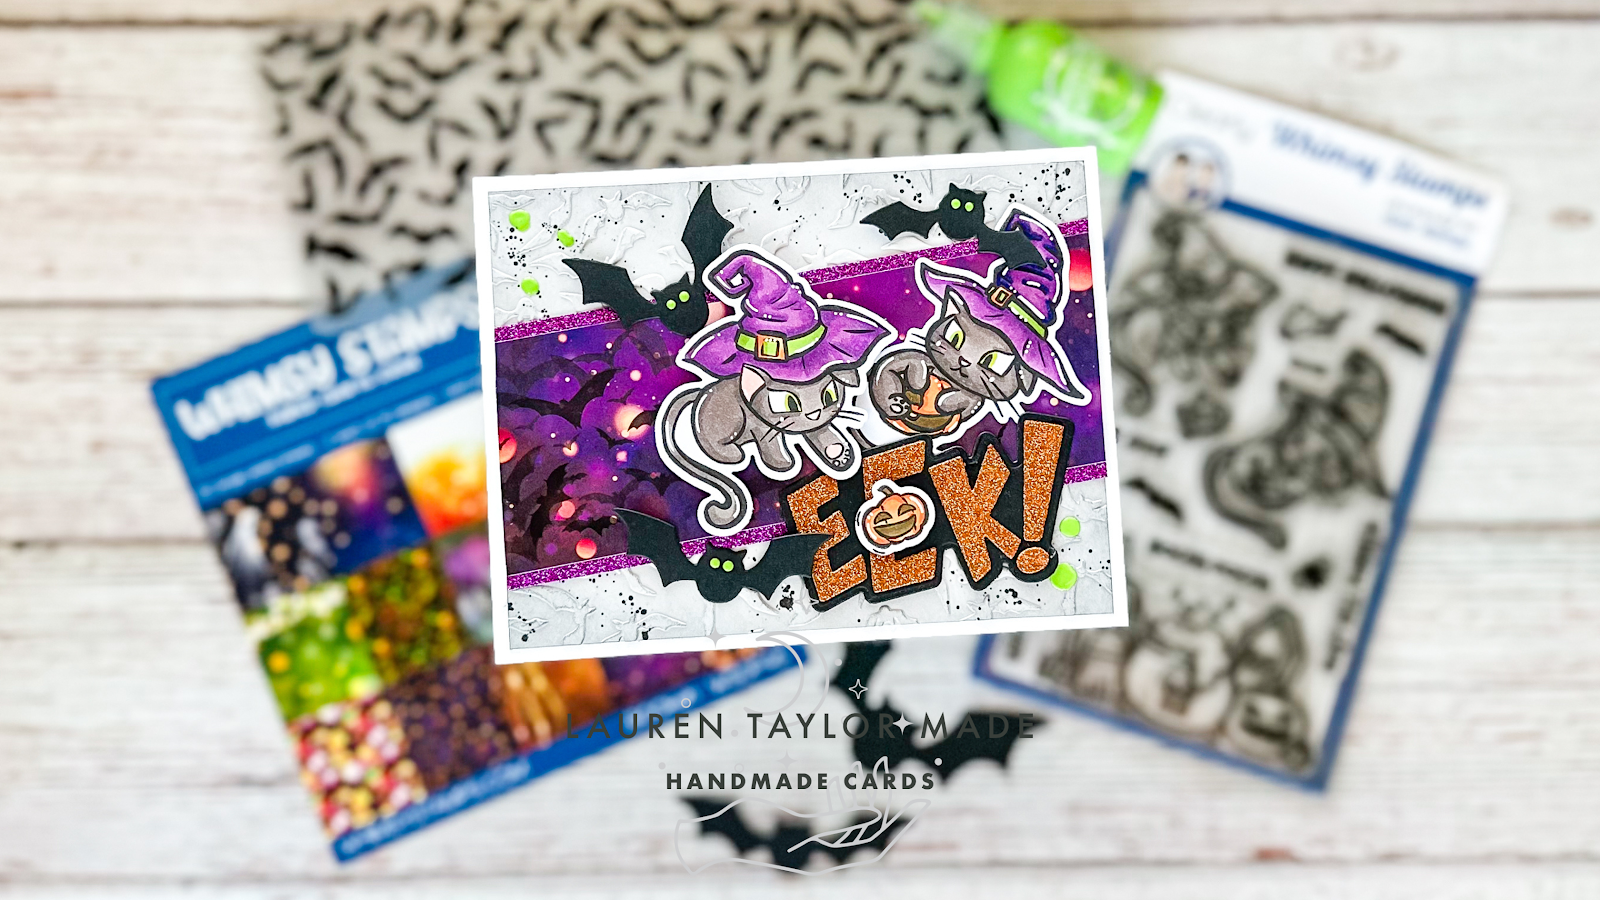
I started with making my background with the Bats Galore embossing folder. As it's slimline sized, I ran it through twice embossing the top of grey cardstock and then the bottom. I didn't worry about where they met on the cardstock as I knew it would be covered. I distressed some Black Soot around the edges of this 4x5-1/4" panel and splattered on some black ink. While it was drying, I stamped, colored and die cut my cute cat images! Abigail colored along with me and I snuck her pumpkin she colored inside my card.

Next I die cut my Eek! sentiment in black and orange glitter cardstock and bats out of black cardstock. I followed the sketch dimensions and layout to cut my Bookeh paper and strips of purple glitter cardstock. I layered the card together and added it to an A2, side-folding card base. I wanted to bring in more green as it was the color on the images I had not incorporated yet.

Using Key Lime Pops of Color, I added eyes for my bats and added some around the card. I hope you enjoyed this Halloween inspiration today and come back tomorrow for my official Halloween video of the month... next month. 

PIN THIS
SUPPLY LIST

Read More

New Tim Holtz + Sizzix Christmas Release! Joy Christmas Tree 5x7 Card

Wednesday, August 30, 2023

I was so excited to get more goodies from a Tim Holtz + Sizzix release from Scrapbook.com! In case you missed it, I also received some of the Halloween products back in July and I just feel so lucky to be able to share with you a project to inspire you as you wait for your goodies for Christmas! Make sure to check out the new release and shop over at Scrapbook.com.

I used lots of Tim Holtz products, but the two new dies in my video todaywith Sizzix are called Trim A Tree Colorize Thinlits and Big Tidings Thinlits. Scrapbook.com also gifted me a couple 6x8 paper pads in Christmas and Peppermint so I used different shades of green, teal, brown, pink and grey to cut out all of the pieces. I love when I have coordinating paper to use for Colorize die sets! Makes it so much easier to put together.

Let me know down below what your favorite new products is from the recent release and make sure to check out my video for the process of assembling the Trim A Tree die cuts and this 5x7 card!

VIDEO TUTORIAL


PIN THIS
SUPPLY LIST

Read More

New from Lawn Fawn! Ta-Da! Diorama Box Card for a Spooky Birthday

Tuesday, August 29, 2023

You know I love a good interactive die! Especially when it helps create an adorable scene! I intended to film this idea, but I really wanted to play out how the die goes together before I recorded myself and boy am I glad... I was a hot mess putting this card together. I'll walk you through each layer of my card, but I definitely did not put it together in an effective manner, haha! So we'll just pretend I did things as logically as I explain and not trying to hot foil stars after gluing my hill and fence down...

The mini slimline base is using textured, purple cardstock and cut with the largest (6.5 x 3.5") die from PopsicleSticks and while it looks great, I wish I would have gone with the second largest (6.25 x 3.25") as it would have been the perfect size to fit evenly with the Ta-Da! Diorama. Next, you should hot foil on the starry sky background (I used opaque white) and then add your hills and spooky fence. The hills are all cut out of a flower patterned paper (freebie in my order) and the spooky fence is in black cardstock. I added a little Distress Ink to give my hills dimension.

Next is the Ta-Da! Diorama and I just followed Lawn Fawn's video to make sure I understood how to assemble the dies. My front and back were cut out of the same purple cardstock and I added stars to my background as well. The side pieces are from the new Spiffier Petite Paper Pack with the gold (so shiny!) and my hills are cut and colored the same as my side hills on the mini slimline. I also added a gate for my fence to the corners, gluing them to the back side of the open window of the cardstock.

I die cut my moon and tombstones next. I added some Distress Ink to my die cut pieces, but I also added some Grit Paste and a little Distress Crayon to my tombstones to give them an aged look. After stamping, coloring, and cutting out my images, I glued them to my hills. It's important to know that you can only fit a little bit on the front hill. I had one of the tombstones next to my wolf, but the Diorama would not close! So make sure you don't put too much on the front hill that is bigger than the side openings where the inserts slide through.

My moon was glued to the background as well as the tombstone that used to be in the front and I added the second tombstone to the back hill. My sentiment for the front of the card was die cut from one of the banners in the interactive die set and I embossed the stamp in white. The inside is using yellow and purple ink and kind of completes the sentiment on the front to fit the theme. When I glued my Diorama to the min slimline, I added in a piece of green twine to die the interactive part closed so I can put it into an envelope without worrying it will move around or not come out of the envelope cleanly. Not sure if I'll do that again, but it's a tip in case you are worried about that, too.

I hope you like this card and I'll definitely be making a video with this die and stamp soon! Maybe not together, but you'll see them featured on projects.

PIN THIS
SUPPLY LIST

Read More

Whale Congrats! Celebration Card with Scrapbook.com

Monday, August 28, 2023

Getting a little punny with today's card! I just love the coordinating Whales Stencil with the Whale Hello Stamp Set together and I wanted to make a fun card that I could save for a nephew in my life. I'm realizing more and more that I don't make enough little kid cards (especially with color schemes and themes my nephews would enjoy) so I'm going to try and make a few more of those.

I have a shorter video sharing the steps of how I made this aquatic mammal card and I hope you enjoy it. I'm working on how to make better ASMR videos, but I'm definitely trying to get better at them. If you have any tips, let me know. Make sure to check out the sales with Scrapbook.com this week, too! It's Cards for Kindness Week and there's some great promotions and freebies going on this week so it's a good time to shop.

VIDEO TUTORIAL

@laurentaylormade whale congrats with @scrapbookcom #craft #crafttok #handmade #handmadecard #asmr ♬ original sound Lauren

PIN THIS
SUPPLY LIST

Read More

Best Mom Ever Slimline Card with Pigment Craft Co. + Dies from PopsicleSticks!

Sunday, August 27, 2023

A couple things that I am excited to share in this card... First, how cute is this sized mini slimline card? I think it's going to be my new favorite sized card. It's 6.5x3.5" and is also perfect for layering with other mini slimline products as they tend to measure 6x3". I was gifted them from PopsicleSticks and they will be on her Etsy site soon. You can also buy her cards over there, so go support her store! I'll make sure to post on my Instagram/Facebook stories when they're live on her store!

Second is that I finally used stamps that I've been hoarding haha. I absolutely love the style of Pigment Craft Co. stamps and dies... and I bought some to make sure I liked them before I bought more... but I finally used this beautiful stamp set called Fresh Cuts and now I want to make all the Mother's Day cards with this set and style of card. It's inspired by Craft Roulette and I'll make sure to bold the requirements so you can see how I met them.

I started with creating my tie dye inspired background using a TCW Stencil and my own concoction of Cloud Whip with Distress Mica Stains. It turned out pastel like Easter candy! Using the smaller of the slimline sizes, I die cut out of some watercolor patterned paper and laid my stencil on it. Then I mixed three different colors and randomly added it to my stencil and used a wide scraper to spread it and just added a little here and there with a small spatula if any areas were missed.

While it dried, I stamped out my flower images and die cut them out. I love the added touch of the embossed tie around the bouquet! I also die cut out my mother's day sentiment and the rest of my slimline die cuts (scalloped and the largest rectangle) out of pretty, coordinating cardstock. Once my background as dry, I layered my pink paper to the card base, then the gold scallops and I popped up the tie dye background with foam adhesive.

My sentiment was glued down to the stenciled background and I popped up my floral bouquet after layering all of the flowers inside the die cut opening. I added a few Pops of Color to for some extra glossy shine and interest around the card. What do you think? I love how it turned out and am excited to save it for my momma.

PIN THIS
SUPPLY LIST

Read More

Three Enchanted Princess Cards with The Sassy Club

Saturday, August 26, 2023

I couldn't narrow down what I wanted to create and share for these Enchanted Princess sets, so I just decided to put all three into one video and one post! It's a longer video today, but I'm walking you through how I put together my evil queen villain A2 sized card, my seven friends at their day job slimline card and finally my enchanted couple book box die card. Make sure to let me know if you want to see a more detailed video of putting the Book Card Die set in the future, but I made sure to show all my steps in the video.

Before I started recording, I stamped all of my images with Onyx Black Ink from The Sassy Club and colored them in with my Ohuhu Art Honolulu Markers. I used my Scan N Cut to cut out all of these images because there were just so many! I also planned out my cards a bit and die cut all of the pieces I needed from each of the die sets with different types of cardstock so I could be ready to assemble once I started filming.

Let me know what you think of the possible ending I talked about in the video and which card is your favorite! I'm already working on ideas for the next set of cards with another fandom bundle from The Sassy Club. Let me know if you have a set(s) idea from The Sassy Club!

VIDEO TUTORIAL


PIN THIS
SUPPLY LIST

Read More

Fabulous Foliage Thanksgiving Card with Trinity Stamps

Friday, August 25, 2023

I love a good stamp and stencil duo! It makes coloring simple and with a layering stencil set, you can use lots of different colors for one background. I'm using Trinity Stamps Fall Foliage set to make a Thanksgiving themed card and I went with warm tone leaf colors. You can watch my process video in a short video down below, but I'll still walk through the process.

After embossing the stamp with gold embossing powder, I used the stencil set with Distress Oxides and then splattered gold watercolor. I hot foiled my sentiment on some wood paper from my Your Paper Insider Box 3 and used the coordinating die to cut around the "Thanks" sentiment. I glued the background to a piece of cardstock and that was adhered to my card base. My sentiment is popped up with foam adhesive and I added some rhinestones for more bling.

I hope you liked this card! What color combination of the leaves do you think I should use next?

VIDEO TUTORIAL

@laurentaylormade fall leaves with trinity stamps #asmr #crafttok #diy #handmadecard #handmade ♬ original sound - Lauren

PIN THIS
SUPPLY LIST

Read More

Spellbinding Family - New Release from Kindred Stamps!

It's a new release day for Kindred Stamps and there are some great new products for the upcoming Halloween holiday! Head over to shop the new release here. I have the new Spellbinding Family stamp set and if you're a child of the 90s, you probably watched this made for tv movies. I wanted to try and embrace as much as I could from the movie series, so I wanted to create a feel of some of the iconic images.

My first card has all four character images from the stamp set and I tried to model the look of the movie poster! There was a pink an purple sky with blue magic swirls, so those are the colors I used to make my distressed background. I splattered on some white metallic watercolor to give it more magic. I die cut my neighborhood building in purple and added yellow behind the windows. I layered some green grass in front of the buildings and added in my characters as well as adding my sentiment to the top in black ink.

My second card has this iconic grandma and I tired to create what could look like the giant pumpkin in this magical town. I have a piece of Celestial patterned paper as my night sky, then the orange circle (again, trying to give a vibe of a pumpkin) with a white fence. I popped up some yellow grass to look more like hay with my sentiment. I added some ink on my orange and yellow cardstock to give it a little dimension. My grandmother is popped up with foam adhesive so she's on the same perspective level as the hay.

My final card is a shaker card! My background is made with the Celestial Stencil and some gold Lunar Paste. I thought this design looked like my witch's hat and knew I had to pair these two together. While my background dried, I stamped and die cut my sentiment with a strip. I made the background as a panel shaker and used some pretty sequins from a retired Sparkle Blends mix. My image and sentiment were glued directly to the acetate of my shaker panel.

I hope these cards give you inspiration of this new set and that you have a lot of fun shopping!

PIN THIS
SUPPLY LIST

Read More

Sweater Weather Turkey with Scrapbook.com

Thursday, August 24, 2023

When I saw the "sweater weather" sentiment, I knew I wanted to make a card involving a sweater in some way. I decided that I would put a sweater on my die cut turkey! You can watch my video down below to see my process of adding ink and gluing the pieces together of my turkey. I also used some patterned paper for my background and sentiment. The Cozy paper pack is definitely one of my favorites and perfect for this upcoming Autumn season.

I went with a warmer color scheme, but I think this turkey would also be really cute with more a cool color scheme with darker blues and browns... Maybe I'll have to make another turkey in a sweater! I'd love to know what critter you would put in a sweater! Let me know in the comments.

VIDEO TUTORIAL


PIN THIS
SUPPLY LIST

Read More

Cowabunga Dude Pizza Party Card with The Sassy Club

Wednesday, August 23, 2023

The Sassy Club has two sets perfect for those who enjoy these teenage reptiles! Cowabunga and Rat Master work so well together; while I only use images from Cowabunga, my solid pizza stamp and part of my sentiment is from Rat Master. My card layout is inspired by last Friday's episode of Craft Roulette and I will bold any of the requirements so you can see how I applied them.

I started with die cutting green cardstock with the Lawn Fawn Foursquare die to make four, small picture frames for my images to pop out of when I assemble the card. Next I stenciled my background with the Checkered Stencil with Lumberjack Plaid Distress Ink and trimmed it down to fit behind the four windows in my green cardstock piece. I also added some Mowed Lawn Distress Ink around the edges of this piece of cardstock.

Using the same ink, I stamped a bunch of pizza slices along the bottom of the green cardstock; I made sure to rotate my stamp so it would look random and a bit chaotic. The second part of my sentiment was stamped to the center bottom with Green Oasis VersaFine ink and I decided to stamp the first part of my sentiment with black ink on white cardstock so I could color in the "Cowabunga!" with a red marker. I fussy cut around the words and popped it up right above the pizza party sentiment.

My images (inspired by comics, cartoon tv shows and video games) were all stamped with Sassy Club Ink in Onyx Black and I colored them in with my Ohuhu Honolulu Art Markers. I used my Scan N Cut to cut arounnd my images and added them by gluing their feet to the back of the green cardstock windows and the tops of their heads and anywhere else they overlapped the window edges on the front. I added foam adhesive all along the back and added the checkered background. To glue to the card base, I added liquid adhesive behind the checkered background and the rest still had foam adhesive so it stuck perfectly on the cover.

For some final touches, I added colors inspired by summer vacation (I already have green for grass) and the colors of these turtles' masks with Pops of Color - blue for skies, red for wagons, orange for the sun and purple for #TeamPurple. 😉 I hope you like this card and that you're playing along with Craft Roulette, too!

PIN THIS
SUPPLY LIST

Read More