Dearer to Me Mini Slimline Shaker Card for Twiddler's Nook

Friday, May 31, 2024

Happy last day of the month! It's hard to believe May is coming to an end, but at least we get to talk about Halloween. I totally missed some Halloween inspiration last month... It was just a wild month and I had just way too much on my plate. These videos are mostly just for me and sharing my love of Halloween, so unfortunately it can get pushed off the plate if need be (like my Christmas videos the month before that).

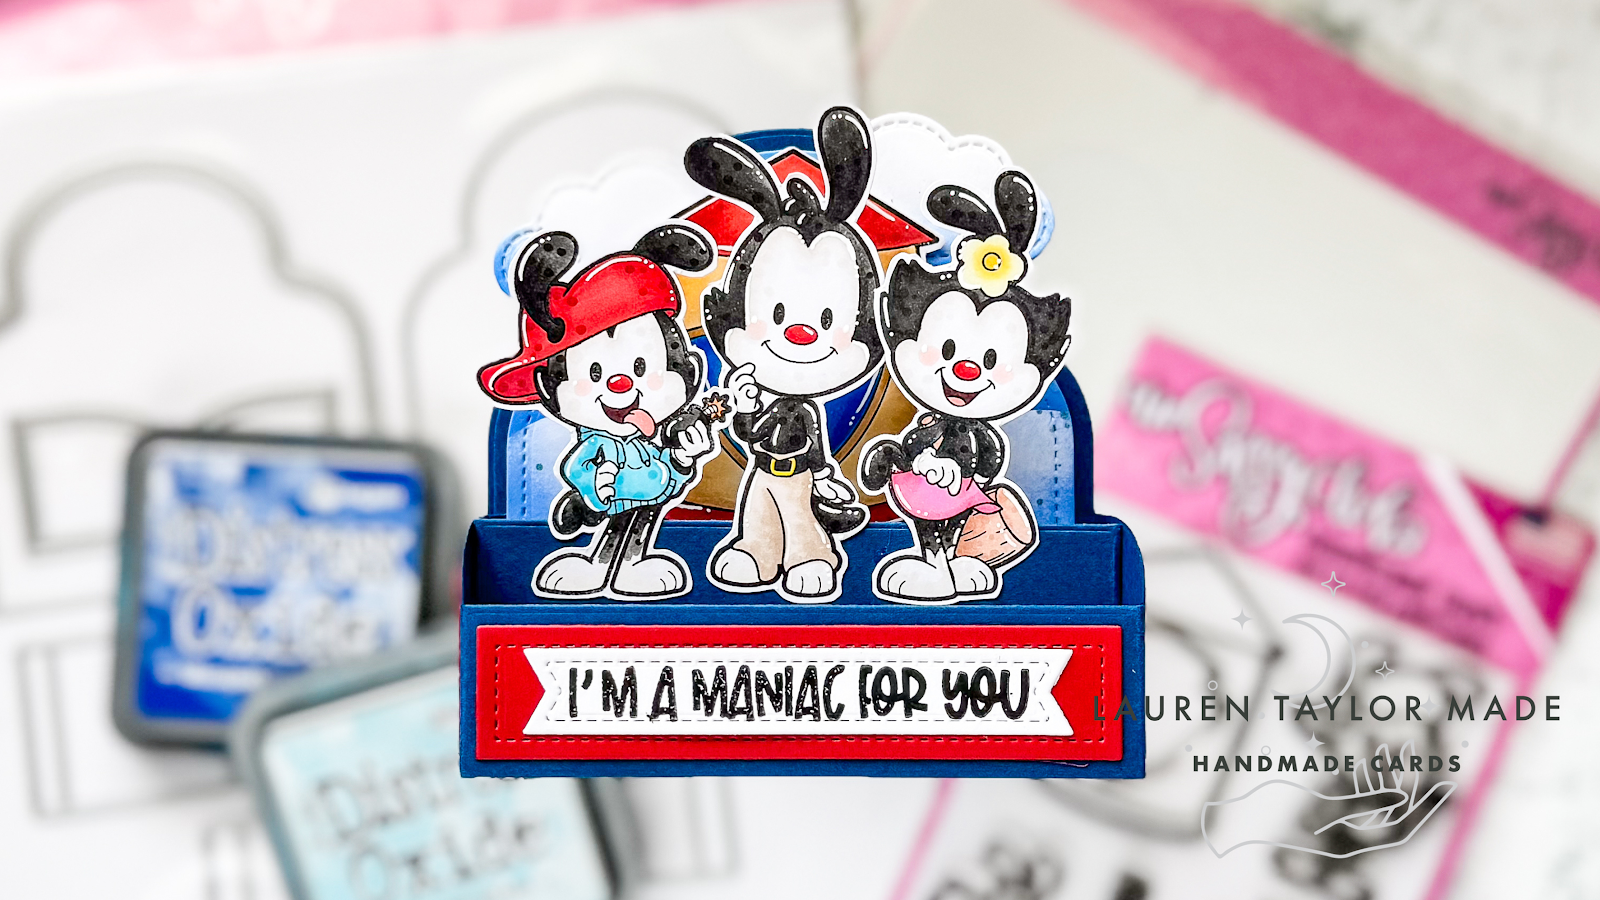
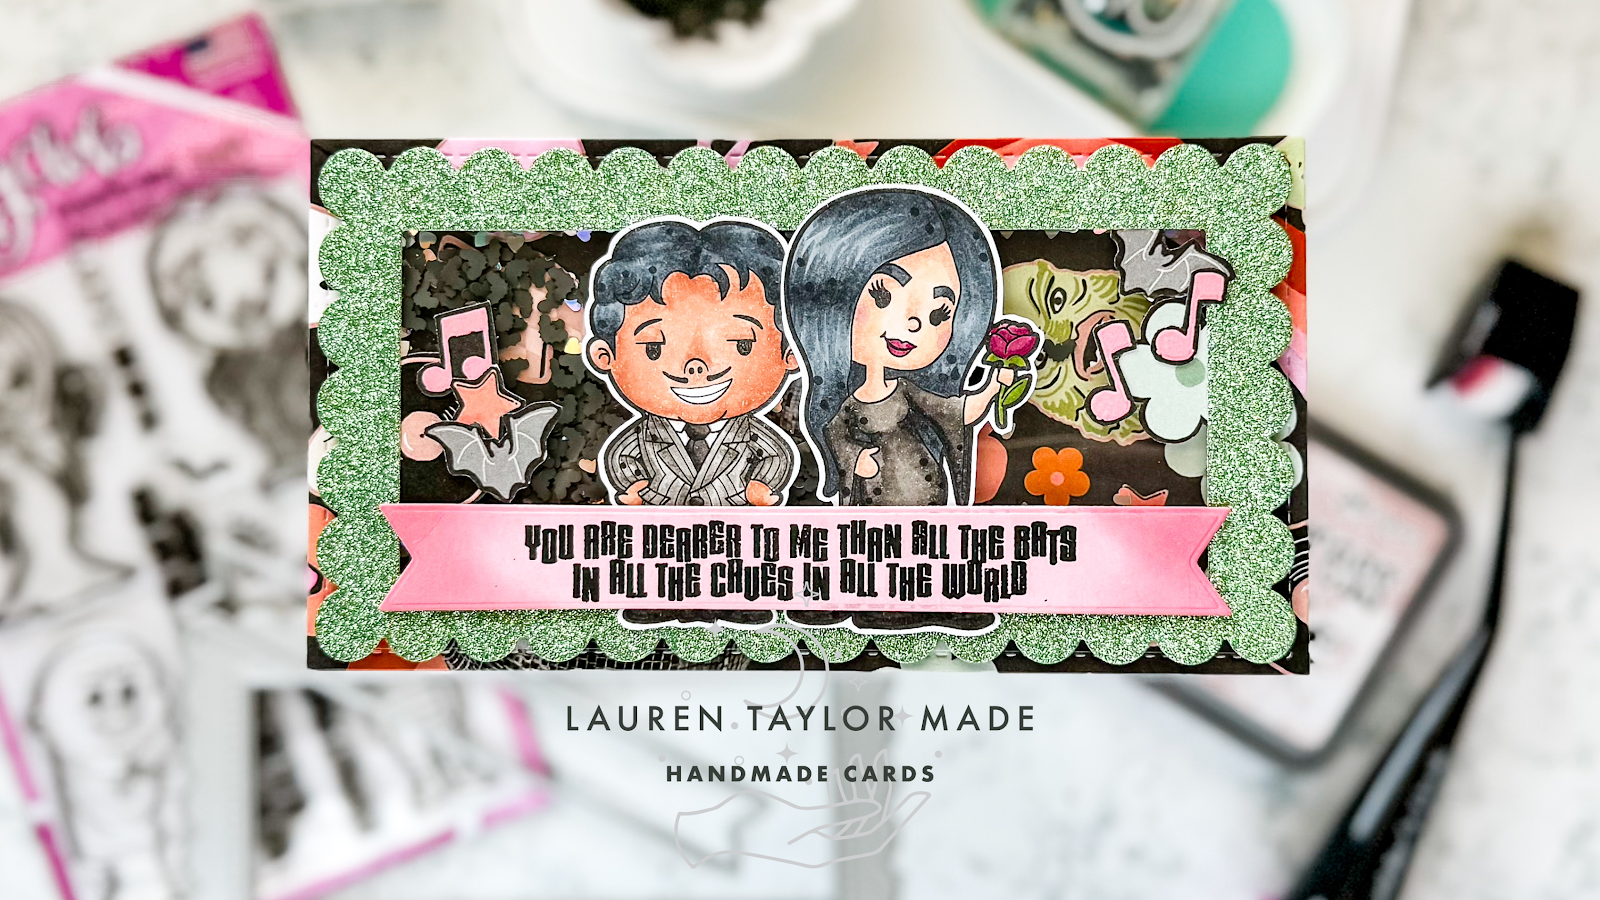
But today is the next Twiddler's Nook Spooktacular Hop so there was no way I was going to miss Halloween this month! I'm using my Twiddler's Nooks products for today's card - I have my blending tools and trays, but the shaker embellishments are from Amanda's shop and they are so fun and perfect for this monster mash Halloween card!

You can follow along how I made my card in today's video, but I'm using fun products from a few of my favorite people! I used Social Paper Plan for the patterned paper, PopsicleSticks for my dies and The Sassy Club for the stamps. This iconic couple is perfect for a Halloween card (well, really any time card) and the sentiment is just so beautiful and perfect!

I hope you'll check out my process video down below and make sure to hop with us over on Instagram! If you want to check out Twiddler's Nook, you can find a link to her Etsy shop in my supplies down below. I am not an affiliate for any of the major companies I feature today, but that doesn't mean I'm not going to share with you my favorite companies!

VIDEO TUTORIAL


PIN THIS
SUPPLY LIST

Read More

Broadway Boys Cards with Kindred Stamps - New Release!

One of my favorite stamps from Kindred Stamps is the Cake Eater stamp set, so when I saw that Kindred was releasing a set called Broadway Boys and the main character from the same musical was in it... I NEEDED it! I have seen two other musicals from this inspired set, and the last one is on my list. I started my cards with stamping and coloring my images with OLO markers. I tried to do different types of skin tones and hair because I love that so many different actors have played these characters! After my coloring, I fussy cut them all out.

For my first card, I wanted to create a newspaper feel, so I printed out my own, fake newspaper and distress the edges with brown ink after using the square die cut. I also used the same brown ink around the edges of all of my vanilla cardstock die cuts and the cityscape patterned paper. I split up my sentiment and stamped I black on the different cardstock pieces and addd them all to the front of an A2 card base.

My second card is my favorite stamp! I started with stamping Cake Eater in green ink on green cardstock and die cut it out. I ink blended on some green ink and embossed my sentiment in white. I layered circles onto the background (which was adhered to an A2 card base) and make sure to add some red splatter for a full effect! I also added a few red enamel dots around the card.

My next card is inspired by a Playbill! I stamped my sentiment in black on yellow cardstock and added a white square with hot foiling with the character. I think it looks pretty cool and I'm happy with how it turned out. I think it would be fun to do this with all of the characters - but I think this Playbill is pretty iconic and was perfect for this musical.

Finally, this is the musical I haven't seen yet! But I did some digging and liked how the media for this musical is very blue and I used striped paper inspired by the shirt this main character wears. I layered different shapes together, added my embossed sentiment and a few enamel dots. I hope you like my take on these Broadway hits and make sure to check out the new release

PIN THIS
SUPPLY LIST

Read More

HB2U Fandom Card with Stamp Anniething

Wednesday, May 29, 2024

I'm having some fandom fun today for this week's episode of Craft Roulette! I bought these amazing stamps and dies from Stamp Anniething that are inspired by one of my favorite time traveling 80s movie. I started with stamping and coloring my images - I used a mix of OLO and Ohuhu markers. There are coordinating dies, but I forgot I had them and fussy cut the images out!

After, I did lots of die cutting for my DeLorean and sentiment. I adhered the car pieces together, but inked up my sentiment with some red ink before gluing together. My background is a piece of blue cardstock and I added white ink with the Starburst Stencil as well as some inking to try and look like smoke inspired by the movie poster.

I adhered the DeLorean to the background that is attached to the card base, then I popped up my sentiment and fandom characters. For some final touches, I added a few rhinestones to "charm" up my card and to meet the last requirement of Craft Roulette. I hope you like my take with these Stamp Anniething products. I will be guest designing with them again in the future - so excited!

PIN THIS
SUPPLY LIST

Read More

Maniac For You Box Card with The Sassy Club

Tuesday, May 28, 2024

I have been loving the fandom sets The Sassy Club has been releasing! I love these throwback cartoon characters from shows I watched as kid - it's been so fun creating these cards and remembering watching these on weekends and after school. For my box card today, I have a quick short sparring how I made my stenciled background and assembled my card, but I started with stamping my images and coloring them in with OLO markers.

When I was done coloring, I fussy cut out the images and die cut my Sassy Box Card dies, clouds and sentiment strip. I stamped myself sentiment and started my stenciling of the clouds on the background. I used blue Distress Oxides and some splatter to create my sky. After adhering the box card together, I added my stenciled sky, sentiment and stamped characters.

I hope this box card gives you some joy today and let me know if you know another fandom set from The Sassy Club you'd like to see on a box card!

VIDEO TUTORIAL


PIN THIS
SUPPLY LIST

Read More

You Make Me Smile Cards with Spellbinders & Lisa Horton

Monday, May 27, 2024

I have been loving my Lisa Horton Interference Ink Pads, so when I had the chance to use some of her collaboration products with Spellbinders, I was so excited! I was gifted the You Make Me Smile Sentiments Stamp Set & Dies, Layered Anemone Dies and Spotlight Circle Duo Press Plates and I made two cards with them.

For my first card, I started with embossing a piece of dark green cardstock with the Flower Frenzy 3D Embossing Folder. I attached it to my A2 card base and moved on to die cutting. While my Glimmer Hot Foil Machine was warming up, I cut the Smile, Layered Anemone, and Mirrored Arch Labels dies from different color pieces of cardstock and pink glitter cardstock.

Using the Press Plate with dots, I hot foiled the design in Rose Gold onto the white cardstock that was then die cut with another Mirrored Arch Label. I assembled all the die cuts together and popped up the flowers and Smile sentiment to the arches. These were also popped up onto the card base with the embossed image. Finally, I stamped my sentiment and used the coordinating die to cut it out and popped up onto the card.

My second card is a different color scheme as I started with a piece of cotton cardstock and used the largest Fluted Classics Rectangle design to create a fun edge. Using a purple ink, I ink blended purple onto the lower third of the panel. I used the striped Press Plate with two different teal blue inks towards the top of panel. I cut the Smile and Layered Anemone out of colored cardstock and glued them together.

I added the flowers to the panel, popping up the flowers. I also added dimension between the blue and purple cardstock in the Smile sentiment. My sentiment was stamped with purple ink and I cut it with the coordinating die and popped it up to the panel. I adhered this panel to the card base and I added a few embellishments around the design.

I hope you liked the cards with the Lisa Horton products with Spellbinders! I really enjoyed making these cards and I hope they brought you some joy today!

PIN THIS
SUPPLY LIST

Read More

Friendly Foxes Floral Card with Scrapbook.com

Sunday, May 26, 2024

I'm so excited that the Friendly Foxes stamp set is now available from Scrapbook.com! I've had it for a bit, but needed to wait until it was available to show you my floral creation when it was released. It's also a current free set this weekend with a purchase over $15 - and with free shipping for the holiday weekend, you have to get it!

To make my card today, I stamped my image with alcohol marker friendly black ink and colored the foxes in with Ohuhu Art Markers. I fussy cut out the image, including the little spot between the foxes - I usually do this by using a hole punch to add a hole in the space, then get my tiny scissors in there to cut it out.

Next is a lot of die cutting! I die cut different strips of patterned paper from the Market Bloom A2 Paper Pad with the Horizontal Stripes A2 plate and on two solid pieces, I added some floral rub-ons. I also die cut two circles in vellum and dark green as well as flowers from the Paper Pad. Finally, I die cut yellow glitter strips of paper using my strips die.

I used a corner rounder on my A2 card base to match the rounded corners of the Horizontal Stripes. I glued each of the strips to the card base, making sure to mix up the types of stripes to create a very colorful background. I love the rub-ons on the solid pieces - it adds more floral to the design and a great way to customize your own patterned paper. I added the yellow glitter stripes where each of the patterned papers lined up to each other.

My vellum circle has Lunar Paste on it with the Mod Asterisk Stencil. Once it was dry, I layered the flowers together and leaves to have them pop out from behind the green circle that was popped up onto the vellum. I adhered this bundle of die cuts to my card base with adhesive and finally popped up my foxes onto the green circle.

I didn't add a sentiment (although the Friendly Foxes set has a cute one) as I think this would a great card to customize depending on the event! Like a wedding, anniversary or maybe just a cute card for a couple or to your partner. I hope this brings a smile to your face - I just love the vibrancy of the card and think it's just so pretty!

PIN THIS
SUPPLY LIST

Read More

Deck the Halls Christmas Card with Simon Says Stamp

Saturday, May 25, 2024

So I know it's late on the 25th by the time this post goes live, but it's still the 25th! So I'm bringing you some Christmas holiday inspiration today. I just love these sweet characters from the Simon Says Stamp set and I finally opened them up to create a card inspired by my own family's holiday decorating. You can follow along in my video down below for my coloring and card assembly.

I started with the coloring - which did take quite some time, so I used the opportunity to "color & chat" in today's video - and then did a simple background with layering patterned paper and vellum. My sentiment is a mix of embossing and stamping in black - I like the contrast of the different types of font. The scene is a pretty simple scene, but I will say the time it took to color really does make the card! I hope it brings you some joy today!

VIDEO TUTORIAL


PIN THIS
SUPPLY LIST

Read More

Shine Bright with the Spellbinders Weekender Kit!

Thursday, May 23, 2024

I finally finished my Weekender Retreat cards from this past weekend's event with Spellbinders! In case you missed it, I did some crafty fun with a few of my friends over on YouTube on Monday... But I had not actually watched the event or made any cards! So I made the card above using supplies that I thought just looked fun to play with.

You'll have to check out the replay of our live down below to see how the card came together and I also have a quick Short if you want to see my take on the retreat cards from the event. I like how there were different styles and creators at the event - which card was your favorite? I think the Shine Bright products are my favorite, but I loved learning from Kim and Yana! Great cards!

VIDEO TUTORIAL


PIN THIS
RETREAT CARDS


SUPPLY LIST

Read More

Hot Diggity Dog! with Simon Hurley Create

Tuesday, May 21, 2024

I'm excited to share my next project for Ranger Ink using products from Simon Hurley Create! I created a silly, Summer scene using rubber stamps, a clear stamp set and stencil. After masking off a piece of cardstock cut to 4x5.25” in half (at 2”), stamp the Sound Waves stamp in different shades of green - Overzealous, Later Gator and Fake Plant. Move the masking tape to the bottom half (still at 2”) and ink blend a blue sky using Clear Skies ink pad. Leaving the mask in place, use one of the Sunrays Layering Stencils to stencil on No Chill Neon Lunar Paste to create a textured sky.

Once the background is dry, adhere to the center of an A2 card base. Stamp one of the dogs from the Hot Diggity Dog! Stamp Set in Ground Espresso Archival Ink and watercolor the image with Overzealous and Weeping Willow ink pads. Use the coordinating die to cut out the image and pop it up to the card base with foam adhesive. Finally, stamp your sentiment with Ground Espresso Archival Ink under the dog. I hopefully you like my latest card for Ranger and I cannot wait to show you the next release from Simon!

VIDEO TUTORIAL


PIN THIS
SUPPLY LIST

Read More

Believe! with This Calls for Confetti's New Sasquatch Line!

Monday, May 20, 2024

Today is a GREAT day because it's a new release day from This Calls for Confetti and I'm hopping along with some of my crafty friends for this month's Oh So Inspired Collaboration Hop! I just love the layout of this month's inspiration card from Lin Brandyberry and I thought it would be perfect to use with the new TCFC Sasquatch products. You can watch my video down below to see how I interpreted the design and showcase a few of the new products.

Make sure to also head over to my Instagram where you can hop with us to celebrate the new release - the theme is The Hunt Is Over and I cannot wait to see how everyone used the new products! I love the paper pad - especially the fun topographical map designs. The solid green in the pack is what I used to do my die cutting, too. The Bigfoot image is so whimsical and so easy to color! I also love that "Believe" has its own coordinating die.

But the most exciting part of the release is the new Retro Stripes Layering Stencil! I love how it made my color blocked panel so easy to make and I think it's going to be a must for everyone. So make sure to check out the new release here and let me know what you decide to pick up!

VIDEO TUTORIAL


PIN THIS
SUPPLY LIST

Read More