Showing posts with label ink road stamps. Show all posts

FRIDA 5x7 Card with Ink Road Stamps

Monday, February 19, 2024

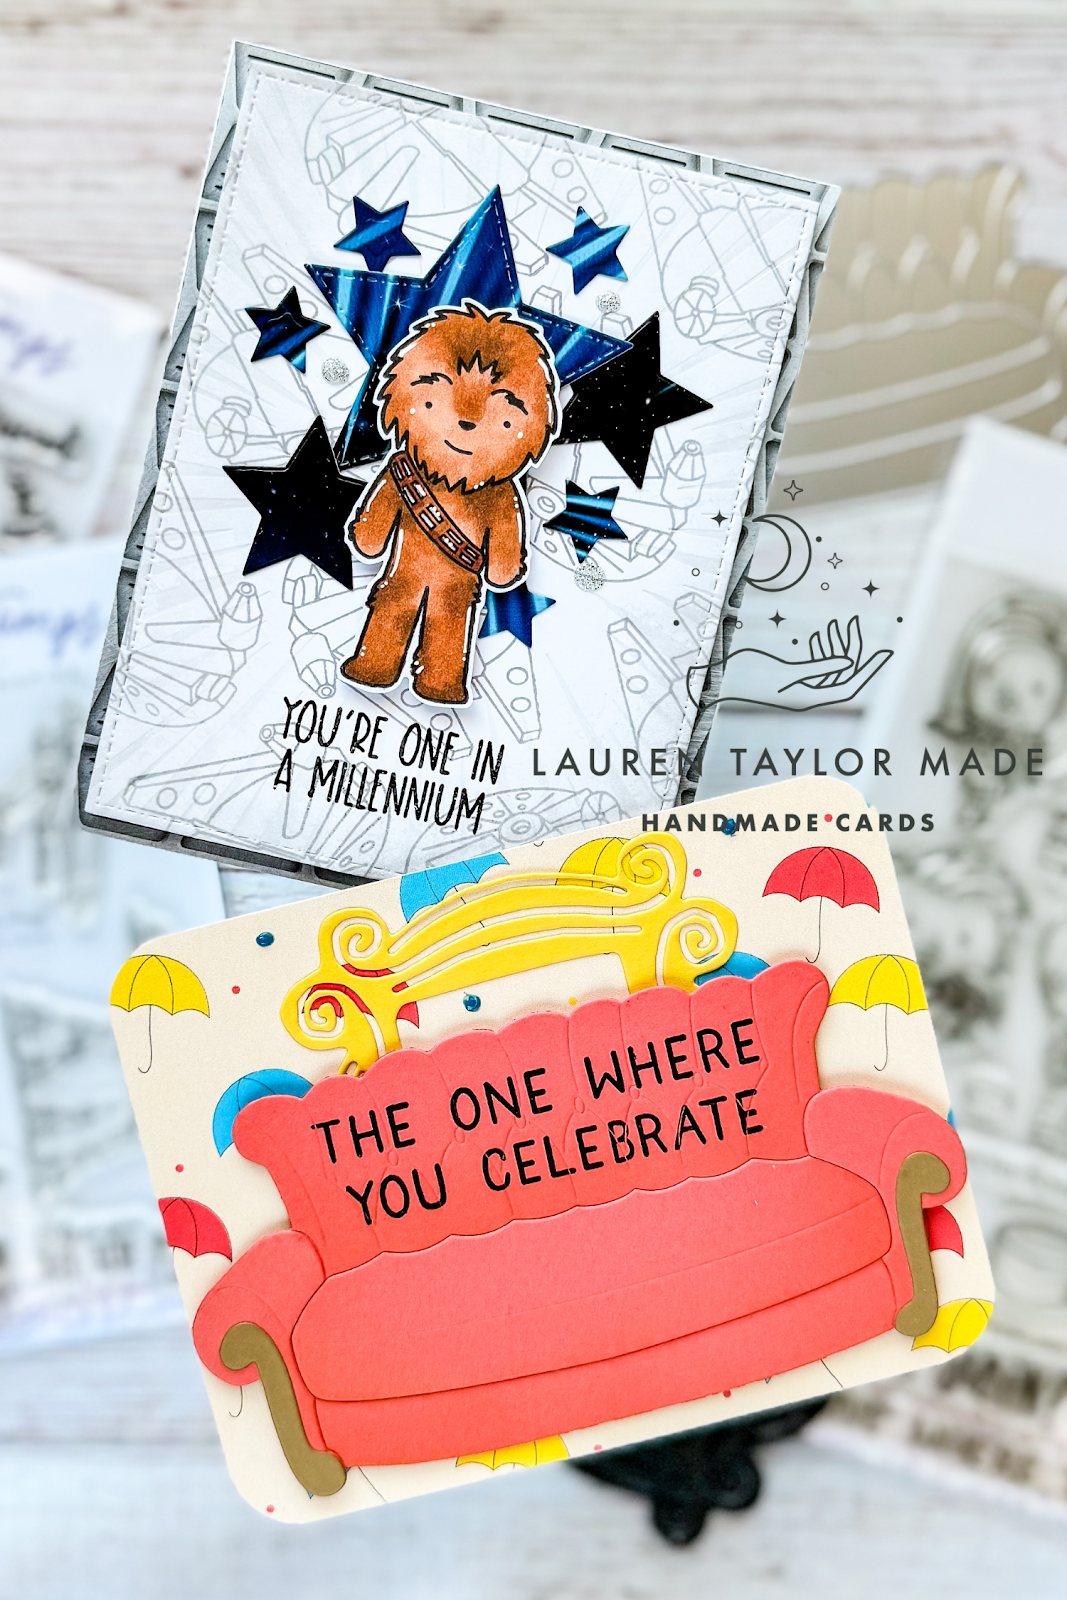
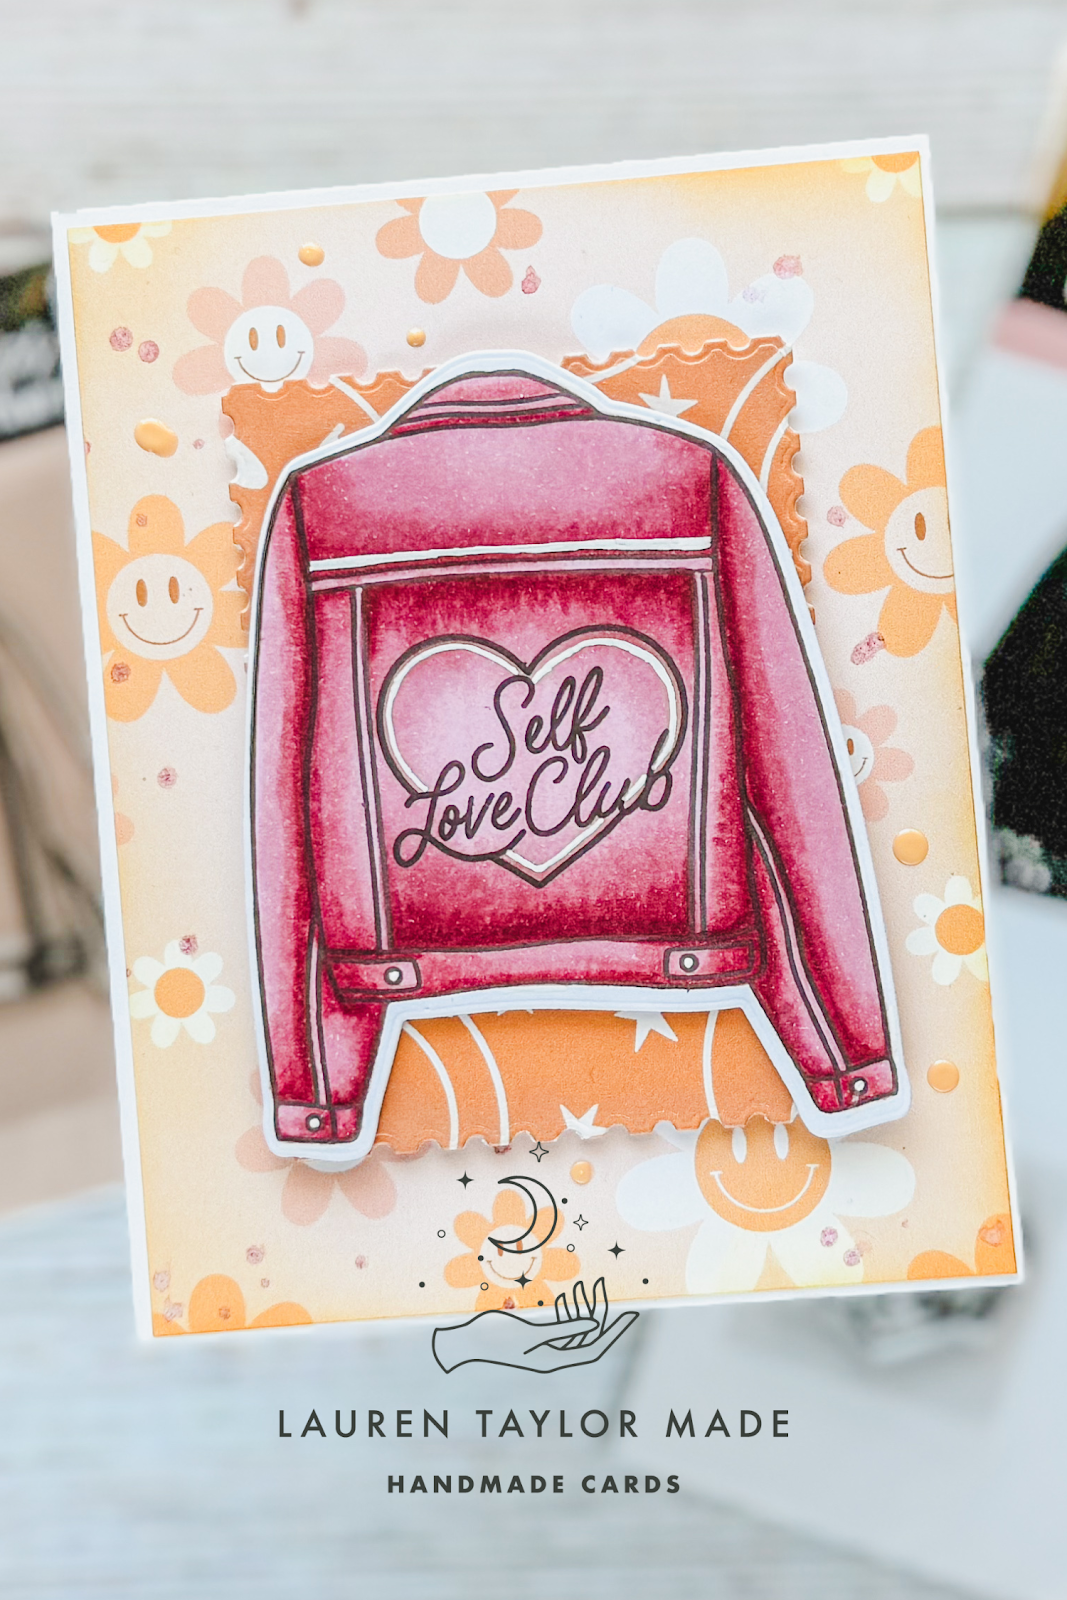
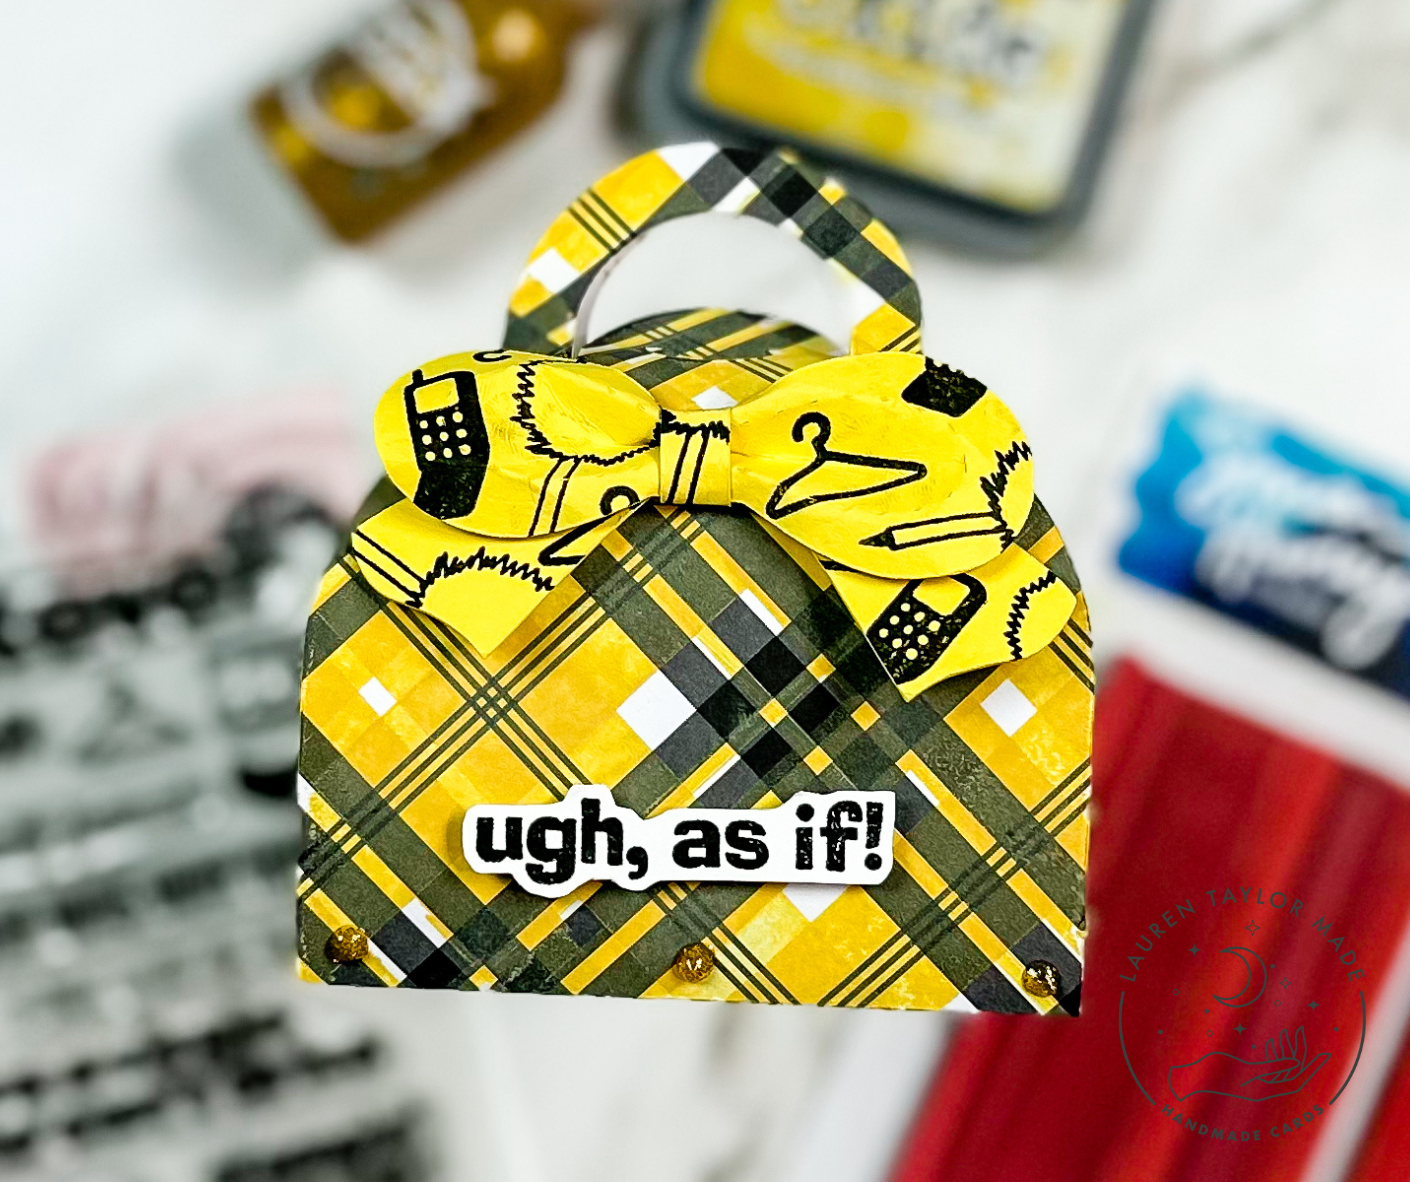
I really struggle with 5x7 cards and when I saw Craft Roulette this past Friday was this size card, I was a little discouraged at first... But I can't stop my streak of making cards - this will be 125th, consecutive card I have made with the parameters as inspiration! So let's walk through today's card! First I went through my stash of old patterned paper and settled on some paper that had colors that looked to like it would meet the formal and information parameter.

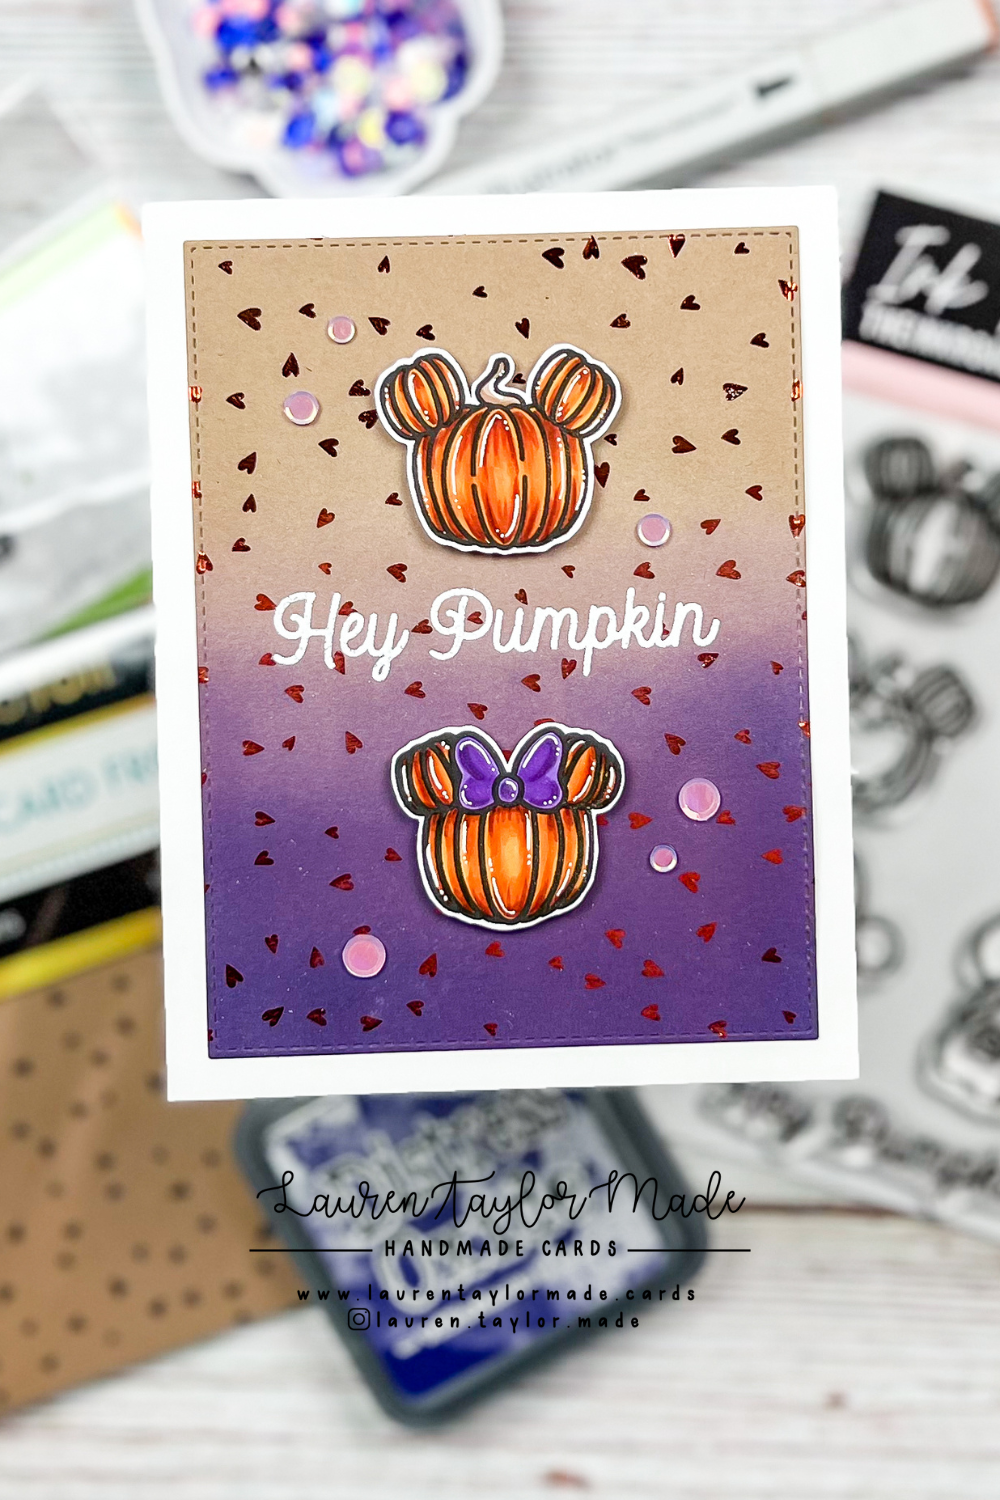
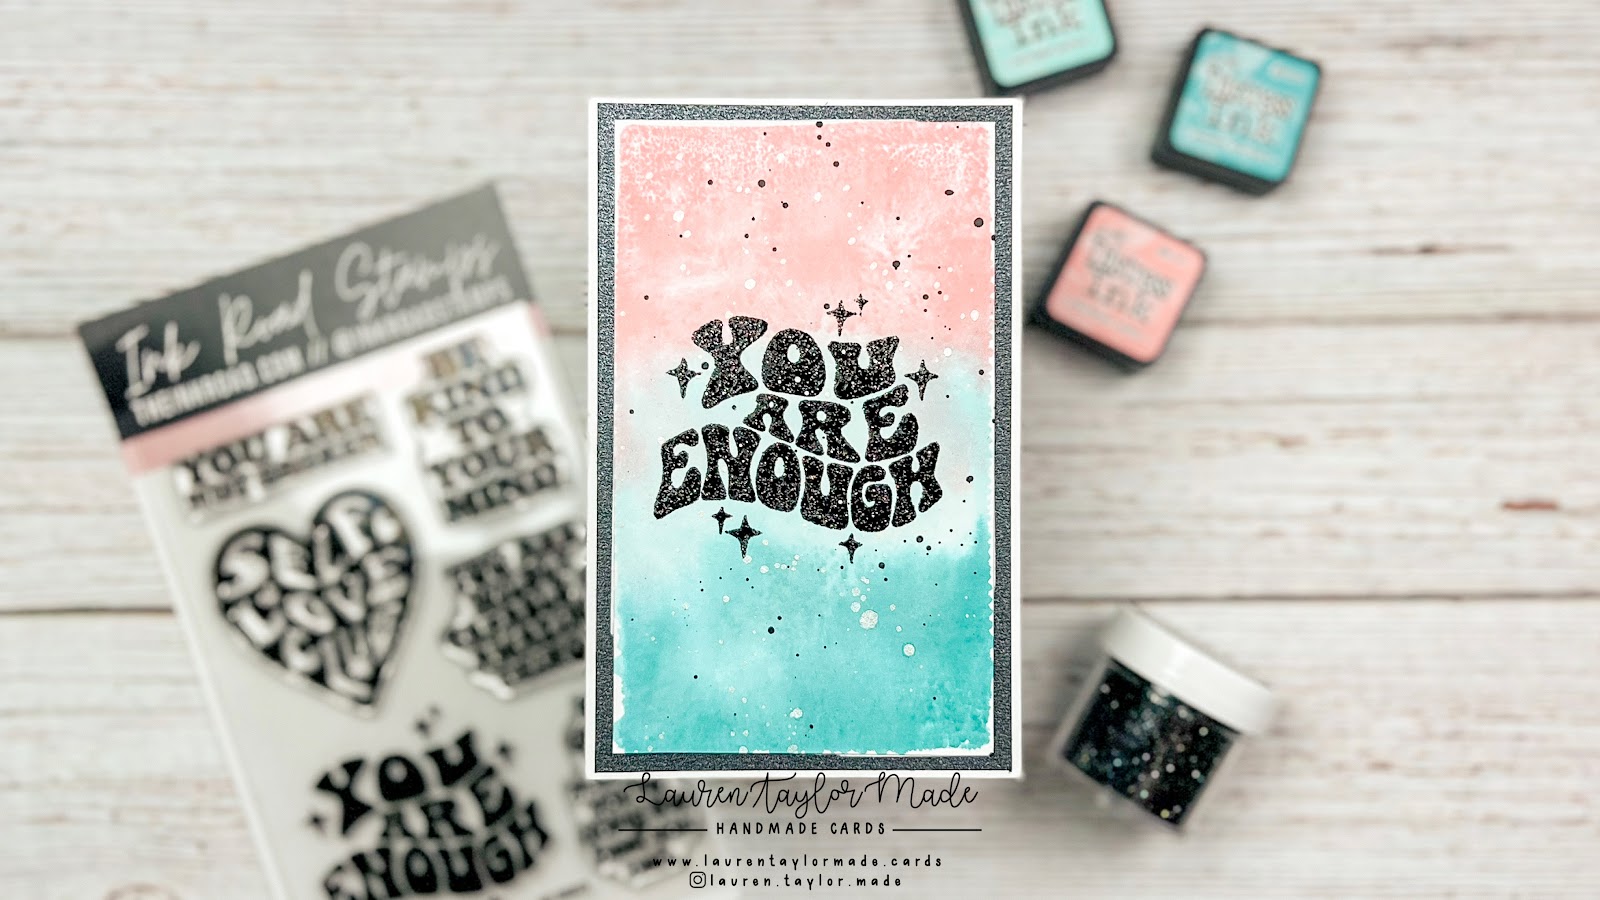
Since I did not make a card last month using the Show Us Your SheetLoad sketch from January 2024, I decided to scale it for a 5x7 card. For some of the panels I cut following the sketch, I made my own crisscross pattern with a stencil and black ink. I also added some splatter and let it dry while trimming my pieces of my card.

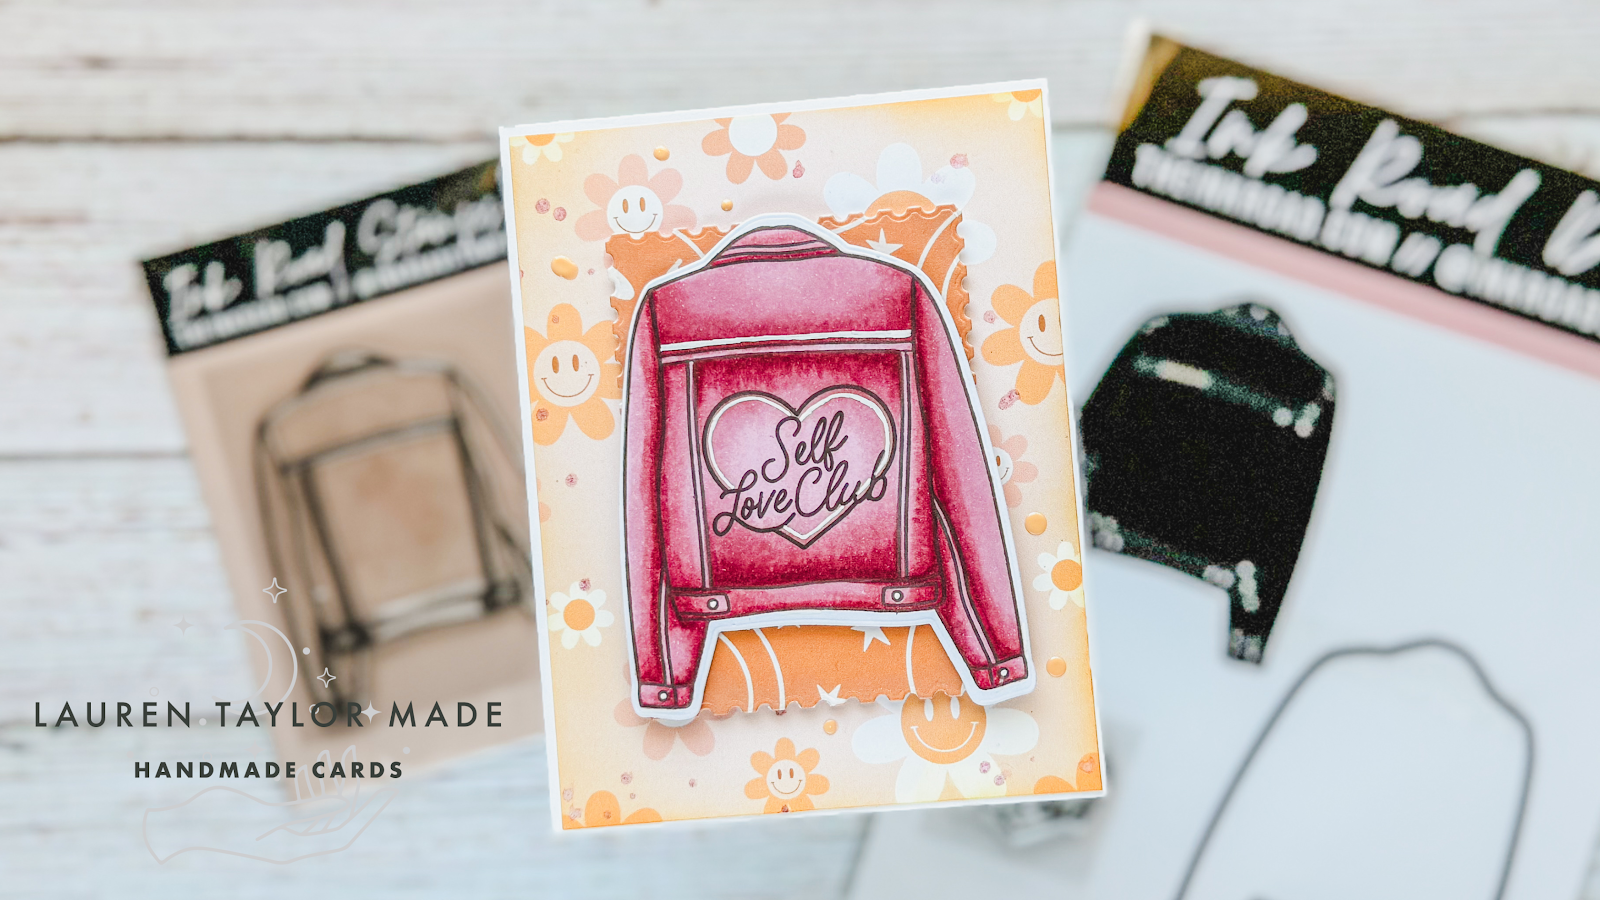
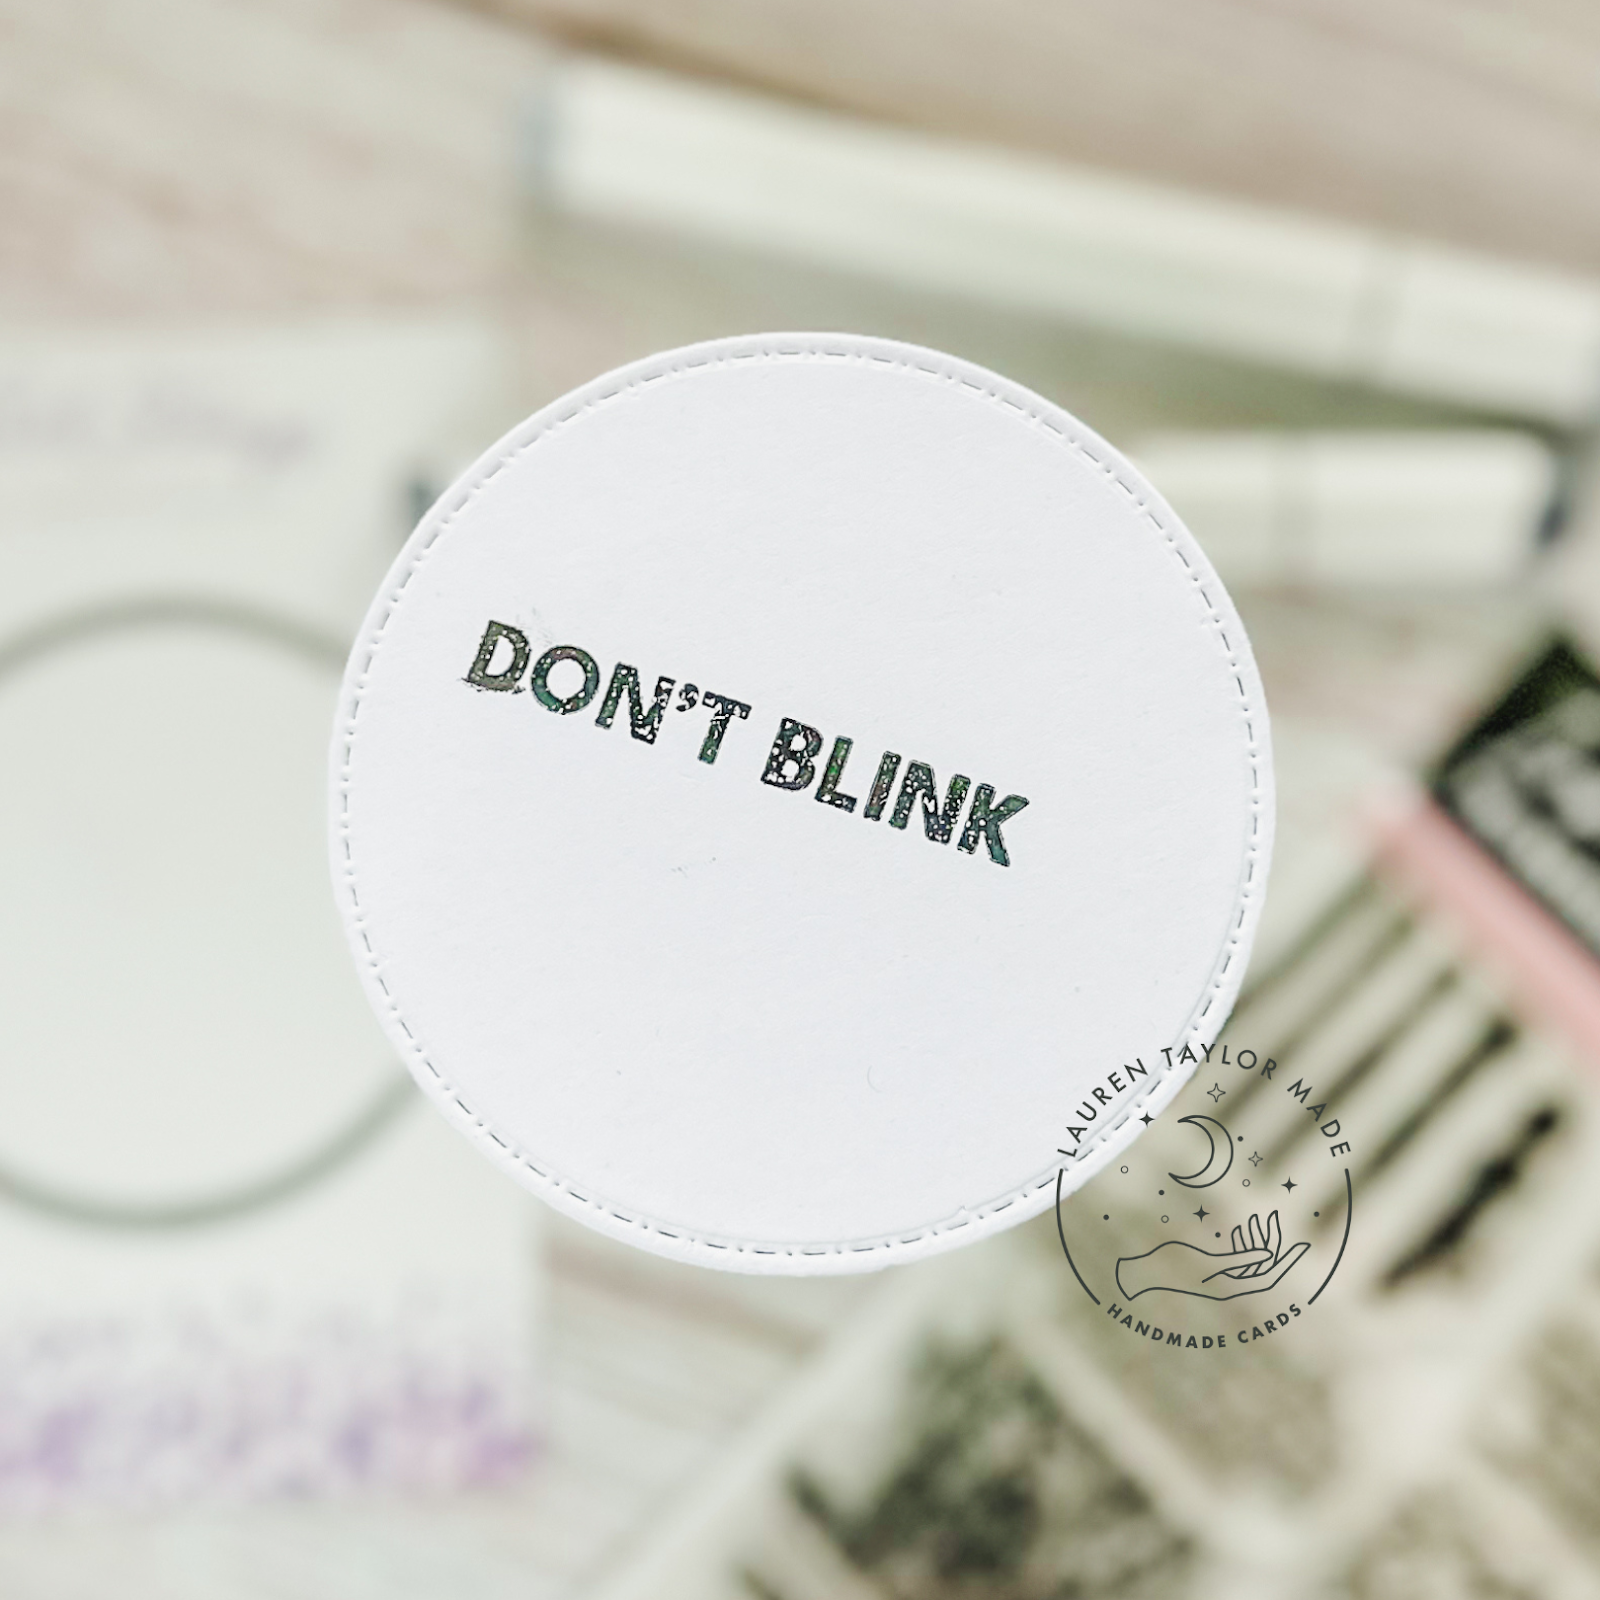
I put my card together and added a few touches of shimmery green cardstock. My image was stamped and colored with alcohol markers and I used an oval to cut my Frida out as I thought it would fit the image better than circle. For my sentiment, I embossed it in white on black cardstock and I'm relying on the word "coffee" to meet the warm element to finish of my card!

PIN THIS
SUPPLY LIST

Read More

Fandom Birthday Cards - Mix and Matching Different Companies

Sunday, November 19, 2023

I wanted to make a couple birthday cards that were more a little more personalized for the gift receivers and believe or not I had some time to craft for myself! I wanted to use some of my new fandom products that I've recently collected so I'm sharing how I mix different companies together for one of my cards and the other space themed card is all from Kindred Stamps.

In today's video I'm sharing how I colored my fandom character, made my own stamped and hot foiled background, lots of die cutting and how these two cards came together. I wanted to point out that the couch die from Scrappy Boy is actually not out yet! I found this die when I helped Pear Blossom Press at the Scrapbook Expo and I was searching and searching to share it with you all. I asked someone on the Design Team and it's not due to release until closer to the end of the year.

I hope these two cards bring you some joy today and let me know which one is your favorite and if you have any other fandom brands you love for me to check out!

VIDEO TUTORIAL


PIN THIS
SUPPLY LIST

Read More

Self Love Club Card with Ink Road Stamps

Tuesday, November 14, 2023

One thing I love about Craft Roulette is that I get to make cards with brands that I love but do not always have time to use on busier months with the companies I work with. I used Ink Road Stamps for my card today and finally used a cool jacket stamp and die set that has been sitting and waiting for me!

I have an A2 card and trimmed down the floral happy face patterned paper to just slightly smaller than A2. Before I adhered the paper to the card base, I distressed the edges of the paper and splattered on some pink metallic watercolor.

I die cut another patterned paper with a postage stamp die from The Sassy Club and added some pearlescent crayon to the edges of the die cut. I popped this up to the center of the card base with foam adhesive. I stamped my jacket and the "Self Love Club" image and colored it in with dark red/maroon colors. My colors are inspired by a forest that is going through a change of colors for the season!

There is a coordinating die for the jacket so I cut it out and popped it up to the center of the card. For some final touches, I added a few Pops of Color on the happy face patterned paper. I love how this card turned out and I'm so grateful for the chance to use some products that I have been collecting more than using!

PIN THIS
SUPPLY LIST

Read More

The One Where It's Your Birthday Cafe Box Card with The Sassy Club

Tuesday, May 16, 2023

These two are the best 90s/00s style icons and I just had to get them colored up! The Sassy Club released two stamp sets featuring all the characters from this show, but it really is my dream to just dress like these two characters. I picked a couple of my favorite outfits to inspire my Ohuhu Art Marker choices. I stamped them with alcohol marker friendly black ink and white cardstock; once I finished coloring I fussy cut all of my images out.

Using a box card die, I cut out the base of my box card from a brown piece of cardstock from Your Paper Insider Box 3 and the details from an Ink Road Stamps paper pack. I glued two "shelves" inside of my box card and added my sentiment to the front of the box card. I stamped six coffee cups and I glued them onto the first shelf inside the box. On the second shelf, I glued down my two characters. I also added the sign (I colored the circle to look like a window) to the back of the box card with thin foam adhesive.

On the back and sides I added the green sign patterned paper and also a piece of white cardstock with the rest of the sentiment with room to sign. I really like how this card turned out and a great way to color up some of my favorite outfits from this show. Let me know any of your favorite outfits from the show in the comments below! I need to plan another box card with my favorite character duo from the show - the guy roommates...

PIN THIS
SUPPLY LIST

Read More

Time Traveler Lunch Note

Thursday, April 27, 2023

I am still here making weekly(ish) lunch notes for Abigail! This one was a quick one because I already had these stamped and cut out from when I returned back from the Kindred Stamps Retreat earlier this year. I don't own this retired stamp set, but I hope one day I can get my hands on it! These two images were stamped with alcohol marker friendly black ink and I colored them with Ohuhu Art Markers.

For the note, I die cut white cardstock with the larger circle from the Card Basics Die Set and stamped "Don't Blink" from an Ink Road Stamp Set from the same fandom. I used this same die to cut out patterned paper that is blue with white star images from the Futuristic Family Limited Edition Kit and glued them together. I added my two characters with foam adhesive and that's it! Kept it simple since I needed to get it right into Abigail's lunch. I'll be back soon with a batch of lunch notes with a bunch of characters! 

PIN THIS
SUPPLY LIST

Read More

Crafting with Abi: Timey Wimey Space Man Cards

Sunday, March 19, 2023

Abi and I had some fun in the craft room when she had a day off of school. These cards were just for fun and I have no real technique to share... Abi just wanted to make a video for YouTube! So we stamped out our favorite images from our favorite British sci-fi fantasy show in alcohol marker friendly black ink and colored them in with my Ohuhu Art Markers.

You can see how Abi's card came together in the video - I skipped over mine otherwise our "just for fun" video would have been like, an hour long. I think her card turned out so much more fabulous than mine, but I embossed my large sentiment in silver, added my images with foam adhesive and some silver Pops of Color. I wish I would have maybe made my own background by stamping the blue phone box for a tone on tone look, but I just use this as more work on my coloring.

Thanks for watching and checking out our video today. We had some good fun and I do miss crafting with her so much! Hopefully we get some more time over her next holiday off from school.

VIDEO TUTORIAL


PIN THIS
SUPPLY LIST

Read More

Lucky to Know You with Ink Road Stamps

Wednesday, March 15, 2023

This card is literally a smorgasbord of supplies! I dug through my stash of products and used up some items that have just been sitting there waiting to be used. St. Patrick's Day is not a normal holiday that I make cards for, but since I made my Lucky Charms cards, I wanted to make a few more because it was just so fun to play with rainbows! 

My kraft notecards are 4x5" and from Target probably years ago... They come with envelopes and they ended up being pretty cute as the card bases for these cards. Next I stenciled shamrocks with Lucky Clover Distress Oxide and die cut out some scalloped rectangles. Next I added some Twisted Citron as well as more Lucky Clover to the edges of the panel and then splattered on gold watercolor as well as Lucky Clover Distress Ink with water.

Once this panel was dry, I attached it to the card base. I had some leftover shamrock pieces from die cutting my rectangles, so I added some small strips to the inside of the cards. Next I stamped my rainbow and sentiments with Rain Forest VersaFine Clair ink. The white banners are leftovers from a kit that has been in my scraps box also forever, so I used those to stamp the sentiment on the front of my card. The rainbow and shamrock were stamped on mixed media paper so I could do some watercoloring.

I embossed the rainbow with clear embossing powder since VersaFine is an excellent ink for embossing. Then I embossed the polka dots with clear embossing ink and gold embossing powder. I love the layered gold dots with the green! Using colors from all three sets of Distress Watercolor Pencils, I colored in my beautiful rainbow, starting with green since those little four leaf clovers looked so cute with dark green on light green.

Finally, I popped up my rainbow with craft foam and glued my banner to cover the bottom of the rainbow. I added a few gold embellishments (also from a box of unused embellishments) around the rainbow just for some extra shine! I ended up making five of these little notecards and sent them out to some crafty friends who would appreciate some colorful kindness in their mailboxes!

PIN THIS
SUPPLY LIST

Read More

Ugh, As If! Purse with Ink Road Stamps

Sunday, January 29, 2023

Well, it finally happened. The wheel at Craft Roulette finally landed on the dreaded purse card parameter. I searched through my stamps, and I could not find anything I wanted to use with a purse! I did see my Whatever stamp set from Ink Road Stamps and I thought it would be cute to make a purse that looks like something Cher from Clueless would carry!

The parameters this week were a purse card project, 3 pops of gold for colors, an element that starts with an "e" and a frame. I made a purse using a cut file from Brother on my Scan N Cut and chose plaid paper as the plaid makes lots of frames! I have three pops of gold along the bottom of the purse and there is an exclamation point for my element with an "e".

You can see how it came together in my Reels down below, and I did glue it shut because it's now sitting on my desk for me to admire. How do you think I did with this week's parameters?

VIDEO TUTORIAL


PIN THIS
SUPPLY LIST

Read More

Hey Pumpkin Magical Mouse Inspired Halloween Card with Ink Road Stamps

Thursday, October 20, 2022

I was super lucky to win a prize from Therm O Web! One of the things I won was some orange heat transfer foil - perfect for the Halloween season. I also ended up placing an order (of course) and some of the item I bought were some card fronts. I really liked the Dainty Hearts on kraft and I added them to cart.

For the background, I used one of the card fronts with the Carrot Orange transfer foil, then trimmed it down with a rectangle die to fit on a card front so I can have a border showing from my card base. The purple was added with Villainous Potion Distress Oxide and I created an ombre look. The sentiment is embossed with white from the Hey Pumpkin stamp set from Ink Road Stamps.

The two Mouse shaped pumpkins are also from the same set! I stamped them with an alcohol marker friendly ink and colored them in with my Spectrum Noir Illustrator markers. There was definitely a lot of shine because of the heat foil, but I wanted to add some purple sequins to bring up the purple into the kraft.

It's a simple card, but it's a set I haven't used before and I think it turned out super sweet! If you'd like to see my process, I have a simple Instagram Reels down below (or you can find it on TikTok). 

VIDEO TUTORIAL


PIN THIS
SUPPLY LIST

Read More

You Are Enough with Ink Road Stamps

Wednesday, July 27, 2022

This is one of my favorite stamp sets from Ink Road Stamps. The sentiments on here are so powerful and really speak to me. I was so excited to make a card as my last Design Team project for Ink Road Stamps. Well, for now! I'm taking a break for the rest of the year as I'm traveling in August, September, October and December (plus holidays)... So I need lighten my load until after the holidays.

The card is simple as I knew the sentiment would be bold and powerful so I wanted it to be the spotlight. I used my 3x5 Gel Press to get a consistent rectangle with Distress Ink - you can see how my card comes together by watching my Instagram Reels down below (or on TikTok).

The sentiment is embossed with a glitter black powder and I added a little bit of black and pearlescent splatter which matched the cardstock layering onto this notecard. I hope you like this stamp set as much as I do!

INSTAGRAM REELS TUTORIAL


PIN THIS
SUPPLY LIST

Read More