Showing posts with label avery elle. Show all posts

Cheesiest Birthday Card for Craft Roulette

Wednesday, March 5, 2025

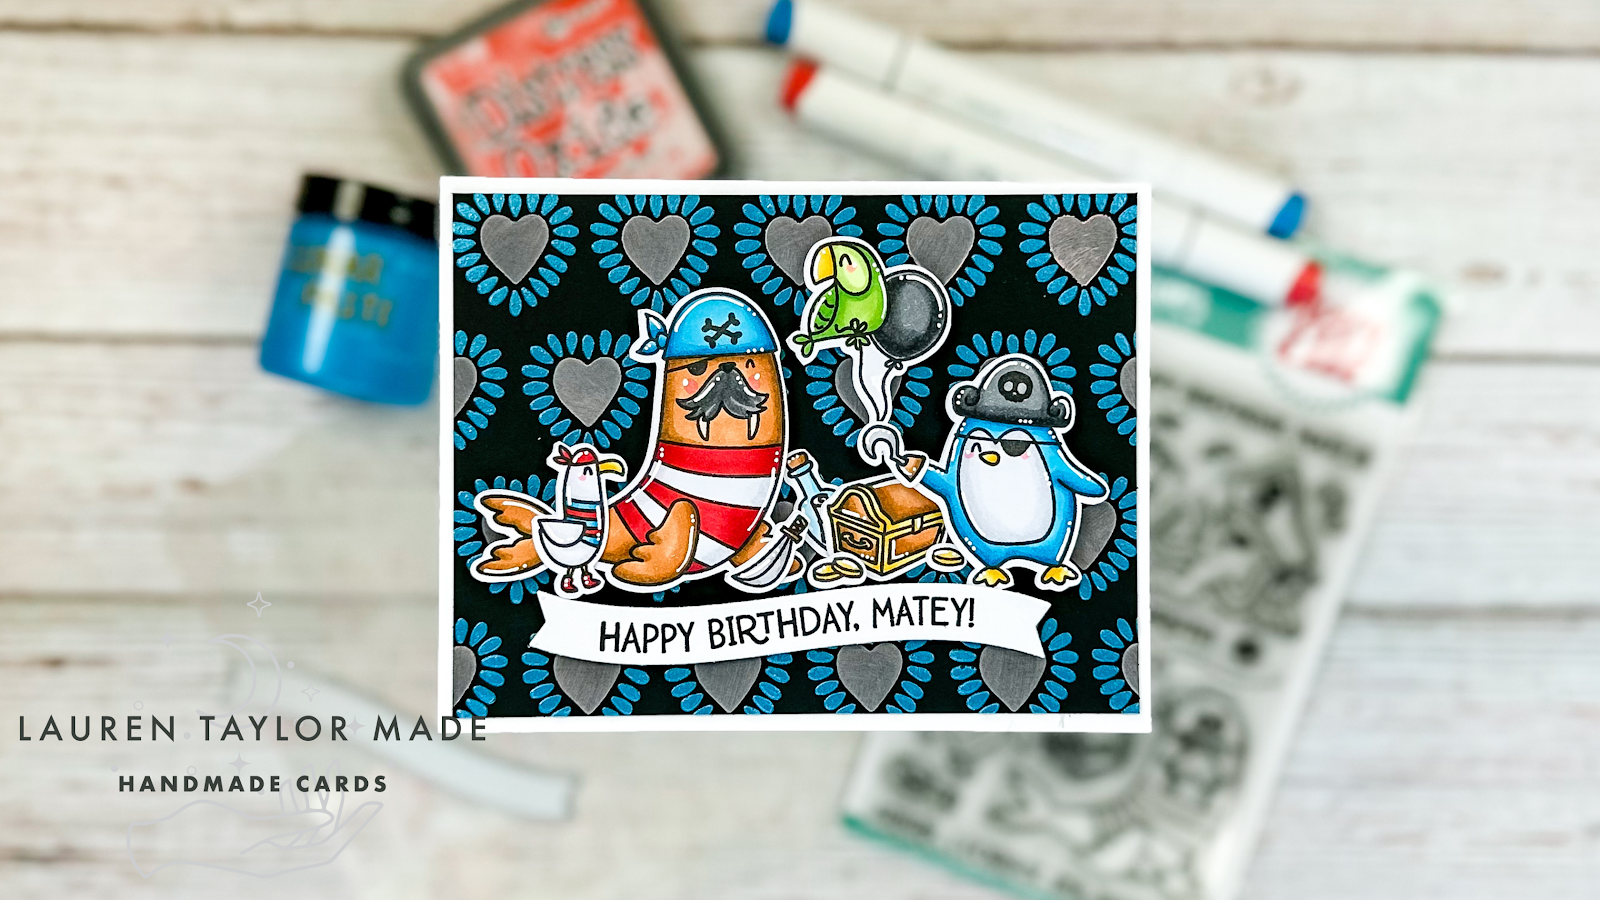
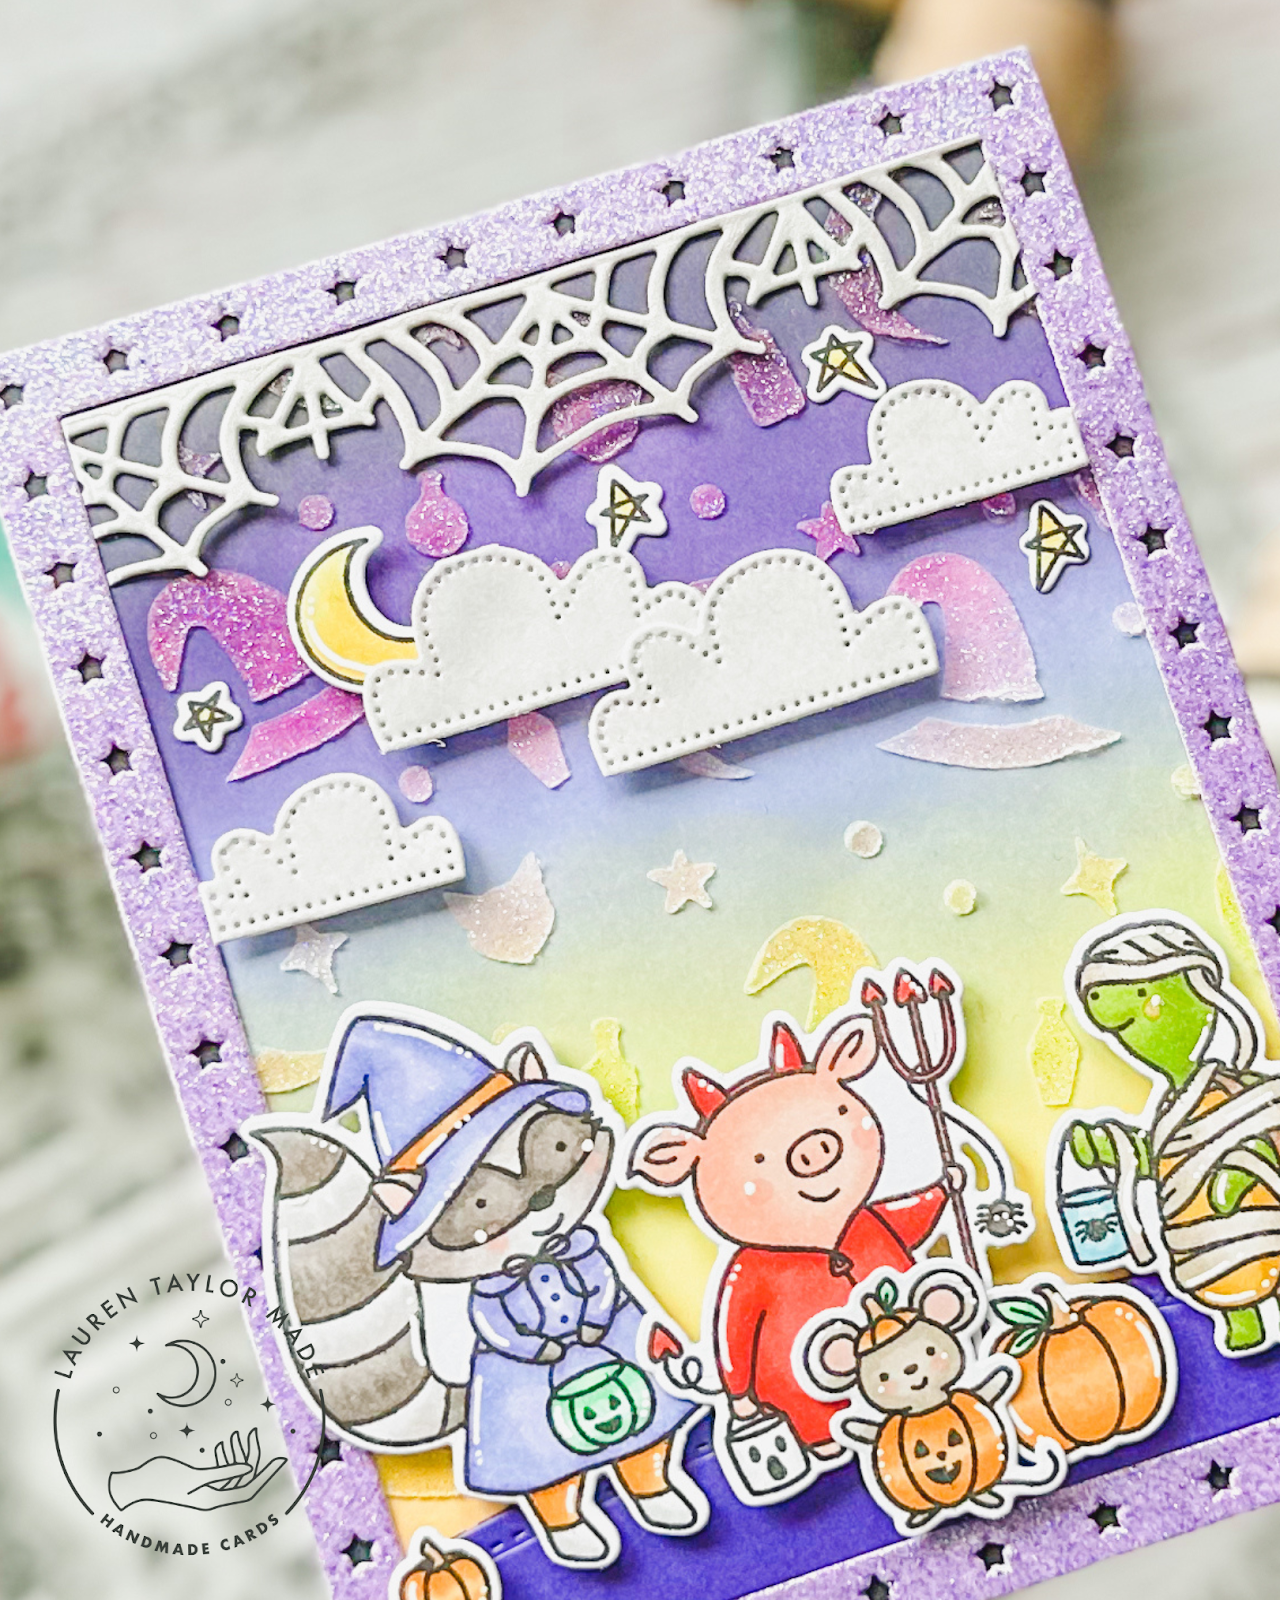
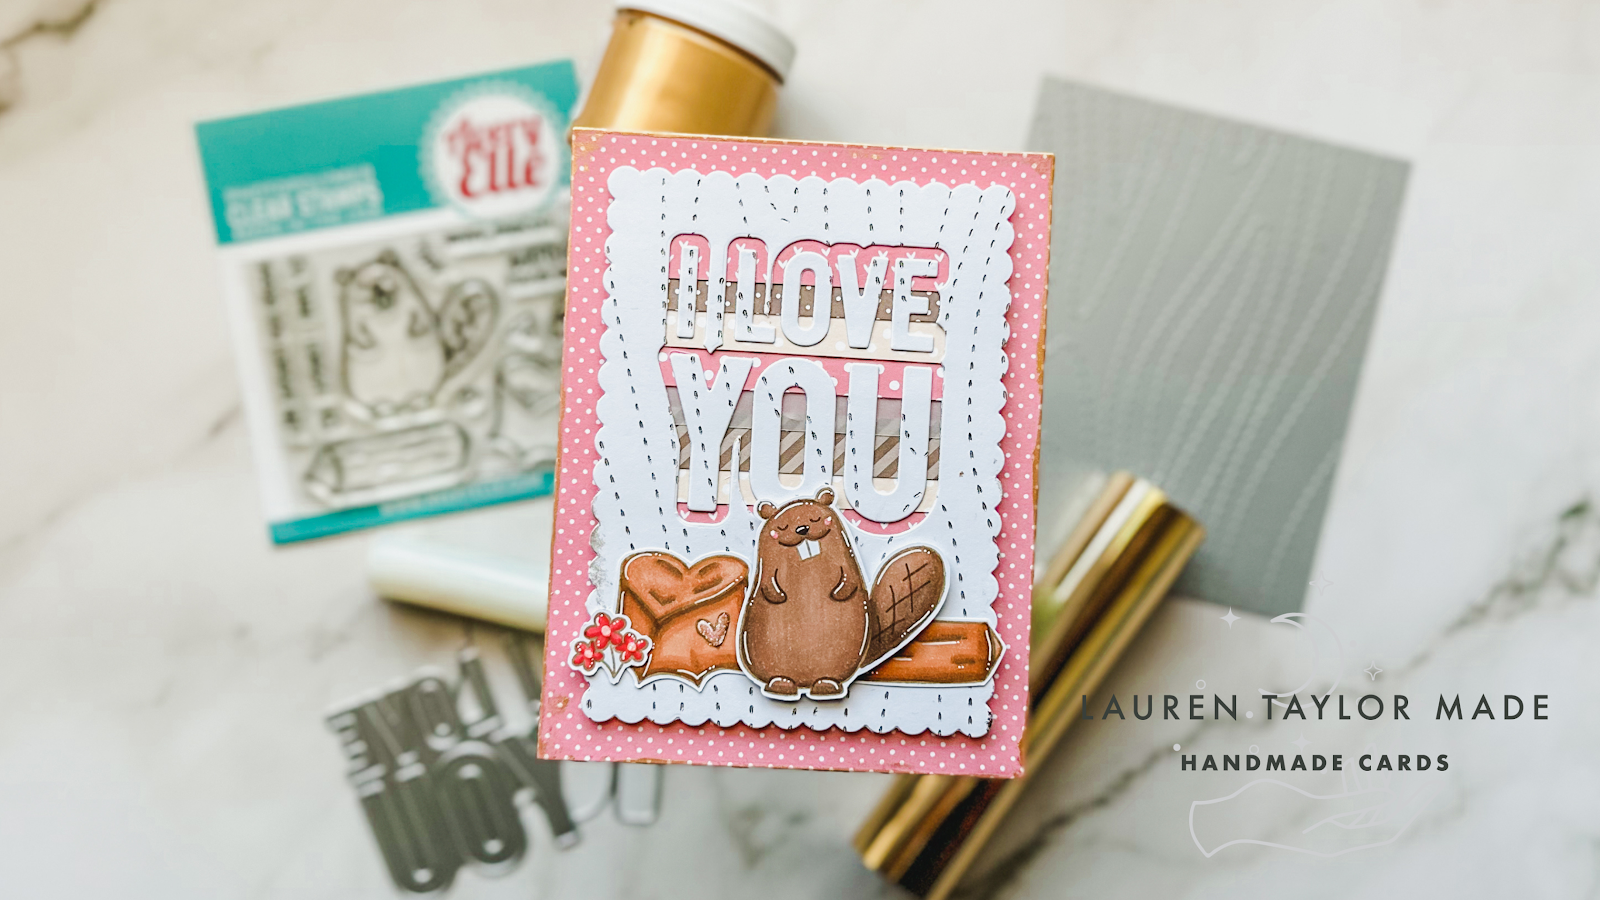
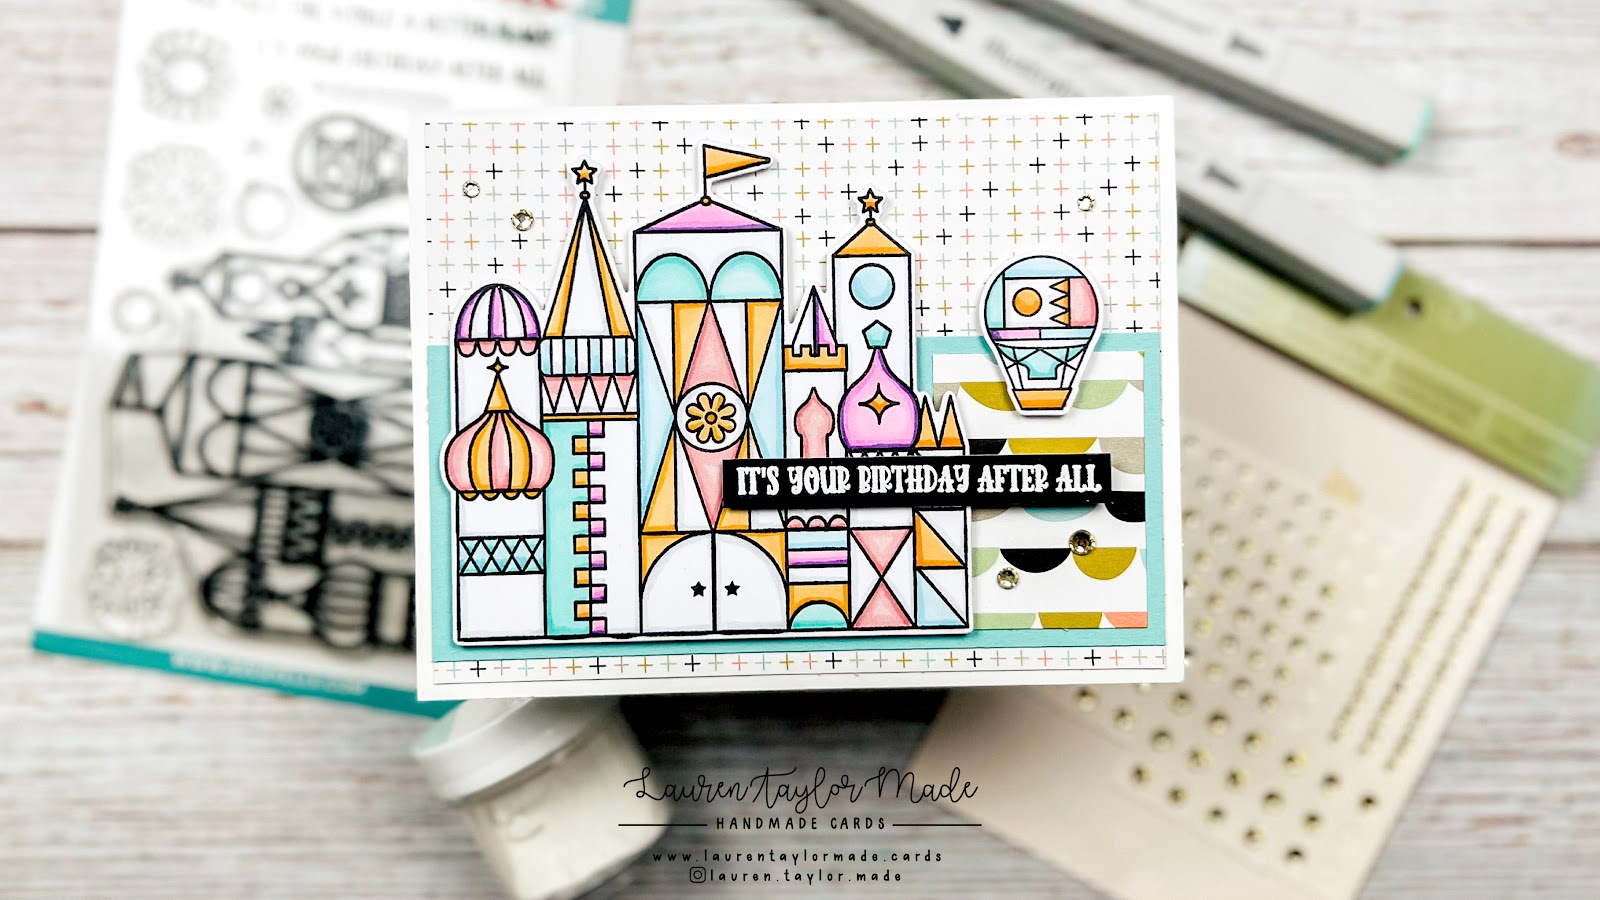
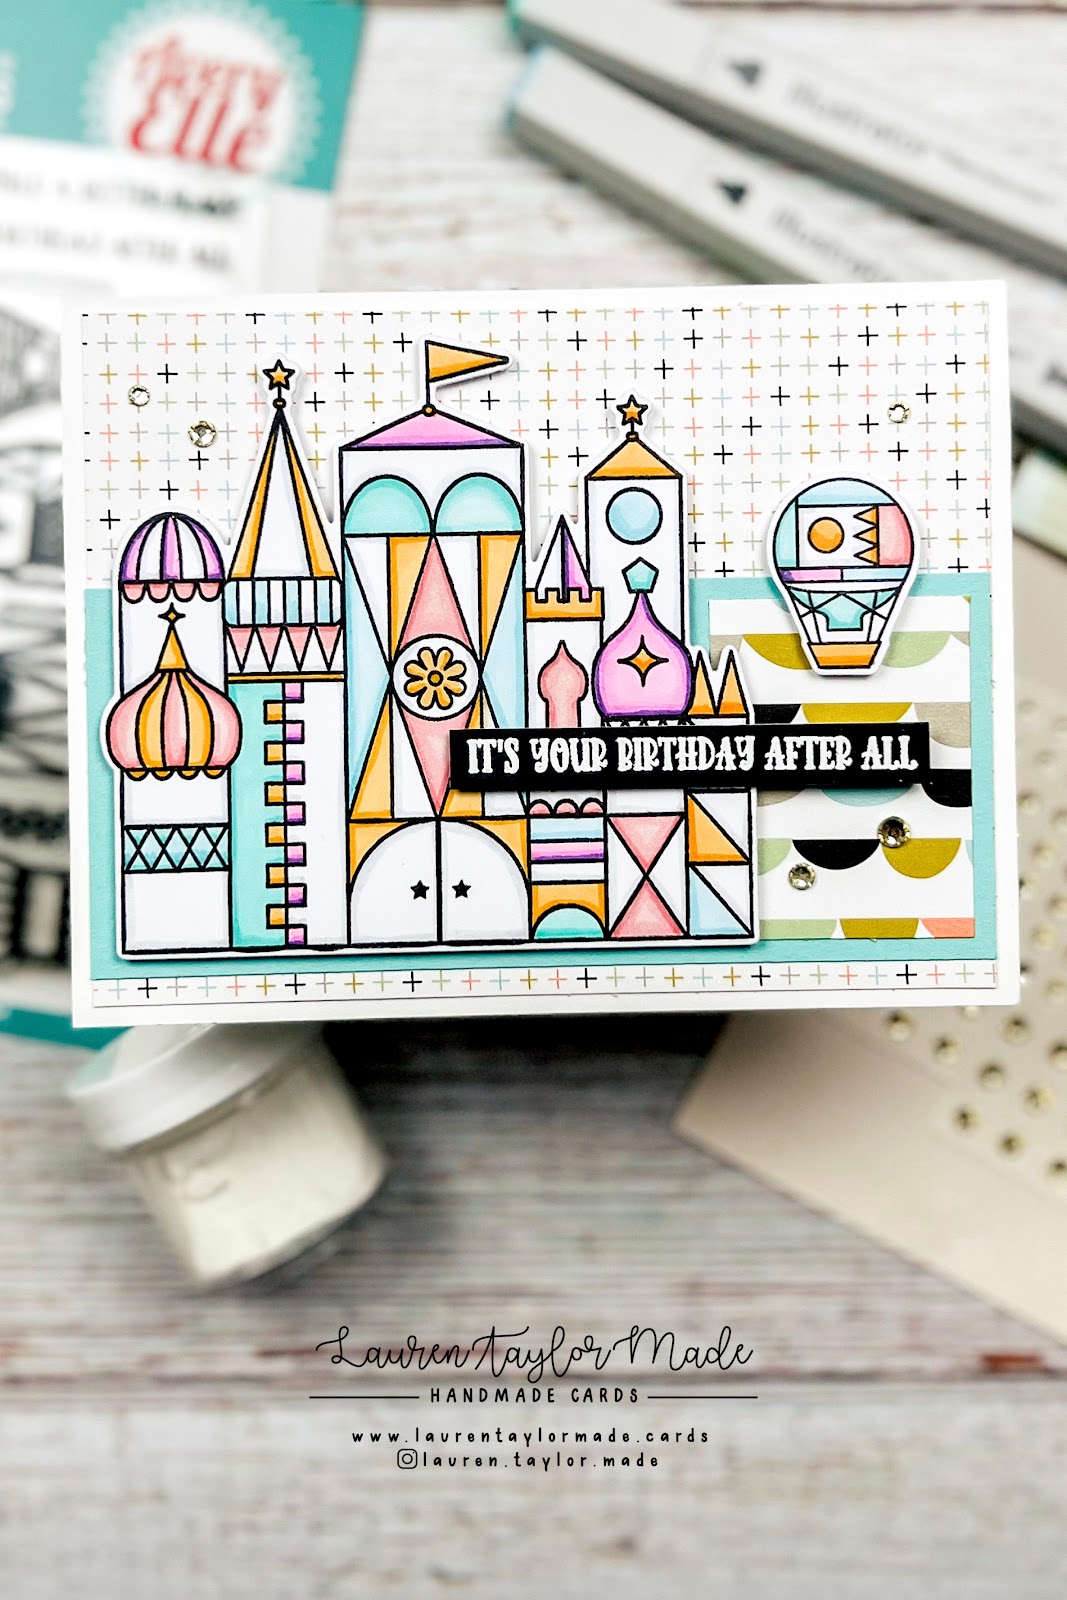
This week’s Craft Roulette challenge had me stepping out of my comfort zone in the most delightful way—creating an A7 sized card! I took this as the perfect excuse to finally crack open some long-neglected supplies in my stash. The A Little Latte Designer Series Paper from Stampin’ Up! made the perfect rustic background, and I gave it a decorative edge with the largest Admit One A7 Layer die from Popsiclesticks.

To build the card, I made my own A7-sized card base and adhered the background panel. Then, I reached for Avery Elle's Char-Cute-Rie stamp set (which had been sitting patiently in my collection) and stamped both of its beautiful wooden boards onto Desert Storm cardstock using Crunchy Leaf Lawn Fawn ink—perfect for that warm, natural tone. Coloring with my OLO markers brought the boards to life, and I gave them a crisp, finished look by stamping over them again with Pinecone VersaFine Clair ink before cutting them out with the coordinating dies.

Of course, a charcuterie board isn’t complete without delicious treats! I used the dies to cut out an assortment of cheese, crackers, and other goodies from white cardstock and colored them with my OLO markers, blending soft yellows, warm browns, and olive greens to make them pop. Once they were all ready, I carefully arranged and adhered them onto the wooden boards, making sure to create that perfect balance of savory and sweet.

To finish off the card, I added some stamped hearts and a punny sentiment in Warm Breeze VersaFine Clair ink—because what’s a charcuterie card without a little cheesy humor? I love how this card turned out, and I’m so glad I finally put these products to use. If you’ve been hoarding some new (but unopened) supplies, let this be your sign to break them out and get crafting! Let me know in the comments—what’s the last new-to-you product you finally used?

PIN THIS
SUPPLY LIST

Read More

Groovy Light Up Lava Lamps with Pear Blossom Press & Avery Elle

Saturday, March 9, 2024

Groovy! I saw this stamp set and dies from Avery Elle and just needed them. Something about the lava lamps just drew me ini and I was excited to use them with some Pear Blossom Press lights. I decided to go with the new versions of the Twinkle Lights - which of course are incredibly hard to capture in images so you'll definitely need to watch today's video down below to see how fun they look!

I started with my ink blended background, die cut my sentiment, colored in my lava lamps and assembled my card with the Twinkle Light. I felt like my background was missing something so I decided to do some multi-stamping with the peace sign around the edges of the background and added a few glitter confetti from Trinity Stamps around the card. I hope you have fun with today's video as much as I had fun making the card!

VIDEO TUTORIAL


PIN THIS
SUPPLY LIST

Read More

Color & Chat: Ahoy, Matey from Avery Elle

Friday, April 14, 2023

Today I am finally back with another coloring guide with Ohuhu Art Markers! I put a poll on Instagram Stories to get some feedback on what coloring guides would be helpful but I already started these before I got any feedback... So I have plans now for the next couple of months! But I picked a stamp set that I thought would look good with one of my A Colorful Life Designs stenciled background, which was Ahoy, Matey from Avery Elle.

In my video, I color in all of the images from the stamp set while following along with my guides so you can see how I colored them in. I did do things a bit differently where instead of completing one guide at a time, I went with each color at a time because I used the same colors over and over throughout the images so they matched well together.

To create my sample card, I trimmed down my background to fit on a card base and then used my Scan N Cut to cut out all of my images. There is a coordinating die set for this stamp set, but I don't own it. I popped up most my images with foam adhesive and tucked in a few with my Art Glitter Glue. I also glued some additional images to the inside of the card - so check out my video down below so you can see how the inside turned out, too!

I hope my guides are useful to you - you can just click on the images to enlarge them and then save them to your desktop to save for later. I also post my guides on Instagram and you can click the banner image to save them or reference them in my Guides section on my profile as well. Let me know in the comments for any ideas for future coloring guides!

VIDEO TUTORIAL


PIN THIS
SUPPLY LIST

Read More

Frightfully Fun Trick-or-Treaters with Avery Elle

Wednesday, March 1, 2023

Since there was a new release from Heffy Doodle yesterday, I pushed my Halloween inspiration to today! So it's sort of the last day of the month and it's time for a Halloween card. This month I am using some Avery Elle products I bought last year that I hadn't opened yet. I just love these sweet critters and I just had to stamp them all out and color them in!

I used my Ohuhu Art Markers to color in my images (except for the red and orange - I used Copics) that I stamped with alcohol marker friendly black ink. I used the coordinating dies to cut them all out! When you watch the video, you'll see I ran out of room for all of my critters, so I actually stamped the inside of my card and added my cute monkey with green face paint.

The front has lots of die cutting to create my sunset scene and I also did some stenciling with a glittery stencil paste. All of the colored cardstock I used is from Your Paper Insider's Box 2 - there are so many great pieces in this box and I highly suggest you check them out! You can see my unboxing video over in my Facebook Group the Make & Take Club.

I hope you had some fun inspiration today for this Halloween card and it inspires you to sprinkle in a little Halloween happiness throughout the year!

VIDEO TUTORIAL


PIN THIS
SUPPLY LIST

Read More

Wood You Be Mine? I Love You Card with Avery Elle and Others!

Sunday, February 5, 2023

The wheel was kinder this week for Craft Roulette! I dug through my stash and have lots of different goodies from different brands for this card today. Unfortunately the beaver stamp from Avery Elle is retired 😭 but most of my followers probably snagged the Lawn Fawn set so you can definitely use this card as inspiration for that set instead. 😉

I started with stamping and coloring in my images - I used Crunchy Leaf ink from Lawn Fawn for softer tones rather than my normal Sassy Club black ink. I did go in with a Fine Line pen to add in the eyes, cheeks, hands and tail details as they were a bit washed out with the coloring. There is (or was) a coordinating die set, but I just fussy cut them out.

Next I did some hot foiling with a die, which I've seen done before but have never tried myself so I was so nervous! I used my Heffy Doodle woodgrain background with some gold foil and it turned out so cute! There was a little bit of overfilling I used my sand eraser to try and remove, but I don't think it's too noticeable.

I then die cut it with a scalloped rectangle and the I Love You sentiment (shadow and word dies). I layered different strips of patterned paper and vellum to show through the shadow die cut window by gluing them to the back and on the sides of the opening. I then glued the letters back in so it makes a cool background with a collage of different papers! 

Finally I popped up the woodgrain background onto some pink patterned paper and glued down the stamped images except for the beaver, which I used foam adhesive again. I grabbed some gold Stencil Butter to add some metallic shine to the edges of the pink background and my Lawn Fawn Sparkle Glaze to add in glitter to the heart on the stump and the center of the flowers.

So how does this meet the requirements of Craft Roulette this week? Well, I have a card with a collage of papers showing through my sentiment window that also includes vellum, there are three pops of red because of my flowers and I bought this stamp set while I was visiting Florida which is far away from where I live in California! HAH! Have to use those stretchy pants for the last parameter, but I think it works.

PIN THIS
SUPPLY LIST

Read More

12 Days of Christmas: Ohuhu & Spectrum Noir Alcohol Markers + Happy Holidays Slimline Card with Avery Elle

Saturday, December 10, 2022

Continuing my 12 Days of Christmas and Day 10 are some card making essentials - alcohol markers! I just love coloring with alcohol markers and I have been a fan of Spectrum Noir Illustrator Markers for a year now. I have quite a few colors and even have Spectrum Noir's Colorista Art Markers to help fill in a few gaps. But I've started to expand my collection with Ohuhu markers - I currently have pastels and skin tones, but I'll definitely be getting more!

If you'd like to see how I color with Spectrum Noir Markers, you can watch all of my Color & Chat videos over on YouTube. As I will be expanding my collection after the holidays, I'm skipping December but will get back to them next month and will start incorporating Ohuhu Markers in my guides for those who may not have the budget for Copic Markers (like me).

For my holiday slimline card today, I used my Ohuhu Markers to color in all of my images and to add a little coloring to my die cut sentiment as well. The cardstock I used are all from the Harvest slimline pack of Smooth Cardstock and I combined two different slimline dies to do some layering on the card. My sentiment is also die cut twice from pink paper and once from brown to create a small drop shadow and to add dimension to my sentiment.

My images are from Avery Elle and honestly, I think they win an honorable mention for these 12 Days because I don't use them as much as I'd like, but they have really cute images that I have started to collect. Click on my picture down below to see all of the products so far during these 12 days!

PIN THIS
12 DAYS OF CHRISTMAS
SUPPLY LIST

Read More

Have A Super Day Spanner Card with Avery Elle

Monday, November 28, 2022

Have you ever made a spanner card? When the wheel on Craft Roulette this last weekend landed on "spanner card", I was at a total loss! I wasn't sure what I was going to do, so started digging through my stamps and when I saw the city street stamp from Avery Elle's Superheroes set, I knew I could use that as my bridge for the spanner part of the card.

The wheel also said to use vintage colors... Again, what does that mean? 😂 I decided to just google "vintage color palette" and I really liked this one so I used that as inspiration for coloring in all of my images. The final two parameters were "outside" and "textile" which I also accomplished with the stamp set with the buildings and fabric capes!

I added in a little more color for my sky, which is definitely my new go to evening color combination, using Distress Oxides in Shaded Lilac, Stormy Sky and Tumbled Glass. I had a rough layout of my card and stamped the sentiment on the middle panel of the card using Pinecone VersaFine ink. I used the same ink to stamp the swoosh flying marks of my superhero critters!

I added all of my images using foam adhesive onto the card and to add extra stability to the front of the card, there is a strip of cardstock to connect each side of the front of the card with foam adhesive behind the buildings. The over all dimensions of my spanner card is an A2 size, but the front of the card has the middle cut out leaving two 1.25" flaps on the left and right.

What do you think of my spanner card? Did I meet all of the requirements of the wheel? Let me know in the comments if you'd like to see a video of creating a similar card in the future!

PIN THIS
SUPPLY LIST

Read More

Rainbow Small World Inspired Birthday Cards with Avery Elle

Monday, August 15, 2022

I have another video today with my interpretation of Crafty Al's Show Us Your Sheet Load for August 2022! As usual, I pulled out some patterned paper that is old and I've been hoarding, so if you would like to make a similar card, it is a perfect opportunity to use paper from your own stash.

Most months I've been using Lawn Fawn stamps, but I just got this new Avery Elle stamp set and just HAD TO USE IT. It reminds me so much of "it's a small world" at Disneyland just needed to get it on a card.

The ride is white and gold, but I was able to find an older picture of the attraction when it was painted in pastel rainbow colors and I used that image to inspire my coloring. I have my video down below sharing my steps of how this card came together. I hope you'll check it out and also watch Crafty Al's original video (check my description of the video on YouTube) if you haven't followed her already!

VIDEO TUTORIAL


PIN THIS
SUPPLY LIST

Read More

Hugs Enclosed with Avery Elle

Monday, July 25, 2022

The wheel at Craft Roulette was very kind to me this past weekend! I just LOVE how my card turned out - the colors are so just so pretty and perfect together. Especially with the adorable Sending Hugs stamp set and dies from Avery Elle.

This week the parameters were: 4x6 card; coral + cool colors; pocket; and miniature. My card is a side folding card cut from 8x6 inches and scored to be 4x6. I used coral, green, blue and purple with white, black and grey neutrals. My pocket is the envelope that my flowers are sitting in along with my miniature elephant!

My background was made using my 3x5" Gel Press gelli plate with Distress Inks! I wiped the ink onto the plate, used my Distress Sprayer to add water, and then placed a piece of sturdy cardstock on top and pressed onto the plate to pick up the ink. I trimmed it down to be 3x5" and layered it onto my card base with a layer of pearlescent vellum in between.

The "Hello" sentiment is die cut from three layers of black cardstock and then off-set with a layer of pearlescent vellum as well. To make them shiny, I added Glossy Accents once they were glued to the card. The additional shine and embellishments are from, of course, a Sparkle Blend!

What do you think? Did I do well with the parameters?

PIN THIS
SUPPLY LIST

Read More